pfSense 2.3 Verizon FiOS setup with DVR and caller-ID
Revised 7 August 2016.
Introduction
I’m generally happy with Verizons FiOS internet service seeing the full bandwidth from my subscription at low latencies. However being forced into using the Verizon router due to my new homes original coaxial cable supply from Verizons ONT wasn’t particularly rewarding after being spoilt by a custom built pfSense firewall. The original MoCA coaxial network is perfectly fine for distributing video for the TV service around the home, however its limited in comparison to good old Cat5 when it comes to distributing TCP/IP around the home, something I knew I’d be needing as wifi coverage across the larger property im now living in was spotty, and a camera security system install was approaching. To further complicate matters, Verizon rely on their modem to provide functionality such as Video on Demand (VOD), program guide information and premium pay per view purchasing, all of which my family make use of.
Here’s a diagram of what I wanted to accomplish
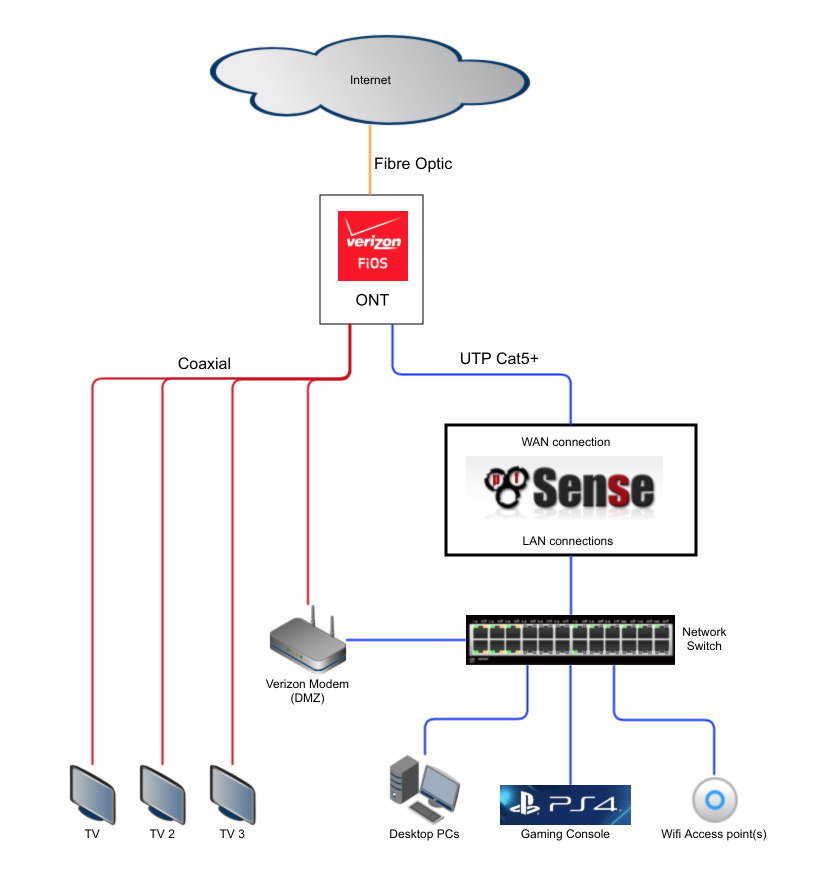
- The Verizon set top boxes receive a video stream via coaxial feeds (red lines)
- My low latency UTP Cat5 network supports all my gaming and desktop needs (blue lines)
- The Verizon modem is placed in a tightly controlled DMZ so can’t snoop on any of my local hardware or traffic and bridges the coaxial and UTP networks
Convert the Verizon ONT to provide a UTP Cat5 connection.
First thing is to get the ONT switched from providing a coaxial based network feed to a UTP Cat5 one. Call Verizon and see what options are open to you to accomplish this, for me an upgrade to a service of > 75mbps required the conversion be done and Verizon will cover the call out costs of this conversion to collect the additional revenue. If you already have a newish ONT installed and can run your own Cat5 cable, you may just require Verizon to remotely reconfigure your ONT which can be done quickly and freely with a simple phone call.
Connect pfSense directly to your ONT UTP connection
I had a few issues actually getting pfSense to acquire a WAN address from Verizon, even after releasing the address from within the Verizon modem it still wouldn’t acquire a new address. I spent a while working through some issues with Verizons technician on the phone and in the end decided it was just easier to just clone the Mac address from my modem into pfSense’s WAN network interface.
To discover the MAC address your Verizon modem is using, Log in to your existing Verizon modem. This works with both the newer G1100 and the older Actiontec MW424 - rev I models.
Navigate to Advanced (in the top menu bar) > Mac Cloning (in the side bar) where you will see the MAC address displayed.
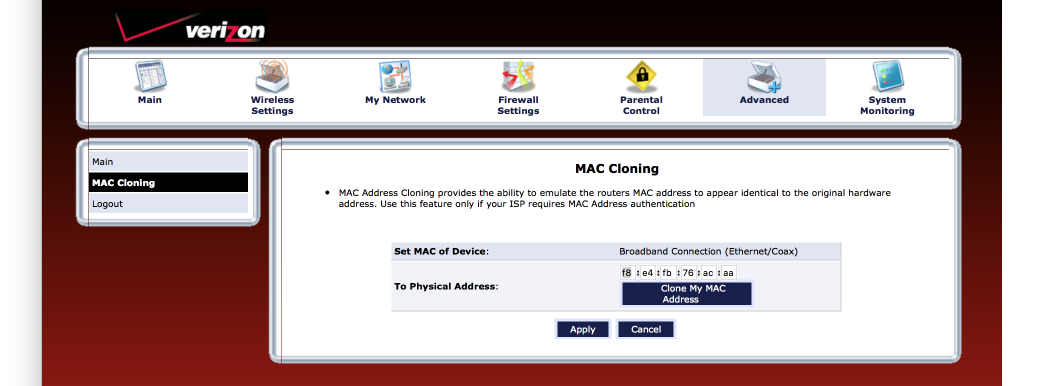
Make a note of this address.
Log into pfSense and Navigate to Interfaces > WAN.
Enter the MAC address from your Verizon modem into the MAC controls field like this
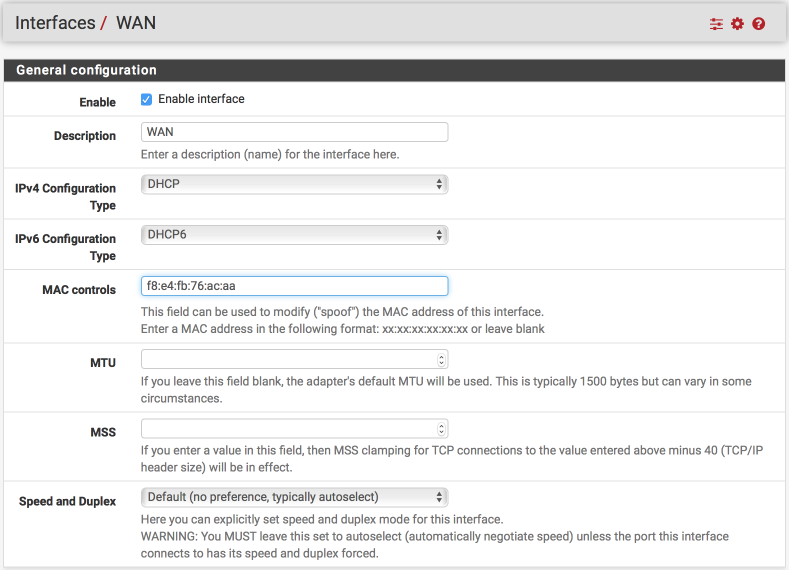
Save and Apply.
Disconnect your WAN connection from your Verizon modem and connect it to your pfSense WAN interface. Reboot pfSense and when it reloads you should have acquired a WAN address.
Update aliases
Navigate to Firewall > Aliases > IP
- Click the pencil icon besides the LOCAL_SUBNETS alias to edit it
- Click Add Network
- Address = 192.168.60.0 / 24
- Description = VL60_FiOS_DMZ
- Click Save & Apply
Navigate to Firewall > Aliases > Ports
- Click +Add
- name = Allowed_OUT_ports_FIOS_DMZ
- Description = Ports allowed out for Verizon FIOS and TV
- Type = Port(s)
- Port
- 80 : HTTP
- 443 : HTTPS
- 49152:65535 : Ephemeral
- 322 : Verizon
- 48879 : Verizon (on-demand service)
- 6794 : Verizon - Save & Apply
Create VL60_FIOS_DMZ LAN Interface
NOTE: As this guide is building upon my previous guides, I’m going to use a VLAN connection to segregate the traffic. Its possible to simply use an available NIC from the Available network ports though, you’ll just need to substitute my VLAN Interface name for yours.
Navigate to Interfaces > (assign) > VLANs
- Click +Add
- Parent Interface = select your parent interface, in my case this is ‘cxl0’
- VLAN Tag = 60
- VLAN Priority = 0
- Description = VL60_FiOS_DMZ
- Save
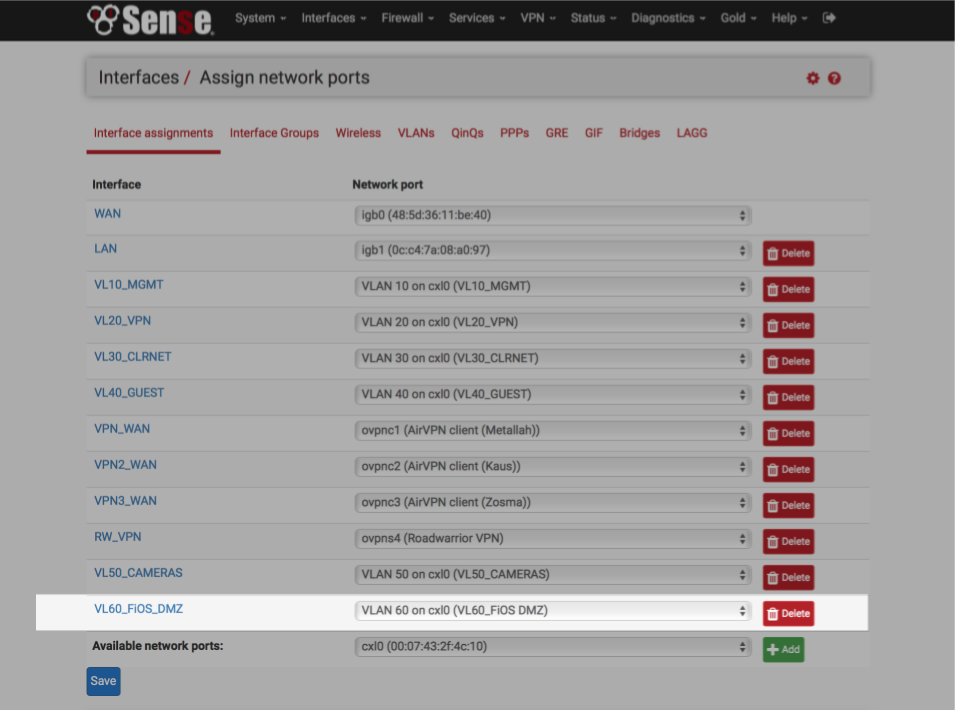
Navigate to Interfaces > (assign) > Interface assignments
- Highlight the VL60_DMZ interface and click +Add.
- Click on the OPTx name to the side of the VL60_DMZ interface to configure it.
Configure the interface as follows
General Configuration
- Enable = [√]
- Description = VL60_FiOS_DMZ
- IPv4 Configuration Type = Static IPv4
- IPv6 Configuration Type = none
- Mac controls = blank
- MTU = blank
- MSS = blank
- Speed and duplex = Default (no preference, typically autoselect)
Static IPv5 configuration
- IPv4 Address = 192.168.60.1
- IPv4 Upstream gateway = none
Private networks
- Block private networks = [ ]
- Block bogon networks = [ ]
- Click Save and Apply
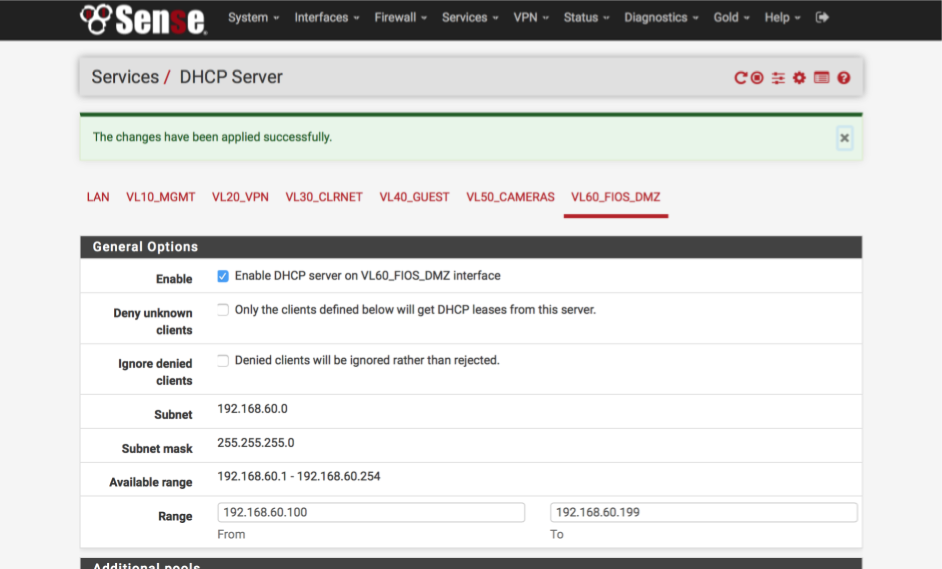
Create VL60_FIOS_DMZ DHCP server
The Verizon modem wont be able to allocate any DHCP addresses when we shift it into bridged mode so we need to handle this from pfSense. I like to set each interface to use x.x.x.100-199 for dynamic addresses and reserve x.x.x.10-99 for static allocations. I also set the NTP server to look to my pfSense for time synchronisation rather than rely on external servers.
Navigate to Services > DHCP Server
Select VL60_FiOS_DMZ tab and set the DHCP server as follows:-
- Enabled = [√]
- Range
- From : 192.168.60.100
- To : 192.168.60.199 - NTP Server 1 = 192.168.60.1
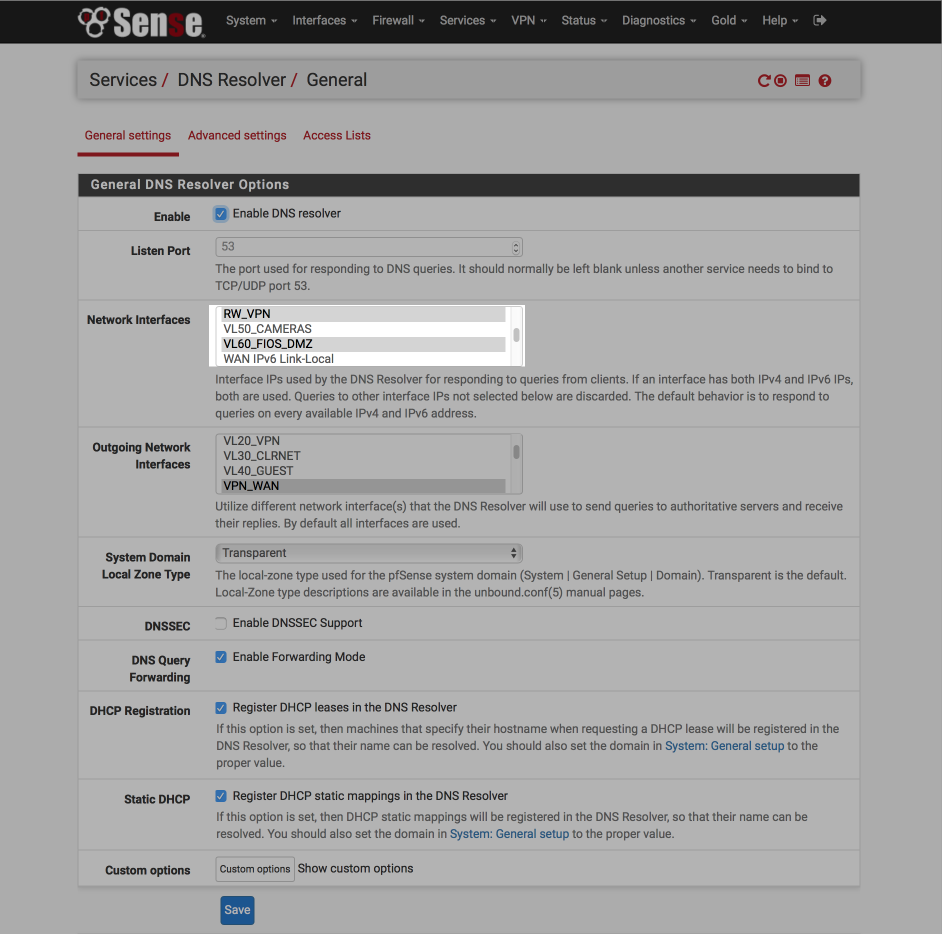
Adjust DNS range
I run all DNS queries via my local DNS Resolver to reduce the amount of info I leak to Verizon.
Navigate to Services > DNS Resolver > General Settings
- Network Interfaces = Add VL60_FIOS_DMZ to your selection
- Save & Apply
Adjust NTP server
As our firewall rules will block all external access to port 123, the NTP port, we have to handle NTP locally. Anything which reduces our public footprint is beneficial so long as functionality doesn’t suffer. No need for this ‘ping’ beacon to be noticeable.
Navigate to Services > NTP
- Interface = Add VL60_FIOS_DMZ to your selection
- Save & Apply
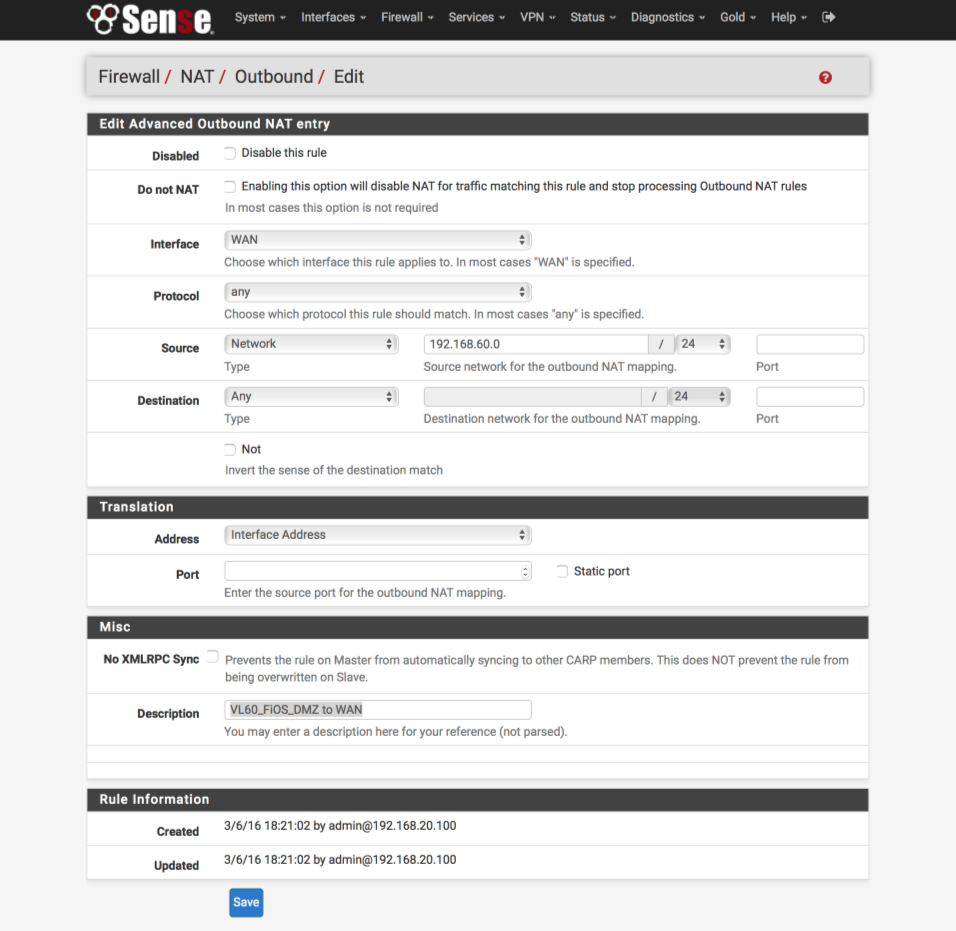
Create VL60_FIOS_DMZ NAT rule
Create a rule to allow the Verizon modem which will be on 192.168.60.x subnet to access the public internet address range. I exit traffic through the default gateway rather than the VPN gateway. I done think Verizon monitor it but they might be surprised if they saw my IP changing from state to state or country to country!
Navigate to Firewall > NAT
- Click ‘↴+’
- Disabled = [ ]
- Do not NAT = [ ]
- Interface = WAN
- Protocol = any
- Source Type = Network
- Source network for outbound mapping = 192.168.60.0 / 24
- Port = blank - Destination Type = Any
- Not = [ ]
Translation
- Address = Interface Address
- Port = blank
- Static port = [ ]
Misc
-No XMLRPC Sync = [ ]
-Description = VL60_FiOS_DMZ to WAN
- Save & Apply
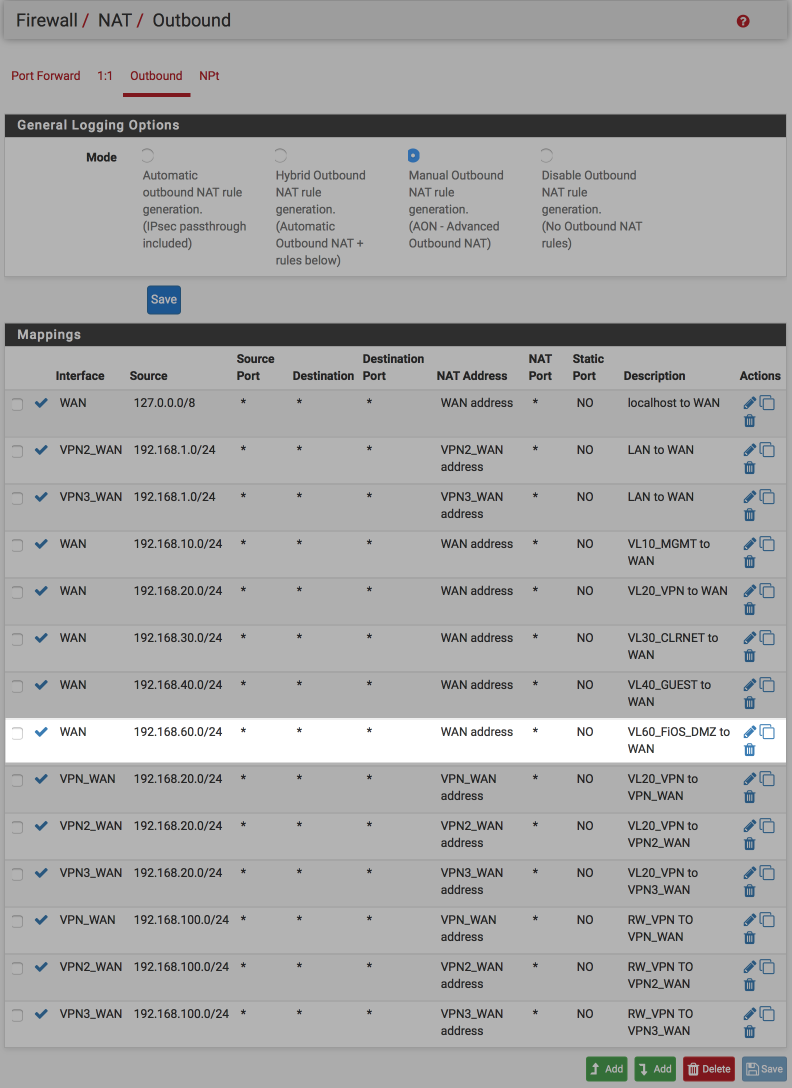
The rule order of the NAT rules is important too so drag the VL60_FiOS_DMZ rule up to above the VPN gateway rules.
- Save & Apply
Your NAT rule should look like this when you’ve done.
Create VL60_FIOS_DMZ firewall rules
Allow DNS lookups
Allow DNS lookups to our pfSense router and the DNS Resolver only.
- Click ‘↴+’
- Action = Pass
- Disabled = [ ]
- Interface = VL60_FiOS_DMZ
- Address Family = IPv4
- Protocol = TCP/UDP
- Source = VL60_FIOS_DMZ net
- Destination = VL60_FiOS_DMZ address
- Destination Port Range:
- From: DNS (53)
- To: DNS (53) - Log = [ ]
- Description = VL60_FiOS_DMZ: Allow local DNS
- Click [Save]
Allow NTP time synchronisation
Allow NTP lookups to our pfSense router only.
- Click ‘↴+’
- Action = Pass
- Disabled = [ ]
- Interface = VL60_FiOS_DMZ
- Address Family = IPv4
- Protocol = TCP/UDP
- Source = VL60_FIOS_DMZ net
- Destination = VL60_FiOS_DMZ address
- Destination Port Range:
- From: DNS (123)
- To: DNS (123) - Log = [ ]
- Description = VL60_FiOS_DMZ: Allow local NTP
- Click [Save]
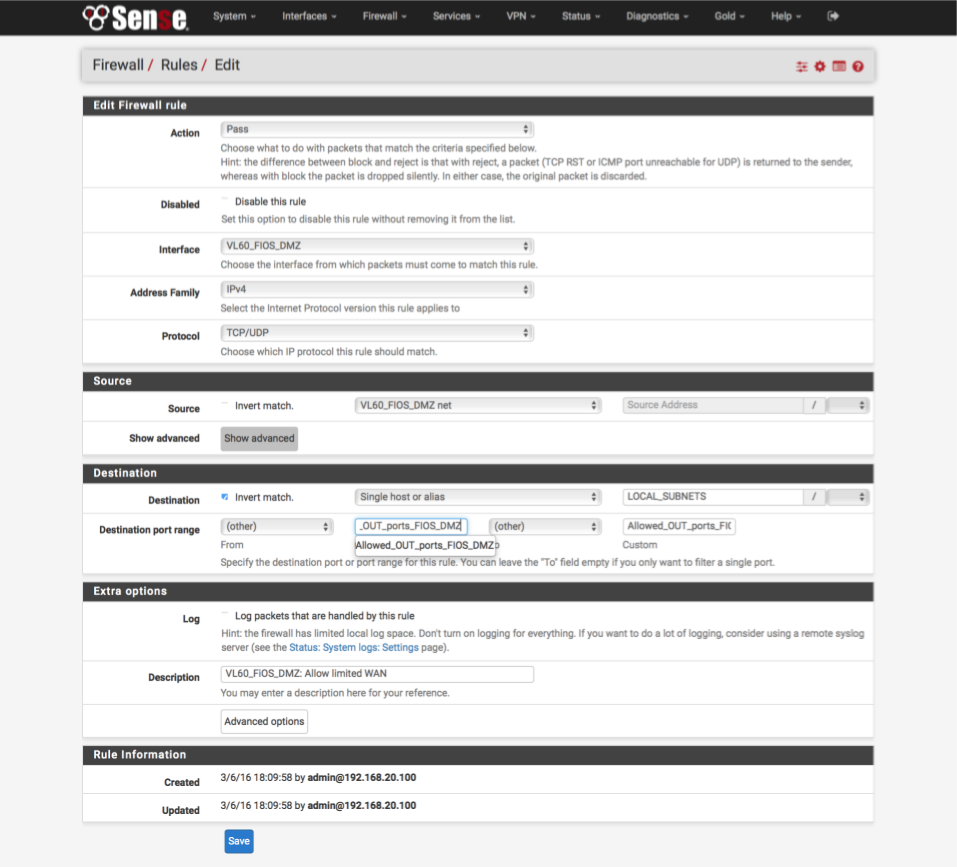
Allow limited internet access to essential services only
Verizons modem only needs access to a few limited ports which we defined in the Allowed_OUT_ports_FIOS_DMZ alias.
- Click ‘↴+’
- Action = Pass
- Disabled = [ ]
- Interface = VL60_FiOS_DMZ
- Address Family = IPv4
- Protocol = TCP/UDP
- Source = VL60_FiOS_DMZ net
- Destination
- invert match: [√]
- Single host or alias
- Address: LOCAL_SUBNETS - Destination Port Range:
- From: (other)
- Custom: Allowed_OUT_ports_FIOS_DMZ
- To: (other)
- Custom: Allowed_OUT_ports_FIOS_DMZ - Log = [√]
- Description = VL60_FiOS_DMZ: Allow limited WAN access
- Click [Save]
As this is a critical rule, validate your settings against the image below
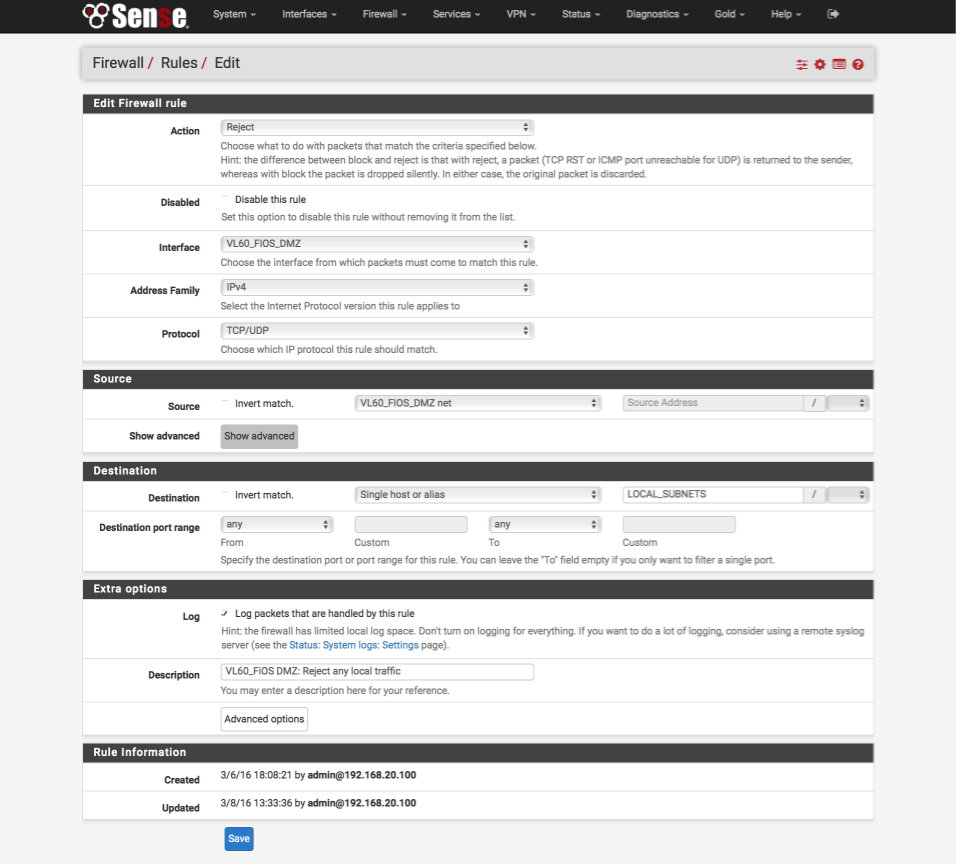
Block all LAN access (DMZ)
To put our modem in a DMZ where its unable to snoop on any other network devices or services, we need to block any and all access to other subnets and network devices.
- Click ‘↴+’
- Action = Reject
- Disabled = [ ]
- Interface = VL60_FiOS_DMZ
- Address Family = IPv4
- Protocol = TCP/UDP
- Source = VL60_FiOS_DMZ net
- Destination
- invert match: [ ]
- Single host or alias
- Address: LOCAL_SUBNETS - Destination Port Range:
- From: any
- To: any - Log = [√]
- Description = VL60_FiOS_DMZ: Reject any local traffic
- Click [Save]
As this is another critical rule, validate your settings against the image below
Default blocks - IPv4
- Click ‘↴+’
- Action = Reject
- Disabled = [ ]
- Interface = VL60_FIOS_DMZ
- Address Family = IPv4
- Protocol = Any
- Source = Any
- Destination:Any
- Log = [√]
- Description = VL60_FIOS_DMZ: Default reject IPv4
- Click [Save]
Default blocks - IPv6
- Click ‘↴+’
- Action = Reject
- Disabled = [ ]
- Interface = VL60_FIOS_DMZ
- Address Family = IPv6
- Protocol = any
- Source = Any
- Destination: Any
- Log = [ ]
- Description = VL60_FIOS_DMZ: Default reject IPv6
- Click [Save]
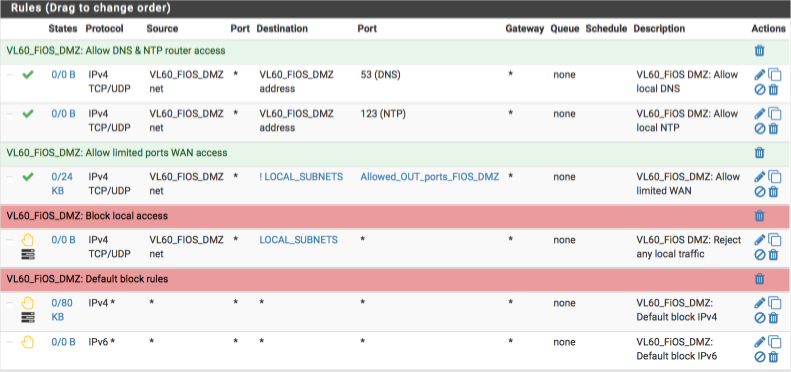
Verify your VL60_FIOS_DMZ firewall rules look like this when complete - the separators are to aid readability, they don’t affect functionality so feel free to omit.
Configure Verizon modem - Actiontec MI424WR Rev. I
Either the Actiontec MI424WR Rev I or the newer G1100 both work fine.
I’m going to use the MI424WR Rev I as its possible to buy one off ebay for less than $30 delivered where as the G1100 is closer to $130. There’s no functional differences when used in this way.
Reset to defaults
First lets reset the device to its default configuration, press and hold the small red reset button on the back of the router for 10 seconds, you’ll notice eventually the green power LED will start to flash whilst it reconfigures itself and boots up.
Login
Connect a network cable to one of the LAN ports and log in at 192.168.1.1
Default username is admin and password is physically found on a label on the side of the router itself.
Change LAN port address
We’ll use the modems LAN ports as a management interface for the remainder of this configuration guide. We will set the interface to a fixed address and move it off the commonly used 192.168.1.x segment and disable DHCP to ensure we can always get back in to the user configuration screens.
Navigate to My Network > Network Connections
- Click on Network (Home/Office)
- Click on Settings
Configure the interface as follows:
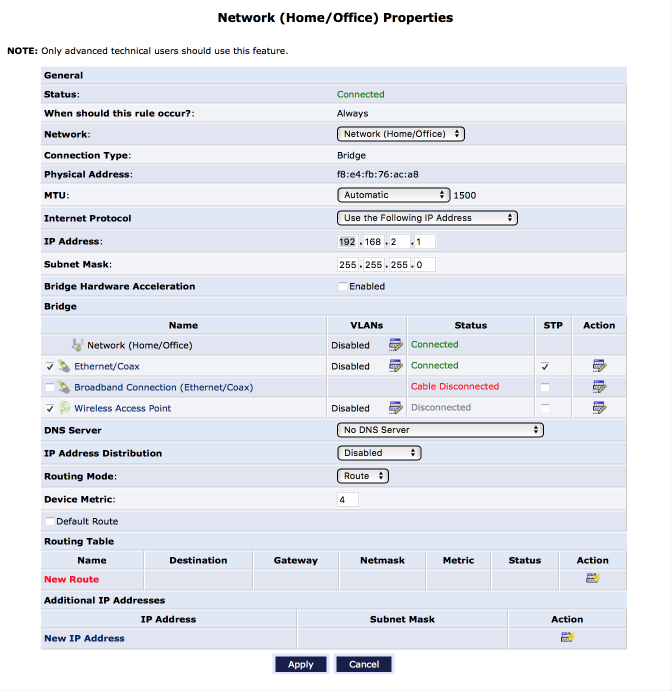
- IP address = 192.168.2.1 (or something that isnt in use on your existing network)
- DNS Server = No DNS Server
- IP Address Distribution = Disabled
- Click Apply
You will need to adjust your PC’s interface settings to be in the same subnet as the address we just programmed into our modem e.g 192.168.2.2.
Once this has been done, we can log back in at the new address.

Once you are logged back in, disable some unneeded services.
Disable wireless
We wont be using the wireless features so lets disable them completely.
Navigate to Wireless Settings > Basic Security Settings
- Turn Wireless On = Off
- Apply
- Ignore the attention sign, Apply again
Disable firewall
As pfSense is now shielding us from WAN attacks, we can disable the firewall feature set too.
Navigate to Firewall Settings
- Set to Minimum Security (Low)
- Inbound policy = Accept
- Outbound policy = Accept - Block IP fragments = [ ]
- Apply
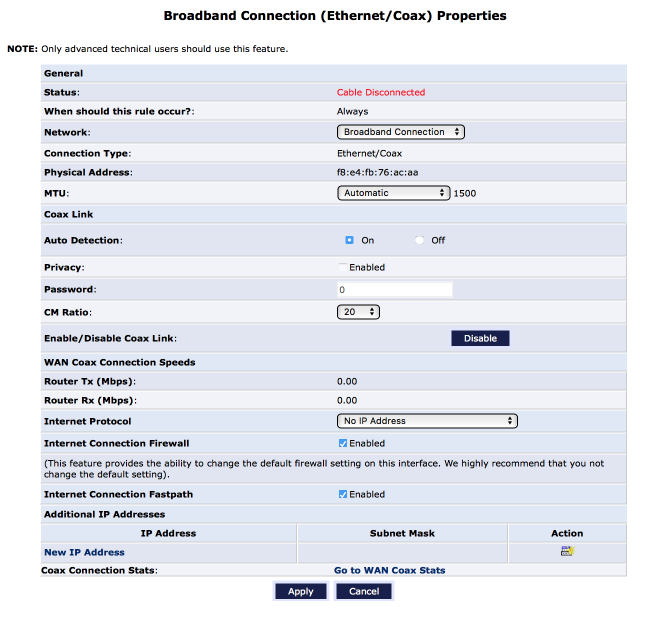
Configure Broadband Connection
Configure the broadband connection interface to operate in bridge mode.
Navigate to My Network > Network Connections
- Click on Broadband connection (Ethernet/Coax)
- Click on Settings
Configure the interface as follows:
- Internet protocol = no IP address
- Internet Connection Firewall = [x]
- Internet Connection Fastpath = [x]
- Click Apply
Create the bridge between WAN & Coaxial interfaces
Navigate to My Network > Network Connections
- Click on Network (Home/Office)
- Click on Settings
Update the interface as follows:-
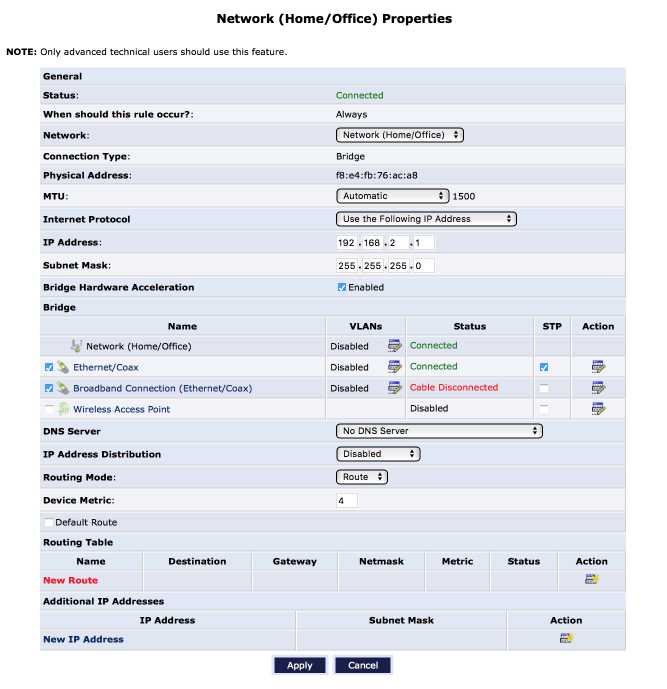
- Bridge Hardware acceleration = [x]
- Bridge
- Ethernet/Coax = [x]
- Broadband Connection (Ethernet/coax) = [x]
- Wireless Access Point = [ ] - Click Apply
- Ignore warning, Click Apply again
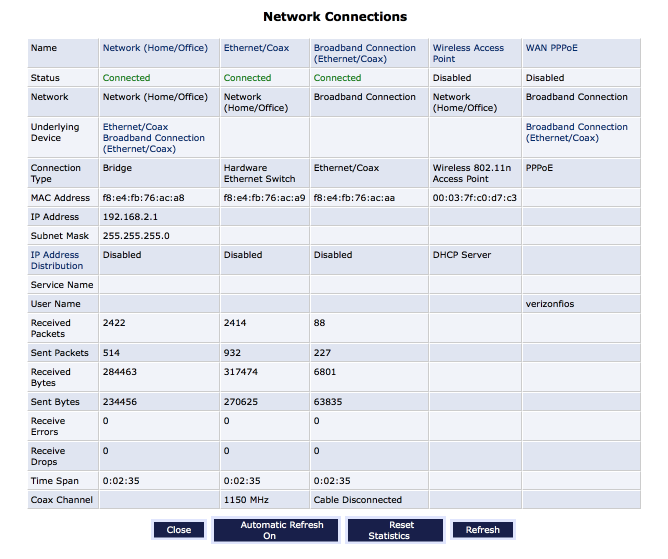
Test the connections
Connect the coaxial line from the ONT to the coaxial input of your modem, connect your pfSense configured interface to the LAN port of your modem.
Navigate to My Network > Network Connections > Full Status
If you log into pfSense and Navigate to Status > DHCP leases you should observe a DHCP allocation for the Verizon box.
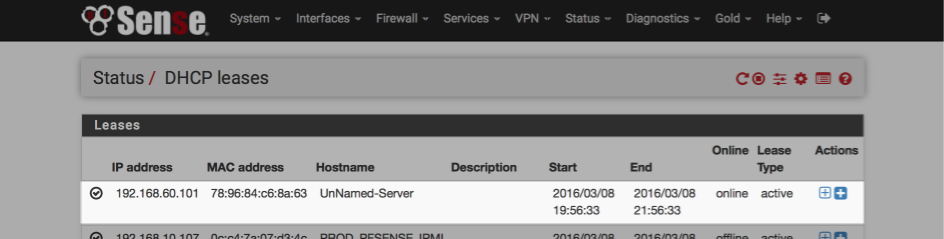
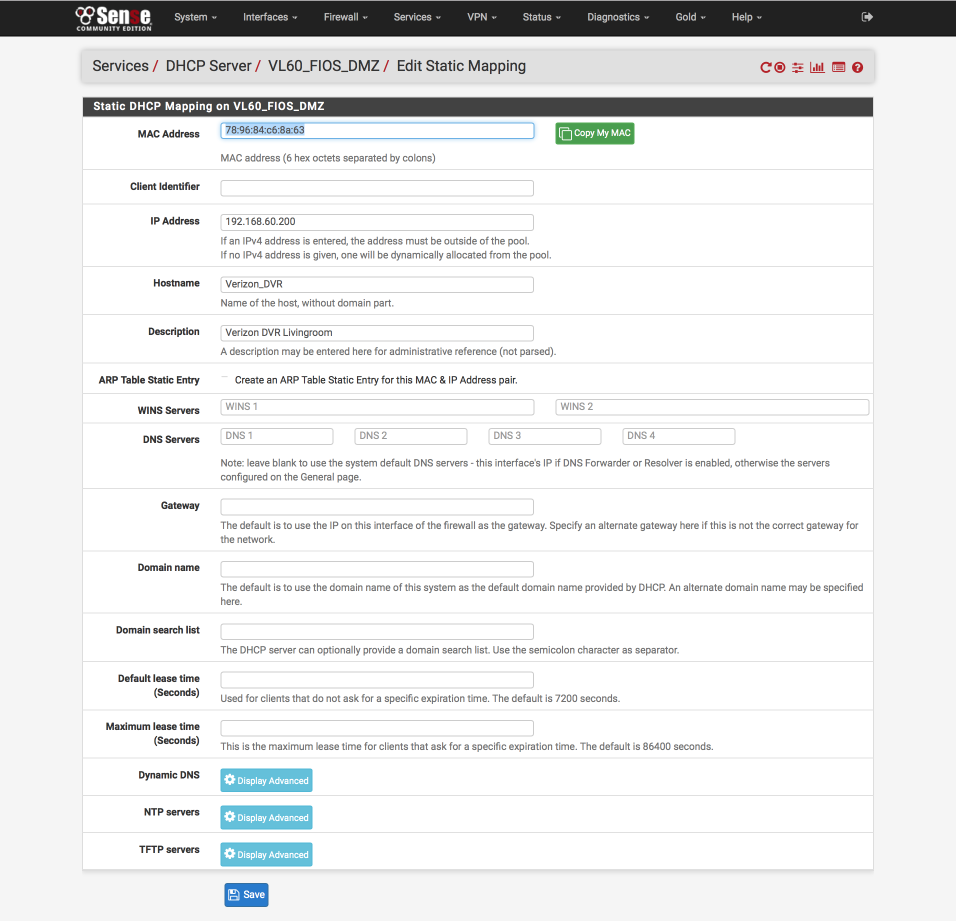
Lets assign a fixed IP address to make it easier to handle port forwards later on which are a requirement for remote DVR and caller ID functionality. Click the ‘+’ sign to the right of the device to assign a static IP address. You can mouse-over to ensure you get the right one.
Provide a IP address for this device which will be reserved and allocated everytime it performs a DHCP lookup. The IP address assigned needs to be outside of the DHCP scope for the interface.
Assign parameters as follows:
- MAC address: will be pre-populated with the MAC address of your STB
- IP address: 192.168.60.20x (assuming you followed my baseline guide)
- Hostname: Verizon_DVR
- Description: Something meaningful, especially if oyu have multiple DVR/STBs
- Save & Exit
It’s worth restarting your Verizon box at this stage to ensure it picks up the reserved IP address, initialises correctly and permits you to meaningfully validate your work so far.
Verify STB functionality
If you go to one of your TV’s and access the Verizon Menu:
Navigate to Settings > System Information and press ‘Info’ to get more details you can verify connectivity.

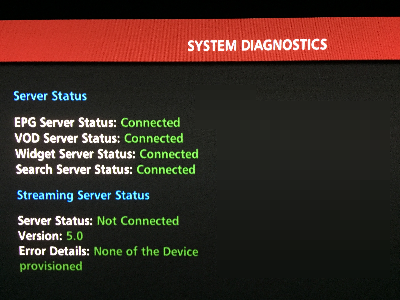
Navigate back to the main menu and try and access On Demand services, verify they still work correctly.
Navigate back to the main menu and try and access ‘Widgets & Apps’, verify they still work correctly.
Port forwarding for Remote DVR and Caller-ID
I added this additional functionality to my system about 6 months ago shortly after I published the original article. Its been reliable for me since so I figured I’d add the additional steps for others too.
To enable remote recording and on screen caller displays, we need to add a couple of port forwards to enable the traffic from Verizon which arrives at our pfSense WAN interface to make its way via our internal network to our STB.
Create port forwards
There’s a need for two ports to be forwarded to enable Caller-ID and remote DVR functionality.
- TCP 35000
- UDP 63145
Note: If you have more than one STB/DVR, you will need to increase the port range by 1 for every box in the creation steps, for example, if you had four boxes you would use 35000>35003 and 63145>63148.
TCP Port 4567 is used by Verizon support technicians to gain access to your modem but given this setup is unsupported there isn’t much point so I’ve omitted it.
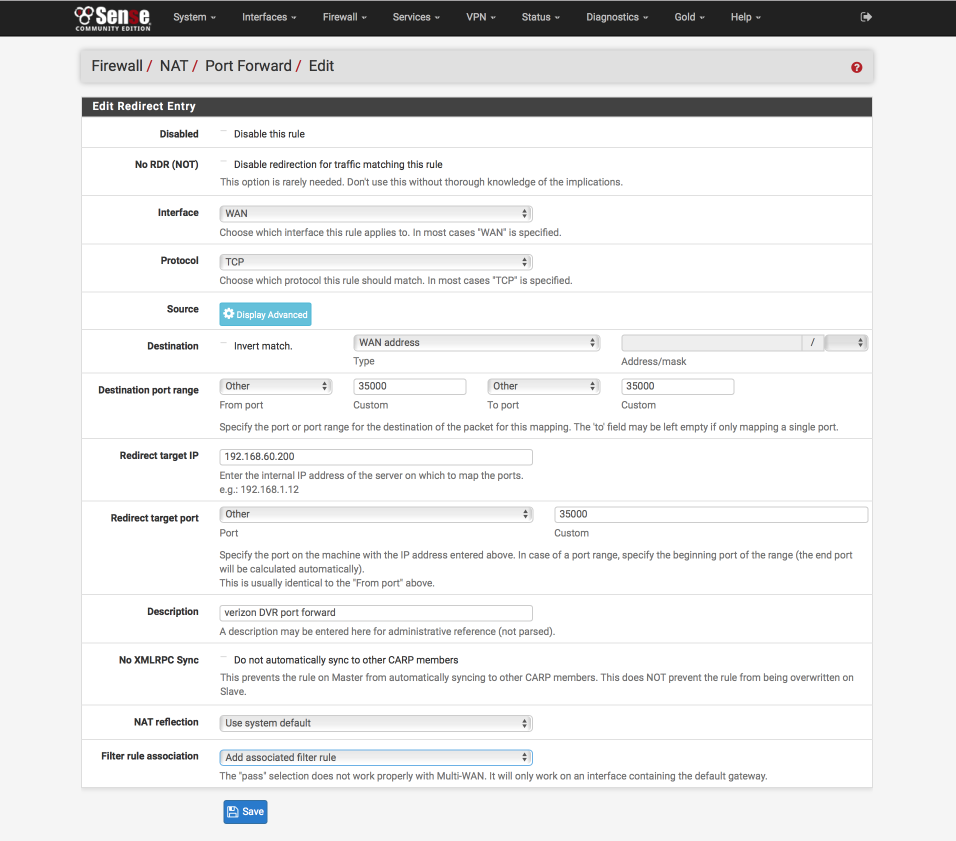
Create TCP 35000
Navigate to Firewall > NAT
- Click ‘↴+’
- Interface = WAN
- Protocol = TCP
- Destination = WAN address
- Destination Port Range = 35000 to 35000
- Redirect target IP = 192.168.60.200
- Redirect target port = 35000
- Description = Verizon DVR
- NAT reflection = Use system default
- Filter rule association = Add associated filter rule
- Save & Exit
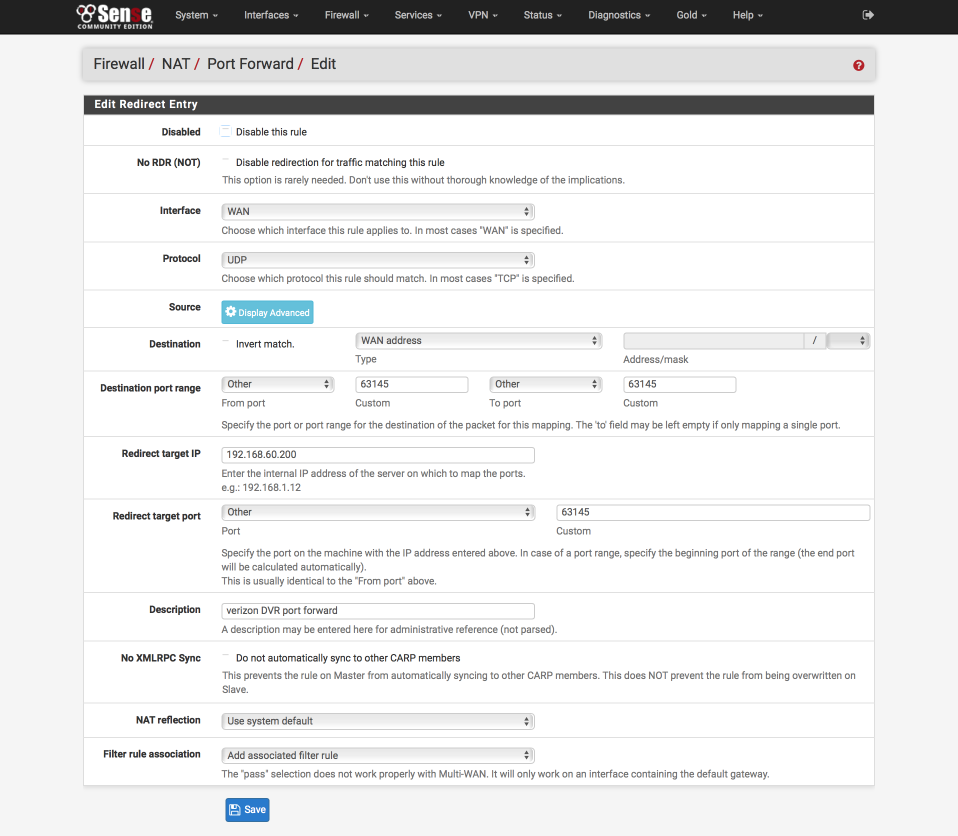
Create UDP 63145
Navigate to Firewall > NAT
- Click ‘↴+’
- Interface = WAN
- Protocol = UDP
- Destination = WAN address
- Destination Port Range = 63145 to 63145
- Redirect target IP = 192.168.60.200
- Redirect target port = 63145
- Description = Verizon DVR
- NAT reflection = Use system default
- Filter rule association = Add associated filter rule
- Save & Exit
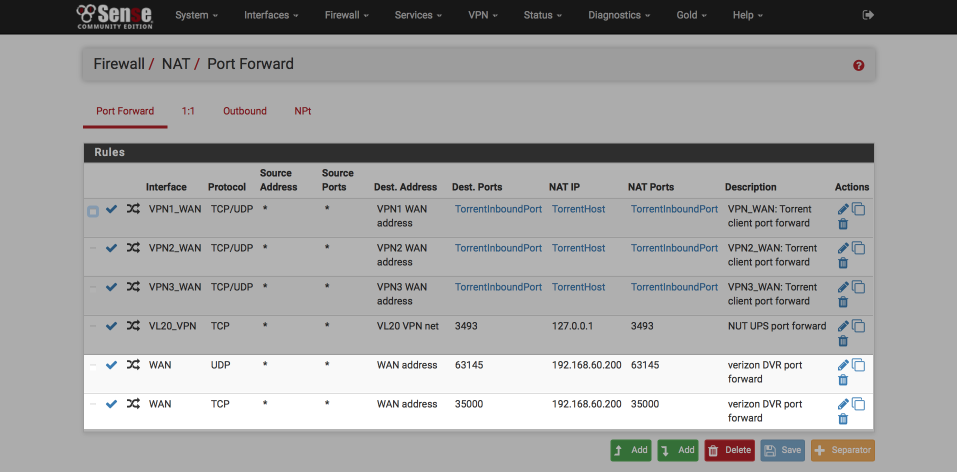
When this is complete, your Port Forwards should look like this (I’ve highlighted the Verizon port forwards for clarity)
Verify firewall rule order
When we created the two port forwards, associated firewall rules were created in the WAN interface to allow the inbound traffic to reach the DVR. They are however created at the bottom of the list and because rules are processed top to bottom, need to be reordered manually.
Navigate to Firewall > Rules > WAN
Drag the Verizon ports up so they are above the default block rules if you have them. When you are complete your interface should look something like this

Verify additional functionality
DVR
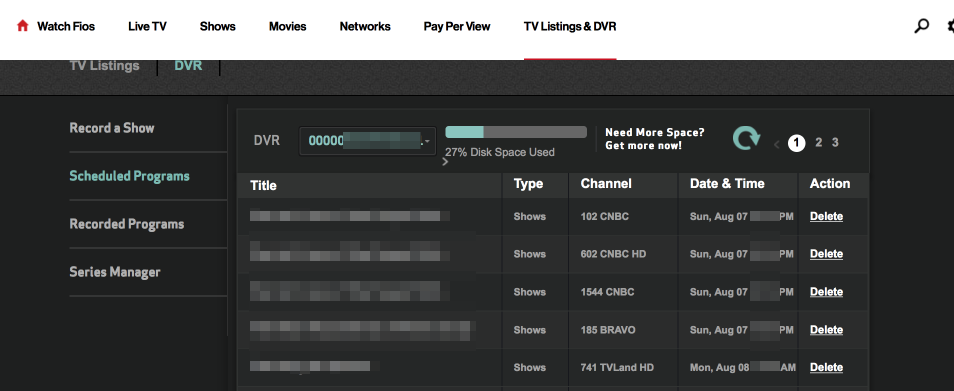
I logged into the Verizons user portal and accessed the ‘TV Listings & DVR’ section where it’s possible to view and manage my authorised devices, view scheduled programming…
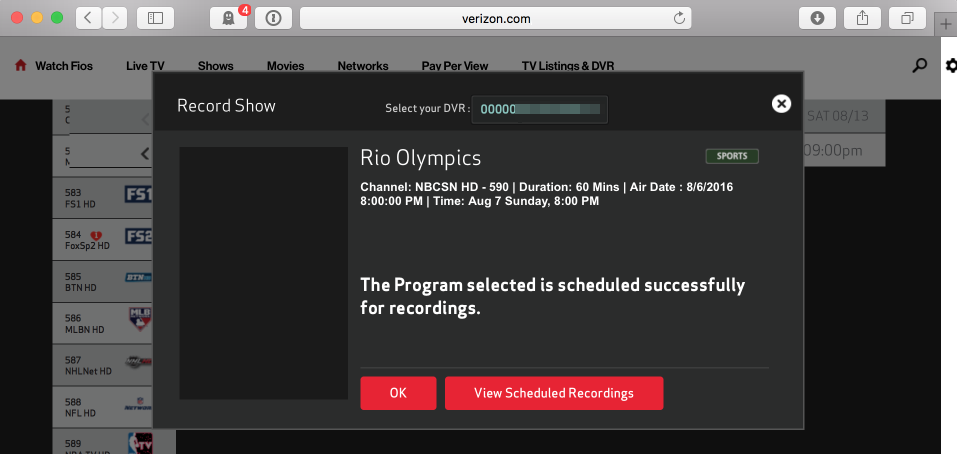
…and selected ones for recording.
All the functionality I tested worked as expected, please let me know if you find something that isn’t working and I’ll see if I can improve this guide and help.
On screen caller ID
To verify this works, ensure the option is enabled on your STB first, then call your Verizon number. You should see a blue box appear on screen notifying you of the call and name/number calling.
Changelog
November 3 2016
Updated modem/pfSense connection info
August 7 2016
Added fixed IP assignment to DVR
Added remote DVR and Caller-ID port forwards