Local stratum-1 NTP server (ntpd)
Last revised 11 February 2018.
Contents
- Introduction
- Network Time Protocol
- Hardware
- Operating system configuration
- Configure GPS receiver
- GPS NMEA sentence optimisation
- NTP installation
- NTP configuration
- NTP service handler
- Verify functionality
- Configure pfSense
- NTP service configuration
- NTP status
- NTP monitoring
- References
- Changelog
Introduction
Its critical for services and operations for all electronics to have an accurate understanding of the current time, its used in key exchanges for Active Directory, DRM systems, software certificates, distributed file systems and is useful to ensure your logs match up across multiple systems. I wanted to reduce my dependency on external services as well as my digital footprint by providing a local time server to my network. This guide will build upon my pfSense baseline configuration guide and cover both hardware and software configurations required to add a local stratum-1 timeserver.
Network Time Protocol (NTP)
The Network Time Protocol (NTP) has been used to syncronise devices to within milliseconds across packet switched, variable latency networks since around 1985. Typically most SOHO connections rely on servers located outside the local network but with the availability of cheap commodity hardware and the GPS satellite network, it’s now possible to create a highly accurate local ‘stratum 1’ time server.
A reference clock is considered to be authoritative and is referred to as a stratum 0 source. An NTP server which uses a stratum 0 clock as its time source is stratum 1. Stratum 2 servers get their time from stratum 1 servers; stratum 3 servers get their time from stratum 2 servers, and so on.
In this guide we will configure a stratum 1 server capable of syncronising our local devices to less than a millisecond difference using GPS broadcasts.
Hardware requirements
A Raspberry Pi equipped with a GPS receiver has often been deployed as a cheap NTP server but it’s less than ideal due to its network port being connected via the USB bus which introduces unnecessary additional latencies and reduces overall accuracy. There is an alternative single board computer (SBC) available from Odroid called the C2 which offers a true gigabit network port and avoids this problem and therefore makes a much better platform to build on.
The Uputronics GPS expansion board will provide GPS data to the Odroid C2. This GPS board is equipped with the current generation Ublox MAX-M8Q positioning module and is of generally a high quality. Although the M8Q isn’t a true timing module, it is possible to be placed in the “stationary” dynamic mode which is the default mode for the much more expensive timing modules. I’ve compared it to other more expensive GPS units and found it to be more than capable for my needs.
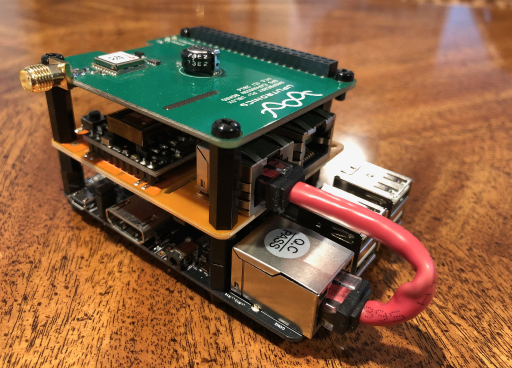
Here’s the components I used to build my NTP server.
- Odroid C2
- Uputronics Raspberry Pi GPS expansion board
- Raspberry Pi PoE switch HAT
- Uputronics Active GPS Patch Antenna with SMA Connector
- Electronics standoffs
- Samsung or Sandisk Micro SD cards, 16GB which have both proven to be fast and reliable.
The PoE HAT is optional but I like the ability to power my Odroid via the ethernet cable as it increases my mounting location options and reduces cable clutter. The PoE HAT can be powered directly from a PoE capable switch port or using a PoE injector.
Here’s what my final hardware stack looks like.
pfSense NTP firewall rules
I recommend assigning a fixed IP address to our NT server to reducing the dependency on both the DHCP server and the DNS server. For my Odroid NTP server I picked 192.168.10.39 which is in my VL10_MGMT management subnet and outside the dynamic range of the DHCP server which covers 192.168.10.100-199.
I also created a rule on the VL10_MGMT network interface to permit my Odroid to access external NTP servers which is useful for the initial setup.

Operating System configuration
To maximize our NTP server accuracy we will configure our system with as few services as possible. There are several lightweight operating systems available but my preference is DietPi primarily because its incredibly lightweight, has a simple user interface to configure the hardware with and enables logging to RAM, minimizing writing and increasing longevity of the SD card. For more information there’s a Raspbian Lite vs DietPi comparison here.
Create bootable SD card
Download the Odroid C2 image from dietpi.com and write it to your micro-SD card, I used Etcher.
Insert the MicroSD card into your Odroid and boot it up. We’ll do the configuration through a SSH connection so won’t require a keyboard or monitor to be physically connected although it might help if you are new to configuring SBC’s.
OS Configuration
Load up your favourite SSH tool, I use iTerm2 and SSH into your Odroid’s root account with the command ssh root@<Odroid IP address>. The default password is dietpi.
Accept the GNU General Public Licence EULA, and wait for the update process to complete. At the time of writing this guide the latest version was 6.1. Once the updates have completed, the Odroid will reboot. SSH back in again to be presented with the configuration screen.
Apply the following options using the configuration menu.
Performance Options
To keep your CPU set to the maximum speed and reduce time to resond to timing interrupts set it to maximum performance.
CPU governor: Set to performance Forces CPU frequency to 1536 MHz.
Advanced Options
To ensure our Odroid has a valid time we will configure it to sync at boot.
Time sync mode: Set to Boot Only.
Security Options
Change root password: Set to something secure.
Hostname: Set to something meaningful, e.g. NTP-C2
Don’t select reboot just yet, there are a few more options to configure first.
Network Options: Adapters
Ethernet: As previously recommended, configure your network configuration to STATIC and assign the permanent IP address here. Select something meaningful for your network, I used 192.168.10.39 which is in my VL10_MGMT subnet and outside the DHCP scope set in my baseline guide.
Save changes and Restart Networking.
Network Options: Adapters - IPv6
Disable IPv6
Language and Regional Options: Timezone
Set to your local timezone.
Exit configuration back to the main menu and select Install: Go >> Start installation for selected software which will complete the configuration and reboot.
Update Odroid OS
After reboot completes, SSH in using ssh root@<Odroid IP address> with your new secure password.
Enter the following commands to ensure your Odroid operating system is up to date.
apt-get update
apt-get dist-upgrade -y
Reboot when completed and log back in again.
Configure GPS receiver
Theres are several GPS clock receivers capable of extracting timing information from the GPS system. We will use the Generic NMEA receiver to extract the current time from a NMEA sentence, as well as the PPS timing signal used to mark the precise time of the start of that second.
Create GPS device aliases
To enable the Generic NMEA receiver driver to operate, we need to create some device aliases.
Enter nano /etc/udev/rules.d/10-pps.rules and paste the following into this file
KERNEL=="ttyS1", SYMLINK+="gps0"
KERNEL=="pps0", SYMLINK+="gpspps0"
Software installation
Install PPS tools and configure the Odroid hardware to use the GPIO pins to communicate with the expansion board.
apt-get install pps-tools -y
echo pps-gpio > /etc/modules-load.d/pps-gpio.conf
echo options pps-gpio gpio_pin=238 > /etc/modprobe.d/pps-gpio.conf
modprobe pps-gpio
Enter reboot to reboot the Odroid and log back in again.
GPS configuration
Enter the following commands to verify the GPS receiver is receiving and decoding the NMEA messages.
/bin/stty -F /dev/gps0 raw 9600 cs8 clocal -cstopb > /dev/null 2>&1
cat /dev/gps0
you should see a stream of GPS NMEA sentences which looks something like this
$GNGLL,390631.3596,N,764615.1428,W,225052.00,A,A*6C
$GNRMC,225053.00,V,,,,,,,200118,,,N*6A
$GNVTG,,,,,,,,,N*2E
$GNGGA,225053.00,,,,,0,04,13.31,,,,,,*7F
$GNGSA,A,1,23,09,07,03,,,,,,,,,28.27,13.31,24.95*27
$GNGSA,A,1,,,,,,,,,,,,,28.27,13.31,24.95*2B
$GPGSV,4,1,14,03,25,179,17,06,00,269,,07,45,283,33,08,18,134,*77
$GPGSV,4,2,14,09,64,333,14,16,37,046,08,22,08,168,,23,70,088,09*76
$GPGSV,4,3,14,26,09,040,,27,22,095,,28,01,209,,30,23,266,22*7B
$GPGSV,4,4,14,48,47,205,,51,49,161,*7B
$GLGSV,2,1,07,70,48,161,,71,73,312,,72,21,329,,73,66,337,09*6A
$GLGSV,2,2,07,74,35,249,,80,24,036,,82,03,066,*5A
theres a lot of data transmitted every second and its possible to optimise our system by removing messages surplus required to establishing accurate time.
GPS NMEA sentence optimisation
The various NMEA messages carry different information, quite often containing duplicated or irrelevant information in respect to our precise timing needs.
| Message | Description | Structure |
|---|---|---|
| RMC | Minimum recommend data C | $GPRMC,hhmmss,status,latitude,N,longitude,E,spd,cog,ddmmyy,mv,mvE,mode*cs |
| VTG | Vector track and Speed over the Ground | $GPVTG,cogt,T,cogm,M,sog,N,kph,K,mode*cs |
| GGA | Fix information | $GPGGA,hhmmss.ss,Latitude,N,Longitude,E,FS,NoSV,HDOP,msl,m,Altref,m,DiffAge,DiffStation*cs |
| GSA | Overall Satellite data | $GPGSA,Smode,FS{,sv},PDOP,HDOP,VDOP*cs |
| GSV | Detailed Satellite data | $GPGSV,NoMsg,MsgNo,NoSv,{,sv,elv,az,cno}*cs |
| GLL | Lat/Lon data | $GPGLL,Latitude,N,Longitude,E,hhmmss.ss,Valid,Mode*cs |
To understand these messages in more detail, refer to the Ublox protocol specification document.
Due to our limited requirements to only establish accurate time, we can disable all but the RMC message which carries the time signal. You could as well rely on the GGA or GLL messages but for this guide, we will use RMC. We will also take advantage of the Ublox 8 modules advanced capabilities by setting it into stationary mode which enables accurate time resolution from less satellites.
Enter nano ~/.profile and paste the following lines at the end of the file
echo -e "\xB5\x62\x06\x01\x08\x00\xF0\x00\x00\x00\x00\x00\x00\x00\xff\x23" > /dev/gps0 #disable GGA
echo -e "\xB5\x62\x06\x01\x08\x00\xF0\x03\x00\x00\x00\x00\x00\x00\x02\x38" > /dev/gps0 #disable GSV
echo -e "\xb5\x62\x06\x01\x08\x00\xf0\x02\x00\x00\x00\x00\x00\x01\x02\x32" > /dev/gps0 #disable GSA
echo -e "\xB5\x62\x06\x01\x08\x00\xF0\x01\x00\x00\x00\x00\x00\x01\x01\x2b" > /dev/gps0 #disable GLL
echo -e "\xB5\x62\x06\x01\x08\x00\xF0\x05\x00\x00\x00\x00\x00\x00\x04\x46" > /dev/gps0 #disable VTG
echo -e "\xb5\x62\x06\x24\x24\x00\x05\x00\x02\x03\x00\x00\x00\x00\x10\x27\x00\x00\x05\x00\xfa\x00\xfa\x00\x64\x00\x2c\x01\x00\x00\x00\x00\x00\x00\x00\x00\x00\x00\x00\x00\x00\x00\x19\x4f" > /dev/gps0 #set stationary mode
Press CTRL-C to end the test and enter reboot to reboot again. Once booted log back in again and validate you see only GNRMC messages by entering the commands again
/bin/stty -F /dev/gps0 raw 9600 cs8 clocal -cstopb > /dev/null 2>&1
cat /dev/gps0
If the commands we added to the boot sequence worked correctly you should only see RMC messages in the NMEA stream now, as shown below
$GNRMC,004310.00,A,390631.3596,N,764615.1428,W,225052.00,0.920,,210118,,,A*7D
$GNRMC,004311.00,A,390631.3596,N,764615.1428,W,225052.00,0.923,,210118,,,A*71
$GNRMC,004312.00,A,390631.3596,N,764615.1428,W,225052.00,1.033,,210118,,,A*77
$GNRMC,004313.00,A,390631.3596,N,764615.1428,W,225052.00,1.081,,210118,,,A*74
$GNRMC,004314.00,A,390631.3596,N,764615.1428,W,225052.00,0.896,,210118,,,A*78
This time signal derived from the NMEA message is only accurate to the current second, the get to millisecond accuracy we will verify we are receiving the PPS signal which is used to indicate the precise start of the current second.
Press CTRL-C to end the test.
Verify PPS reception
Enter ppstest /dev/pps0 to check the PPS source is working, you should see an output similar to that below
# ppstest /dev/pps0
trying PPS source "/dev/pps0"
found PPS source "/dev/pps0"
ok, found 1 source(s), now start fetching data...
source 0 - assert 1512332541.447390478, sequence: 105 - clear  0.000000000, sequence: 0
source 0 - assert 1512332542.447394019, sequence: 106 - clear  0.000000000, sequence: 0
source 0 - assert 1512332543.447399956, sequence: 107 - clear  0.000000000, sequence: 0
source 0 - assert 1512332544.447406519, sequence: 108 - clear  0.000000000, sequence: 0
source 0 - assert 1512332545.447412820, sequence: 109 - clear  0.000000000, sequence: 0
Press CTRL-C to end the test.
We have now verified we have access to the current second via the NMEA GNRMC message, and the PPS signal indicating the precise start of that second. We will now configure the NTP software which will process this information and make that time available to our network.
NTP installation
Install some compilation tools by entering
apt-get install build-essential libcap-dev -y
Download and compile the latest version of NTP, currently at the time of writing this guide 4.2.8p10 from the NTP site.
cd to the root users home folder
cd ~
Download current version of NTP
wget http://www.eecis.udel.edu/~ntp/ntp_spool/ntp4/ntp-4.2/ntp-4.2.8p10.tar.gz
untar the download
tar -xzvf ntp-4.2.8p10.tar.gz
cd into NTP folder
cd ntp-4.2.8p10/
As a stratum 1 server, your downstream clients are depending on your server to notify them of leap-seconds so we need to fix the update-leap command to ensure it runs correctly when we configure it later. Enter
sed -e "s/https/http/" -e 's/"(\\S+)"/"?([^\\s"]+)"?/' -i scripts/update-leap/update-leap.in
and compile NTP with the following command
./configure CFLAGS="-O2 -g -fPIC" --prefix=/usr --bindir=/usr/bin --sysconfdir=/etc --enable-linuxcaps --with-lineeditlibs=readline --docdir=/usr/share/doc/ntp-4.2.8p10
CFLAGS="-O2 -g -fPIC" is necessary to generate Position Independent Code needed for use in the package libraries.
--bindir=/usr/sbin places the administrative programs in /usr/sbin.
--enable-linuxcaps ntpd is run as user ntp, so use Linux capabilities for non-root clock control.
--with-lineeditlibs=readline enables Readline support for ntpdc and ntpq programs.
make (optimised for quad-core CPUs)
make -j5
…and install
make install
Once this completes, verify the latest version (4.2.8p10) is correctly installed by entering ‘ntpq –version’
# ntpq --version
ntpq 4.2.8p10@1.3728 Mon Jan 22 05:19:54 UTC 2018 (1)
Create folder for NTP statistics & drift files
Create a folder for NTP statistics and set ownership
mkdir -p /var/log/ntpstats
chown ntp:ntp /var/log/ntpstats/
and create a folder for the drift and leap-seconds file
mkdir -p /var/lib/ntp/
chown ntp:ntp /var/lib/ntp/
Create NTP configuration
Remove the DietPi installed ntp.conf files by entering
rm /etc/ntp.conf
rm /var/lib/ntp/ntp.conf.dhcp
Then create our GPS based configuration file by entering nano /etc/ntp.conf
and pasting the following contents in
server 127.127.20.0 mode 17 minpoll 4 maxpoll 4 prefer
fudge 127.127.20.0 flag1 1 refid GPS

# security
restrict default kod limited nomodify nopeer
restrict -6 default kod limited nomodify nopeer

# Local users may interrogate the NTP server fully.
restrict 127.0.0.1
restrict -6 ::1

# stats
driftfile /var/lib/ntp/ntp.drift

# Enable statistics logging.
statsdir /var/log/ntpstats/
statistics loopstats peerstats clockstats
filegen loopstats file loopstats type day enable
filegen peerstats file peerstats type day enable
filegen clockstats file clockstats type day enable

# leap file
leapfile /var/lib/ntp/leap-seconds.list
Lets break that down to help understand the various sections.
- Uses the NMEA reference clock 20 driver specified by 127.127.20.0.
Mode 17sets the driver to process only GPRMC message at 9600bps. Using higher clock speeds does not necessarily increase timing precision and because we have disabled non-GPRMC messages, there’s no risk of not being able to transmit the message within the 1 second timespan.minpoll&maxpolldefine the polling intervals possible at 2^4 seconds, i.e 16 seconds.prefermarks the reference clock as preferred.flag1 1activate PPSAPI and enable processing PPS signals.
The security section defines access rights
kodenables a “Kiss-o’-death” packet to be sent to reduce unwanted queries.nomodifyprevents any changes to the configuration.notrapprevents ntpdc control message protocol traps.nopeerprevents a peer association being formed.noquery(which isnt present) prevents ntpq and ntpdc queries, but not time queries. I allow this access for remote logging purposes.
The -6 option is used to specify an IPv6 address.
driftfile – The drift (i.e frequency) is the estimated error rate (in parts-per-million) of the local clock. The NTP daemon saves its estimate every hour to the file named here so that it doesn’t have to recalculate this error rate on startup. If the file doesn’t exist, ntpd will assume that the error rate is zero and recalculate it from scratch. Having it helps your clock align faster upon boot.
statistics & filegen – these direct ntpd to create various types of statistics if statsdir directive is enabled. You don’t need the stats files unless you are interested in monitoring the quality of your time sources.
Download leap-second file
Download the leap-seconds file by entering update-leap -F
# update-leap -F
/etc/ntp.conf specifies /var/lib/ntp/leap-seconds.list as a leapfile, which is empty.
INFO: Download of http://www.ietf.org/timezones/data/leap-seconds.list succeeded
NOTICE: Installed new /var/lib/ntp/leap-seconds.list from http://www.ietf.org/timezones/data/leap-seconds.list
Create NTP service handler
Enter nano /etc/init.d/ntp and paste the following content into the file
#!/bin/sh

### BEGIN INIT INFO
# Provides:        ntp
# Required-Start:  $network $remote_fs $syslog
# Required-Stop:   $network $remote_fs $syslog
# Default-Start:   2 3 4 5
# Default-Stop:
# Short-Description: Start NTP daemon
### END INIT INFO

PATH=/sbin:/bin:/usr/sbin:/usr/bin

. /lib/lsb/init-functions

DAEMON=/usr/sbin/ntpd
PIDFILE=/var/run/ntpd.pid

test -x $DAEMON || exit 5

if [ -r /etc/default/ntp ]; then
        . /etc/default/ntp
fi

if [ -e /var/lib/ntp/ntp.conf.dhcp ]; then
        NTPD_OPTS="$NTPD_OPTS -c /var/lib/ntp/ntp.conf.dhcp"
fi


LOCKFILE=/var/lock/ntpdate

lock_ntpdate() {
        if [ -x /usr/bin/lockfile-create ]; then
                lockfile-create $LOCKFILE
                lockfile-touch $LOCKFILE &
                LOCKTOUCHPID="$!"
        fi
}

unlock_ntpdate() {
        if [ -x /usr/bin/lockfile-create ] ; then
                kill $LOCKTOUCHPID
                lockfile-remove $LOCKFILE
        fi
}

RUNASUSER=ntp
UGID=$(getent passwd $RUNASUSER | cut -f 3,4 -d:) || true
if test "$(uname -s)" = "Linux"; then
        NTPD_OPTS="$NTPD_OPTS -u $UGID"
fi

case $1 in
        start)
                log_daemon_msg "Starting NTP server" "ntpd"
                if [ -z "$UGID" ]; then
                        log_failure_msg "user \"$RUNASUSER\" does not exist"
                        exit 1
                fi
                lock_ntpdate
                start-stop-daemon --start --quiet --oknodo --pidfile $PIDFILE --startas $DAEMON -- -p $PIDFILE $NTPD_OPTS
                status=$?
                unlock_ntpdate
                log_end_msg $status
                ;;
        stop)
                log_daemon_msg "Stopping NTP server" "ntpd"
                start-stop-daemon --stop --quiet --oknodo --pidfile $PIDFILE
                log_end_msg $?
                rm -f $PIDFILE
                ;;
        restart|force-reload)
                $0 stop && sleep 2 && $0 start
                ;;
        try-restart)
                if $0 status >/dev/null; then
                        $0 restart
                else
                        exit 0
                fi
                ;;
        reload)
                exit 3
                ;;
        status)
                status_of_proc $DAEMON "NTP server"
                ;;
        *)
                echo "Usage: $0 {start|stop|restart|try-restart|force-reload|status}"
                exit 2
                ;;
esac
and enter the following commands
chmod a+x /etc/init.d/ntp
update-rc.d ntp defaults
systemctl enable ntp
systemctl start ntp
verify the service started correctly with systemctl status ntp
# systemctl status ntp
● ntp.service - LSB: Start NTP daemon
   Loaded: loaded (/etc/init.d/ntp)
   Active: active (running) since Mon 2018-01-22 04:37:40 GMT; 18s ago
  Process: 28276 ExecStart=/etc/init.d/ntp start (code=exited, status=0/SUCCESS)
   CGroup: /system.slice/ntp.service
           └─28284 /usr/sbin/ntpd -p /var/run/ntpd.pid -g -u 104:109 -g

Jan 22 04:37:40 NTP-C21 systemd[1]: Starting LSB: Start NTP daemon...
Jan 22 04:37:40 NTP-C21 ntpd[28282]: ntpd 4.2.8p10@1.3728 Mon Jan 22 04:34:19 UTC 2018 (1): Starting
Jan 22 04:37:40 NTP-C21 ntpd[28282]: Command line: /usr/sbin/ntpd -p /var/run/ntpd.pid -g -u 104:109 -g
Jan 22 04:37:40 NTP-C21 ntp[28276]: Starting NTP server: ntpd.
Jan 22 04:37:40 NTP-C21 ntpd[28284]: proto: precision = 1.000 usec (-20)
Jan 22 04:37:40 NTP-C21 ntpd[28284]: leapsecond file ('/var/lib/ntp/leap-seconds.list'): good hash signature
Jan 22 04:37:40 NTP-C21 ntpd[28284]: leapsecond file ('/var/lib/ntp/leap-seconds.list'): loaded, expire=2018-12-28T00:00:00Z last=2017-01-01T00:00:00Z ofs=37
Jan 22 04:37:40 NTP-C21 ntpd[28284]: Listen and drop on 0 v6wildcard [::]:123
Jan 22 04:37:40 NTP-C21 ntpd[28284]: Listen and drop on 1 v4wildcard 0.0.0.0:123
Jan 22 04:37:40 NTP-C21 ntpd[28284]: Listen normally on 2 lo 127.0.0.1:123
Jan 22 04:37:40 NTP-C21 ntpd[28284]: Listen normally on 3 eth0 192.168.10.39:123
Jan 22 04:37:40 NTP-C21 ntpd[28284]: Listen normally on 4 lo [::1]:123
Jan 22 04:37:40 NTP-C21 ntpd[28284]: Listen normally on 5 eth0 [fe80::21e:6ff:fe35:56c3%2]:123
Jan 22 04:37:40 NTP-C21 ntpd[28284]: Listening on routing socket on fd #22 for interface updates
Jan 22 04:37:40 NTP-C21 systemd[1]: Started LSB: Start NTP daemon.
Verify functionality
We can now verify that NTP is working correctly by entering ntpq -p, assuming it is, you will see something similar to the text below displayed
# ntpq -p
     remote           refid      st t when poll reach   delay   offset  jitter
==============================================================================
oGPS_NMEA(0)     .GPS.            0 l   12   16  377    0.000    0.005   0.002
The 'o' is what we want to see as it signifies this peer is preferred for pulse-per-second signaling. It might take a few minutes to sync so be somewhat patient if it isn’t displayed immediately.
Alternatively you may see
* system – this is the best of the candidates which survived the filtering, intersection, and clustering algorithms
# backup – more than enough sources were supplied and ntpd doesn’t need them all, so this peer was excluded from further calculations
+ candidate – this peer survived all of the testing algorithms and was used in calculating the correct time
– outlier – this peer includes the true time but was discarded during the cluster algorithm
x falseticker – this peer was outside the possible range and was discarded during the selection (intersection) algorithm
[space] – invalid peer; might cause a synchronisation loop, have an incorrect stratum, or might be unreachable or too far away from the root servers
The command also lists connected time servers and displays information indicating when they were last polled and the stability of the responses. The column headings are as follows:
- remote and refid: remote NTP server, and its NTP server
- st: stratum of server
- t: type of server (local, unicast, multicast, or broadcast)
- poll: how frequently to query server (in seconds)
- when: how long since last poll (in seconds)
- reach: octal bitmask of success or failure of last 8 queries (left-shifted); 377 = 11111111 = all recent queries were successful; 257 = 10101111 = 4 most recent were successful, 5 and 7 failed, for example
00000001 = 001
00000011 = 003
00000111 = 007
00001111 = 017
00011111 = 037
00111111 = 077
01111111 = 177
11111111 = 377
- delay: network round trip time (in milliseconds)
- offset: difference between local clock and remote clock (in milliseconds)
- jitter: difference of successive time values from server (high jitter could be due to an unstable clock or, more likely, poor network performance)
Further information on system performance is available by entering # ntpq -pcrv, i.e
# ntpq -pcrv
     remote           refid      st t when poll reach   delay   offset  jitter
==============================================================================
oGPS_NMEA(0)     .GPS.            0 l   13   16   17    0.000    4.283  15.311
associd=0 status=0414 leap_none, sync_uhf_radio, 1 event, freq_mode,
version="ntpd 4.2.8p10@1.3728 Mon Jan 22 04:34:19 UTC 2018 (1)",
processor="aarch64", system="Linux/3.14.79+", leap=00, stratum=1,
precision=-20, rootdelay=0.000, rootdisp=957.849, refid=GPS,
reftime=de0fe945.4a8ca1d0  Mon, Jan 22 2018  4:38:29.291,
clock=de0fe952.936909f3  Mon, Jan 22 2018  4:38:42.575, peer=32513, tc=4,
mintc=3, offset=23.051000, frequency=0.000, sys_jitter=15.310890,
clk_jitter=10.016, clk_wander=0.000, tai=37, leapsec=201701010000,
expire=201812280000
where
- root delay: our delay in milliseconds to the stratum 0 time source
- root dispersion: the maximum possible offset in milliseconds that our local clock could be from the stratum 0 time sources, given the characteristics of our peers.
- system offset: the local clock’s offset in milliseconds from NTP’s best estimate of the correct time, given our peers
- system jitter: as for peer jitter, this is the overall error in estimating the system offset
- system frequency (or drift): the estimated error in parts per million, of the local clock
Update leap-seconds
The Generic NMEA receiver does not identify ahead of time upcoming leap seconds so we need to handle this by calling the update-leap script which verifies and if necessary updates the leap-second definition file with cron, enter the command
crontab -e
Paste the following line at the bottom of the file, this will call the update script every Monday at 11PM
23 0 * * 1 root /usr/sbin/update-leap
Final check
Its worth a final reboot and verifying the service starts and that the PPS clock manages to sync. If everything works correctly you now have a functional stratum-1 timeserver. The next step is to configure pfSense to use this.
Configure pfSense
This will build upon my baseline pfSense setup guides where NTP was already being served by the pfSense router to devices on our local subnets. NTP traffic was blocked from leaving our VL10_MGMT, VL20_VPNLAN and VL30_CLRNET subnets preventing telemetry being collected from devices where the NTP protocol may be used to identify our IP address. VL40_GUEST is served by pfSense too, but is also open to access any external NTP servers.
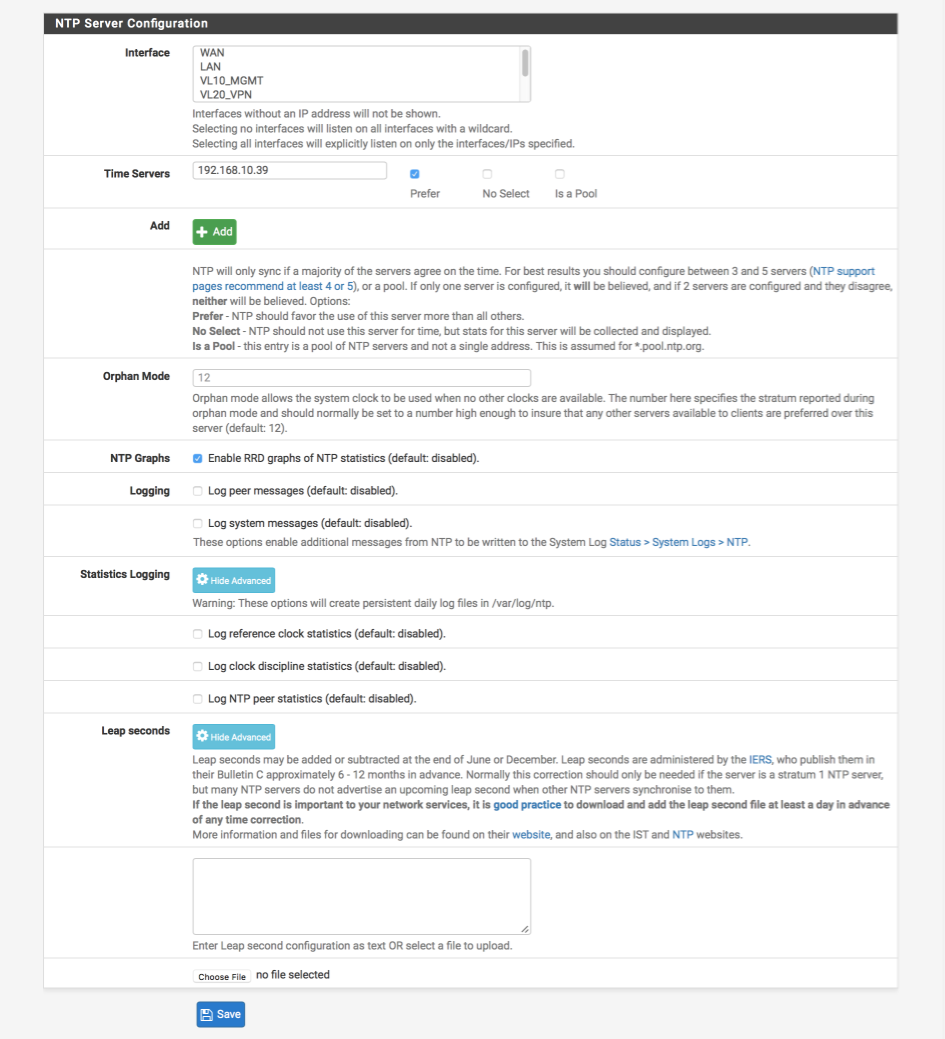
Configure NTP service
Navigate to Services > NTP Server
- Interface: Deselect all interfaces which will listen on all interfaces with a wildcard.
- Time Servers: Remove all default time servers, i.e
0.pfsense.pool.ntp.organd replace with the IP address of your Odroid NTP server, in my case,192.168.10.39 - Prefer =
- No Select =
- Is a Pool =
- Orphan Mode = 12
- NTP Graphs =
Logging
- Log peer messages =
- Log system messages =
Statistics Logging
- Log reference clock statistics =
- Log clock discipline statistics
- Log NTP peer statistics
Leap Seconds
- Configuration = Blank
Click Save and Apply
Heres how my configuration looked before hitting Save
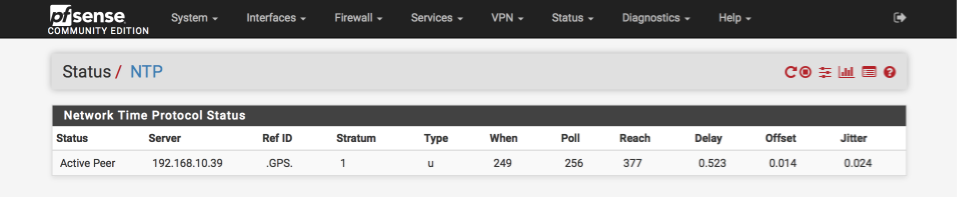
NTP status
Navigate to Status > NTP to see how your time sources are performing
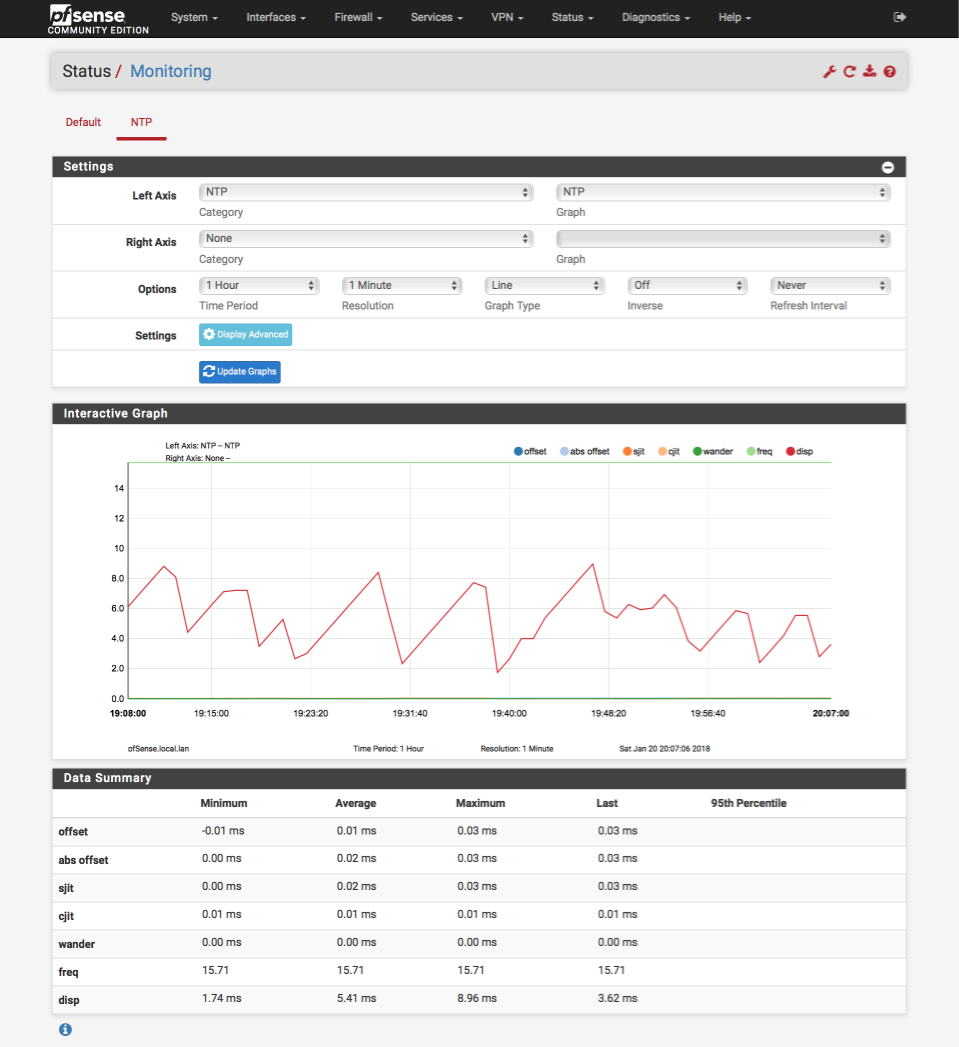
NTP monitoring
Navigate to Status > Monitoring to see how your NTP sources have been performing over a longer time period.
References
NTP Documentation
NMEA message list
NMEA reference clock drivers
NMEA driver 20 reference
Changelog
11 February 2018
Updated for DietPi v6