pfSense 2.3 WPAD/PAC proxy configuration guide
Revised 31 August 2017 for pfSense 2.3.
NOTE: This guide is now deprecated, please see the updated pfSense 2.4 based guide here.
pfSense made some changes as of version 2.3 to use nginx which resulted in my previous guide becoming redundant. I’ve deprecated the old guide and put together this new version which supports pfSense 2.3+.
I don’t use a proxy on my network for ad filtering any more as I moved over to pfBlockerNG which provides greater control and flexibility. I’ve received a number of requests for an updated guide so here it is. I initially set my proxy to work over a transparently but this method didn’t work with some recent changes I’ve made to my network. To enable my filtering system to keep on working I had to configure each device separately to use port 3128 which was an inconvenience. A system called WPAD/PAC (Web Proxy Auto-discovery Protocol & Proxy Auto Configure) promised an easy workaround and the ability for devices to auto configure themselves when connecting to to my network. This wasn’t as easy as I expected partly due to different devices having different ways of accessing the info and partly because of my specific network setup. I’ve spent a bit of time researching how to make this work and wanted to document this for myself and others who may have struggled to make it work in the past.
Create proxy discovery files
First we will create the proxy configuration files. Three of them are required due to different browsers using different filenames to obtain proxy information.
We’ll create the initial proxy.pac file, and then create two ‘linked’ files to wpad.dat and wpad.da files which will make keeping them all in sync easier.
ee /usr/local/www/nginx/proxy.pac
Paste the following into the file you just created. Change my proxy address (192.168.1.1) to yours obviously.
function FindProxyForURL(url,host)
{
  if(isPlainHostName(host))
  {
    return "DIRECT";
  }

  if(isInNet(host,"127.0.0.1","255.255.255.0"))
  {
    return "DIRECT";
  }

  return "PROXY 192.168.1.1:3128";
}
This PAC file checks to see if the host which is being looked up is a plain host name, i.e “intranet”, or is the localhost (127.0.0.1) network, if it is, the access bypasses the proxy (“DIRECT”). If neither of the above conditions are met then the access is made via the proxy and port 3128.
I have to do these checks because I do some web development and that development is tested on a local server and I don’t want that to go through my proxy. Its possible to extend the PAC file functionality to include features such as black/white lists etc.
Create the other two file variations by generating links. This is preferable as it helps keep all versions synced if you make any changes in future.
ln -s /usr/local/www/nginx/proxy.pac /usr/local/www/nginx/wpad.dat
ln -s /usr/local/www/nginx/proxy.pac /usr/local/www/nginx/wpad.da
Verify your folder looks something like this when done,
$ ls -l
-rw-r--r--  1 root  wheel  537 Jul 19 12:07 50x.html
-rw-r--r--  1 root  wheel  612 Jul 19 12:07 index.html
-rw-r--r--  1 root  wheel  212 Aug  6 11:43 proxy.pac
lrwxr-xr-x  1 root  wheel    9 Aug  6 11:45 wpad.da -> proxy.pac
lrwxr-xr-x  1 root  wheel    9 Aug  6 11:45 wpad.dat -> proxy.pac
Setup a second nginx web server
Best practice dictates we should only allow access to the pfSense webConfigurator via secure HTTP and on a different port to 443. This leaves us with a slight problem. The default and only system file server is dedicated to serving the webConfigurator pages on this secure port and can’t be used simultaneously to serve WPAD data on port 80 any more. To be able to serve up the WAD config files, we need to create a second file server which will handle the WPAD requests for us.
Lets start by duplicating the systems default nginx configuration file. We can use this as the basis for our second nginx instance. Don’t try and create this file in /var/etc folder as it will be deleted on reboot. We’ll use the same folder as where our config files are stored.
ee /usr/local/etc/nginx/nginx-wpad.conf
Paste the contents below into this file.
worker_processes  1;

events {
    worker_connections  1024;
}

http {
    include       wpad-mime.types;
    default_type  application/octet-stream;

    sendfile        on;
    keepalive_timeout  65;

    server {
        listen       80;
        server_name  wpad;

        location / {
            root   /usr/local/www/nginx;
            index  index.html index.htm;
        }
    }
}
Add additional filetypes
Lets create a specific wpad-mime.types for this instance of nginx by entering ee /usr/local/etc/nginx/wpad-mime.types. Paste the following lines into this file.
types {
    text/html                             html htm shtml;
    text/css                              css;
    image/jpeg                            jpeg jpg;
    text/plain                            txt;

    application/x-ns-proxy-autoconfig     pac;
    application/x-ns-proxy-autoconfig     dat;
    application/x-ns-proxy-autoconfig     da;
}
Verify second nginx is working
Test our second nginx instance works by entering the following command and verifying you don’t see any errors.
/usr/local/sbin/nginx -c /usr/local/etc/nginx/nginx-wpad.conf
You can verify both Nginx servers are running by entering
ps aux | grep -i "nginx: master"
the results should both nginx instances are running with their respective configurations, for example.
$ ps aux | grep -i "nginx: master"
root    42903   0.0  0.0  28896   6344  -  Is   12:21PM     0:00.00 nginx: master process nginx -c /usr/local/etc/nginx/nginx-wpad.conf (nginx)
root    70764   0.0  0.0  39136   6520  -  Is   Mon09PM     0:00.00 nginx: master process /usr/local/sbin/nginx -c /var/etc/nginx-webConfigurator.conf (nginx)
root    81674   0.0  0.0  18740   2256  0  S+   12:22PM     0:00.00 grep -i nginx: master
Set nginx-wpad to autorun
We’ll configure a cron job to start the second nginx instance on boot. Create a file to check if our nginx module is already running, and if not, start it by entering
ee /root/check_proxy_wpad.sh
Paste the following into this file you just created.
#!/bin/sh

/bin/ps ax | /usr/bin/grep /usr/local/etc/nginx/nginx-wpad.conf | /usr/bin/grep -v grep
if [ $? -eq 0 ];then
    /bin/echo ok
else
    /usr/local/sbin/nginx -c /usr/local/etc/nginx/nginx-wpad.conf
fi
Set this script as executable
chmod +x /root/check_proxy_wpad.sh
Create a cron job to autorun
You could do this via the command line but the Cron tool available under System > Packages makes life easier. Install it if you haven’t already.
Create a job as * * * * * root /root/check_proxy_wpad.sh
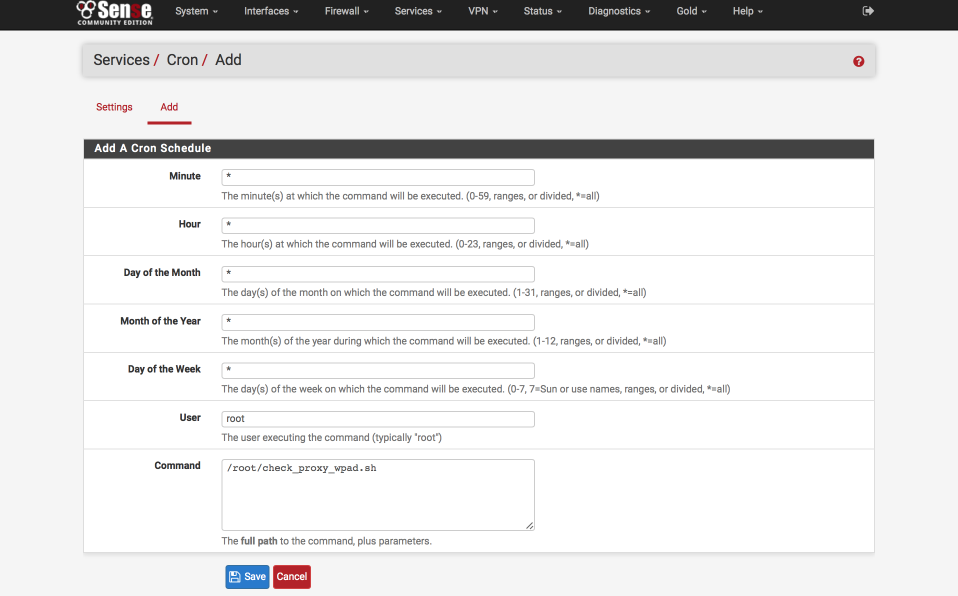
Reboot and verify the second nginx instance starts automatically using the command shell and the command detailed above.
Serve the WPAD files
There are two methods of serving WPAD files, DNS and DHCP. You can use either one or both together, in my personal testing I’ve found DNS to be the more reliable though I have heard other users who found DHCP to be more reliable.
It is possible to run both systems concurrently, if an address isn’t received via DHCP the system will fall back to DNS next. As of when I wrote the original guide in 2014, Firefox didn’t support WPAD via DHCP which was a known bug for quite a number of years. I’ll detail both methods but suggest you try both and see which one works best for you and the clients you want to serve.
Configure DNS
I’ve upgraded from the DNS Forwarder to DNS Resolver which this guide will focus on.
Navigate to Service > DNS Resolver
- DNS Resolver = [x]
- Listen port: 53
- Network Interfaces = highlight your intended interfaces
- Outgoing Network Interfaces = highlight the interfaces DNS resolution should occur on.
- System Domain Local Zone Type = Transparent
- DNSSEC = Preferably ticked but I’ve had a few issues so I leave it unticked.
- DNS Query Forwarding = [x]
- DHCP Registration = [x]
- Static DHCP = [x]
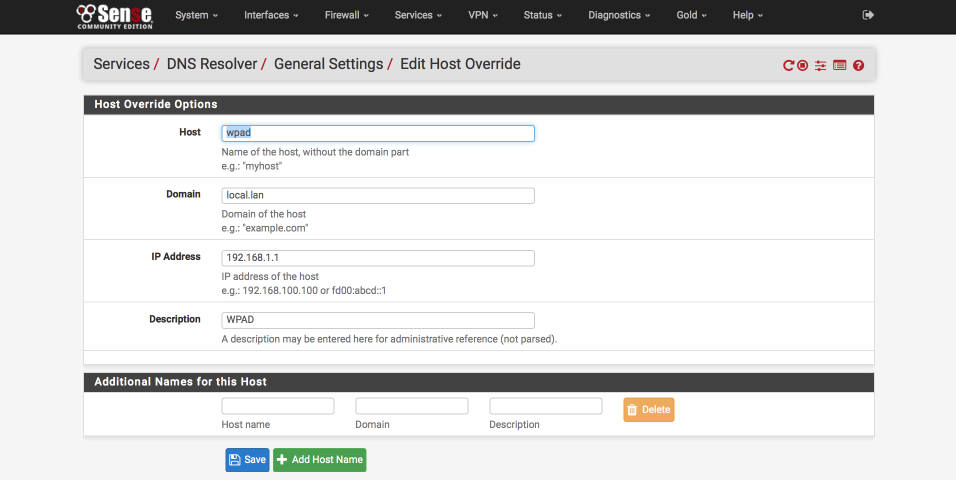
We will now create a wpad host override for ‘wpad’.
- Click + next to Host Overrides
- Host = wpad
- Domain = domain name you have set in the pfSense general settings,
local.lanis mine. - IP = your LAN IP
- Description = WPAD or something descriptive
- Save
Test the WPAD host override works with nslookup. This should report the host override IP address back to you. (192.168.20.1 is my DNS server)
$ nslookup wpad 192.168.20.1

Server:   192.168.20.1
Address:  192.168.20.1#53

Name: wpad.local.lan
Address: 192.168.1.1
Its also worth testing to make sure you can download the wpad.dat file (and other two) from within your browser. Open your browser and navigate to http://wpad.local.lan/wpad.dat. You can use curl too if you prefer, here curl is returning my wpad.dat file correctly.
$ curl http://wpad/wpad.dat

function FindProxyForURL(url,host)
{
  if(isPlainHostName(host))
  {
    return "DIRECT";
  }

  if(isInNet(host,"127.0.0.1","255.255.255.0"))
  {
    return "DIRECT";
  }

  return "PROXY 192.168.1.1:3128";
}
Configure DHCP
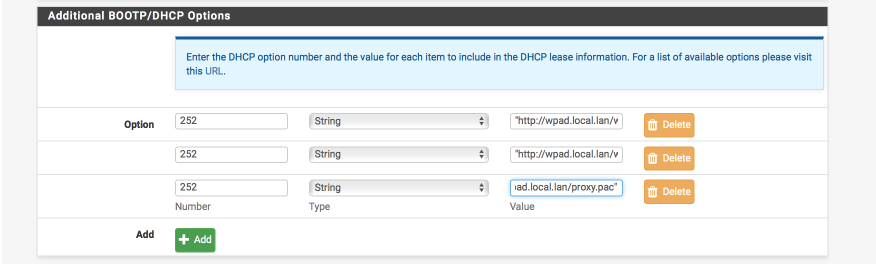
In your DHCP server, add the following three options in the ‘Additional BOOTP/DHCP section’.
For the wpad.dat file
number: 252
type: string
value: "http://wpad.local.lan/wpad.dat"
For the wpad.da file
number: 252
type: string
value: "http://wpad.local.lan/wpad.da"
and finally for the proxy.pac file
number: 252
type: string
value: "http://wpad.local.lan/proxy.pac"
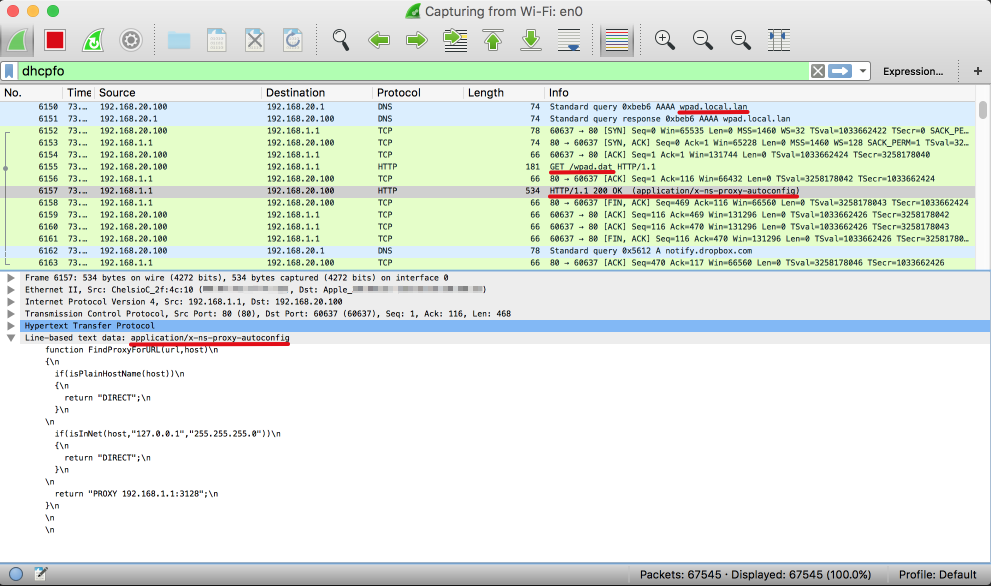
Verification
I ran Wireshark at this stage to make sure everything was working as expected. Here’s a screen grab showing
You can see top to bottom where I’ve highlighted key pieces of info, i.e
- DNS lookup of wpad.local.lan
- GET request wpad.dat file
- HTTP download reorting “200 OK” for the wpad.dat file
- Line based text data as ‘application/x-ns-proxy-autoconfig’
- Contents of wpad.dat
Client and browser configuration
Assuming you can download the WPAD configuration files without issue in your browser, this part should be easy. I’ll provide a few examples of my configurations for my Macbook and Firefox but other clients should be similar enough.
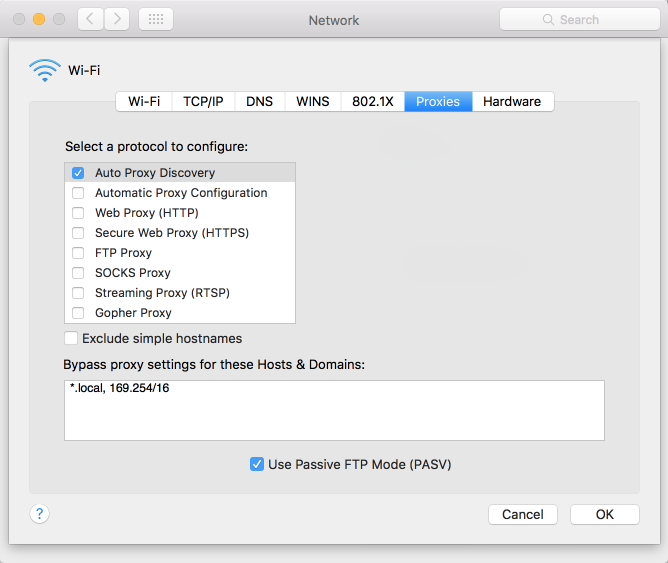
Mac Network Settings
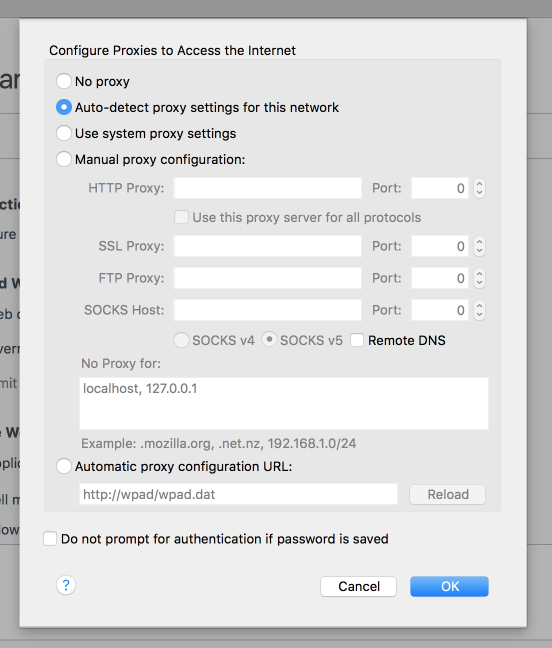
Firefox Settings
Note its possible to tell Firefox to use system settings too but this is an alternative.
Windows / Internet Explorer

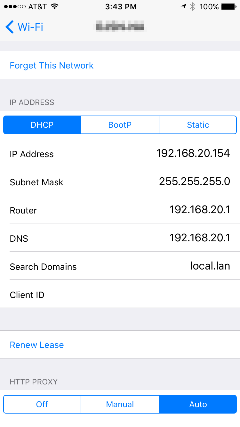
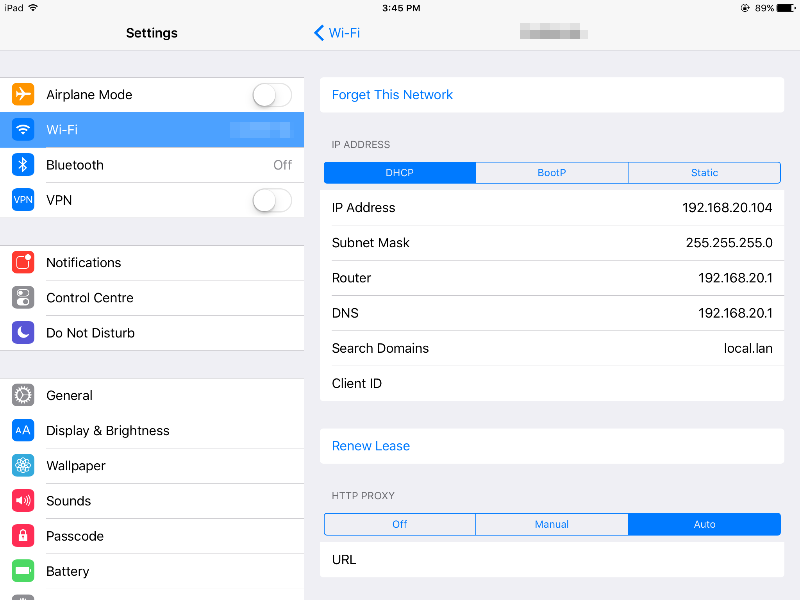
Iphone & Ipad
Auto discovery works in iOS too. Head into settings, click the info symbol besides your network connection, scroll down and select ‘Auto’. Don’t fill in any details, just leave them blank.
Firewall
I didn’t actually mention this in my previous guide but please ensure you have a firewall rule that will permit port 80 traffic to allow the delivery of the wpad file from the server.
Possible next steps
Block surfing on port 80
Once you have the WPAD redirection working and all traffic is flowing over port 3128, if you require you can create a firewall rule to prevent browsing via the usual HTTP port 80 ensuring all browsing is only done via your proxy.
NAT backup
To catch any PCs which aren’t configured with ‘auto configure’ in their settings, its possible to implement a port forward to catch any traffic directed at port 80 through to 3128.
References
Changelog
31 August 2017
Corrected typo in check_proxy_wpad.sh