pfSense 2.1 WPAD/PAC proxy configuration guide
Published 15 August 2014. Revised 16 January 2016 for typos and formatting.
NOTE: This guide is now deprecated, please see the updated pfSense 2.4 based guide here.
I’ve been using a proxy to provide web filtering for adverts and content for a while now. Initially I set it up to work over a transparent proxy but this method does’t work with some recent changes I’ve made to my network. To enable my filtering system to keep on working I had to configure each device separately to use port 3128 which was an inconvenience. A system called WPAD/PAC (Web Proxy Autodiscovery Protocol & Proxy Auto Configure) promised an easy workaround and the ability for devices to auto configure themselves when connecting to to my network. This wasn’t as easy as I expected partly due to different devices having different ways of accessing the info and partly because of my specific network setup. I’ve spent a bit of time researching how to make this work and wanted to document this for myself and others who may have struggled to make it work in the past.
Backup settings
Before commencing with any modifications to a working setup take a backup in case you need to revert to a last known working config.
Diagnostics->Backup/Restore
Download Configuration
Create proxy discovery files
First we will create the proxy configuration files. Three of them are required due to different browsers using different means to obtain this info.
We’ll create the proxy.pac file and then two ‘linked’ files to the wpad.dat and wpad.da files which will make keeping them all in sync easier later.
mkdir /usr/local/www/wpad
cd /usr/local/www/wpad
ee proxy.pac
Paste the following into the file you just created, don’t forget to change my network address (192.168.124.2) to your proxy.
function FindProxyForURL(url,host)
{
  if(isPlainHostName(host))
  {
    return "DIRECT";
  }

  if(isInNet(host,"127.0.0.1","255.255.255.0"))
  {
    return "DIRECT";
  }

  return "PROXY 192.168.124.2:3128";
}
ESC/RETURN, save and exit.
This PAC file checks to see if the host which is being looked up is a plain host name, i.e “intranet”, or is the localhost (127.0.0.1) network, if it is, the access bypasses the proxy (“DIRECT”). If neither of the above conditions are met then the access is via the proxy and port 3128.
I have to do these checks because I do some web development and that development is tested on a local server. Its possible to extend the PAC file functionality to include features such as black/white list testing etc.
Create the other two file variations by generating links. This is preferable as it helps keep all versions synced if you make any changes in future.
cd /usr/local/www/wpad
ln -s proxy.pac wpad.dat
ln -s proxy.pac wpad.da
Setup a second web server
Best practice dictates we should only allow access to the pfSense webConfigurator via secure HTTP and on a different port to 443. This leaves us with a slight problem. The default and only system file server is dedicated to serving the webConfigurator pages on this secure port and can’t be used simultaneously to serve WPAD data on port 80 anymore. To be able to serve up the WAD config files, we need to create a second file server which will handle the WPAD requests for us.
Lets start by duplicating the standard lighttpd configuration file, we can use this as the basis for our second lighttpd instance. Don’t try and create this file in /var/etc folder as it will be deleted on reboot. We’ll use the same folder as where our config files are stored.
cd /usr/local/www/wpad
cp /var/etc/lighty-webConfigurator.conf /usr/local/www/wpad/lighty-proxy-wpad.conf
We now need to edit this file
ee /usr/local/www/wpad/lighty-proxy-wpad.conf
EDIT 24/10/14: Added my production use config file here for reference.
I’ll list the changes required so you can duplicate it preserving any local info which may be required.
Change folder this instance will serve files from.
server.document-root = "/usr/local/www/wpad/"
Create specific error file for messages relating to this instance
Add the following line
server.errorlog = "/var/log/lighty-proxy-wpad.log"
Add additional filetypes
The .pac line will already be present so just add the .dat and .da lines to it.
".dat"          =>      "application/x-ns-proxy-autoconfig",
".da"           =>      "application/x-ns-proxy-autoconfig",
".pac"          =>      "application/x-ns-proxy-autoconfig",
Bind this Lighttpd instance to your server
Replace ‘0.0.0.0’ with your proxy server address.
server.bind  = "0.0.0.0"
server.port  = 80
Delete any references to HTTPS or SSL which may be here too.
Specify a unique pid for this instance
server.pid-file = "/var/run/lighty-proxy-wpad.pid"
ESC/RETURN and save the file you just created.
Verify second Lighttpd is working
Test this works by entering the following command
/usr/local/sbin/lighttpd -f /usr/local/www/wpad/lighty-proxy-wpad.conf
If you see an error complaining that port 80 is already in use, verify access to the web configurator is via a different port, preferably a user defined secure port.
Also verify in System->Advanced that WebGUI redirect is disabled.
Once any errors have been addressed, verify two instances of lighttpd are running by
ps aux | grep -i "lighttpd"
You should see something like this illustrating both lighttpd instances are running
$ ps aux | grep lighttpd
root   38166  0.0  0.1 26272  6320  ??  S    11:56AM   0:01.07 /usr/local/sbin/lighttpd -f /var/etc/lighty-webConfigurator.conf
root   73772  0.0  0.0 24224  3940  ??  S    12:13PM   0:00.29 /usr/local/sbin/lighttpd -f /usr/local/www/wpad/lighty-proxy-wpad.conf
Set WPAD lightppd to autorun
We’ll configure a cron job to start the second lighttpd instance on boot.
Create file to check if our lighty module is already running, and if not, start it
ee /root/check_proxy_wpad.sh
Paste the following into this file you just created.
#!/bin/sh

/bin/ps ax | /usr/bin/grep /usr/local/www/wpad/lighty-proxy-wpad.conf | /usr/bin/grep -v grep
if [ $? -eq 0 ];then
    /bin/echo ok
else
    /usr/local/sbin/lighttpd -f /usr/local/www/wpad/lighty-proxy-wpad.conf
fi
ESC/RETURN save and exit
Set the script as executable
chmod +x /root/check_proxy_wpad.sh
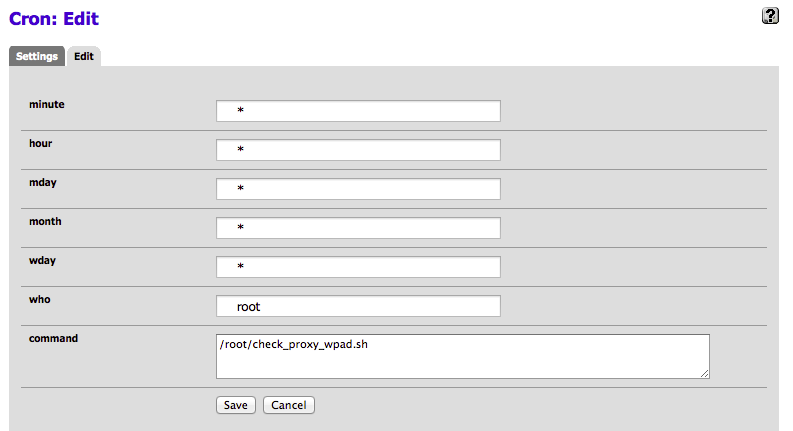
Create a cron job to autorun
You could do this via the command line but the Cron tool available under System->Packages makes life easier. Install it if you haven’t already.
Create a job as * * * * * root /root/check_proxy_wpad.sh
Reboot and verify the second lightty instance starts automatically.
Serve the WPAD files
There are two methods of serving WPAD files, DNS and DHCP. You can use either one or both together, in my personal testing I’ve found DNS to be the more reliable though I have heard other users who found DHCP to be more reliable.
It is possible to run both systems concurrently, if an address isnt received via DHCP the system will fall back to DNS next. Its worth noting Firefox still doesn’t support WPAD via DHCP which has been a known bug for quite a number of years now. I’ll detail both methods but suggest you try both and see which one works best for you and the clients you want to serve.
Configure DNS
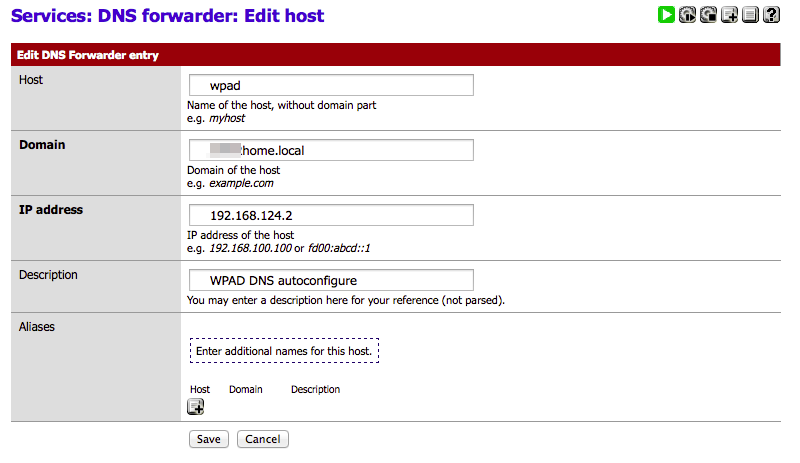
Service ->DNS Forwarder
- Ensure the DNS forwarder is enabled.
- Click + next to Host Overrides and create a woad host.
- Host = wpad
- Domain = domain name you have set in the pfSense general settings
- IP = your LAN IP
- Description = anything descriptive
- Save
To test the WPAD host override works, do a nslookup test on WPAD. This should report the IP address back to you.
$ nslookup wpad.home.local
Server:     192.168.124.2
Address:    192.168.124.2#53

Name:   wpad.home.local
Address: 192.168.124.2
Its worth testing to make sure you can download the wpad.dat file (or others) from within your browser too, e.g in my case, http://192.168.124.2/wpad.dat
Configure DHCP
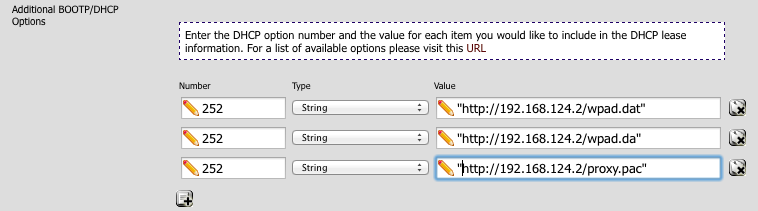
In your DHCP server, add the following three options in the ‘Additional BOOTP/DHCP section’.
For the wpad.dat file
number: 252
type: string
value: "http://192.168.124.2/wpad.dat"
For the wpad.da file
number: 252
type: string
value: "http://192.168.124.2/wpad.da"
and finally for the proxy.pac file
number: 252
type: string
value: "http://192.168.124.2/proxy.pac"
Its worth testing to make sure you can download the wpad.dat file (or others) from within your browser too.
Client and browser configuration
Assuming you can download the WPAD configuration files without issue in your browser, this part should be easy.
I’ll provide a few examples of my configurations for my Macbook and Firefox but other clients should be similar enough.
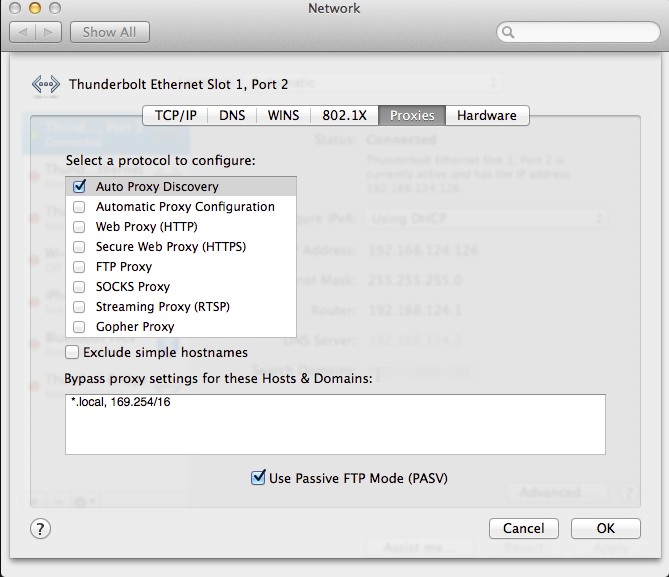
Mac Network Settings
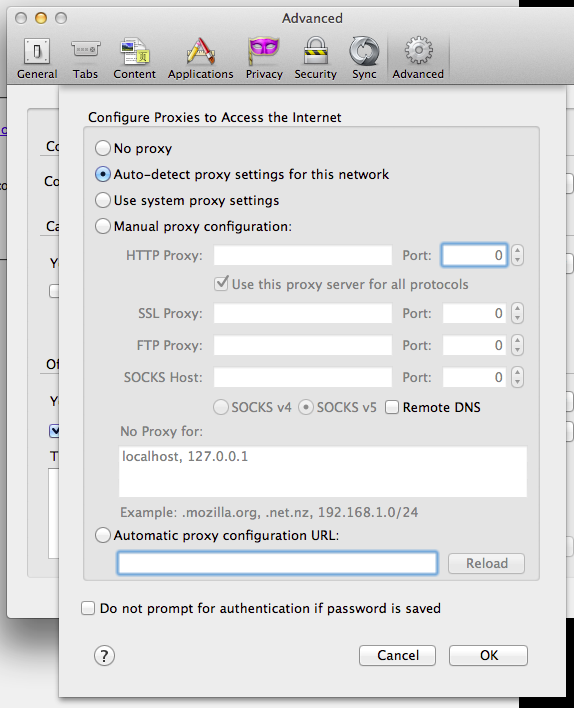
Firefox Settings
Note its possible to tell Firefox to use system settings too but this is an alternative.
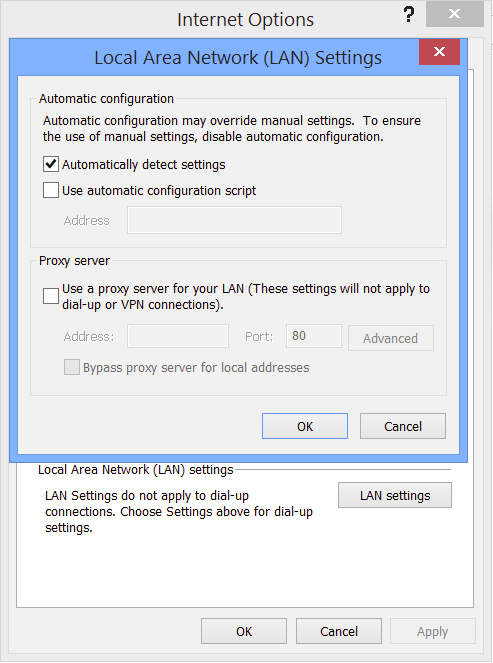
Windows / Internet Explorer
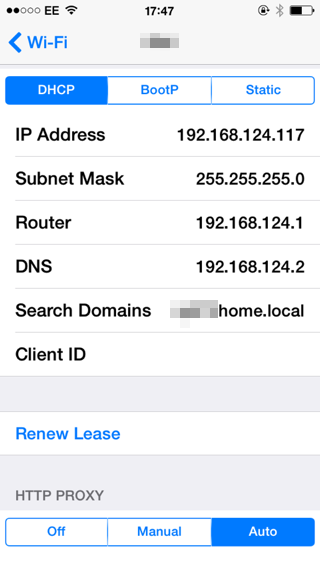
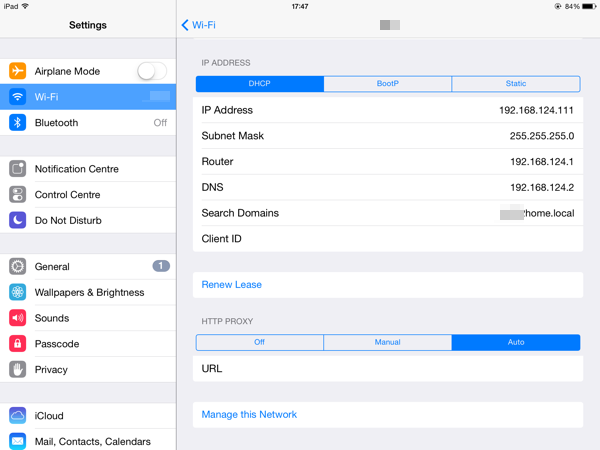
Iphone & Ipad
Yes, auto discovery works in iOS too. Head into settings, click the info symbol besides your network connection, scroll down and select ‘Auto’. Dont fill in any details, just leave it blank.
Possible next steps
Block surfing on port 80
Once you have the WPAD redirection working, if you require you can create a firewall rule to prevent browsing via the usual HTTP port 80 ensuring all browsing is via your proxy.
NAT backup
To catch any PCs which aren’t configured with ‘auto configure’ in their settings, you could implement a port forward for any traffic directed at port 80 through to 3128.