pfSense Squid proxy configuration
Published 2 May 2014. Revised 17 January 2016 for typos and formatting.
One of the things that irks me these days is the amount of pop-ups and adverts I experience whilst surfing on my iPad. Like most people my tablet gets a lot of use due to its convenient size and portable nature. My desktop browsers run the popular Adblock plugins which clean up the surfing experience considerably but these plugins don’t work with the iPads native browser and moving to a third party browser which would enable Adblock functionality, would lose bookmark sync and native rendering performance which apple keep locked up for its own benefit.
Having recently installed a pfSense router into my home network, I wanted to utilise a plugin called Squid to use to improve my tablet surfing experience.
There are two benefits using Squid, caching and filtering. Both contribute to a quicker and more pleasant browsing experience.
To give you a taste of the improvements, this is the before and after on my iPad.
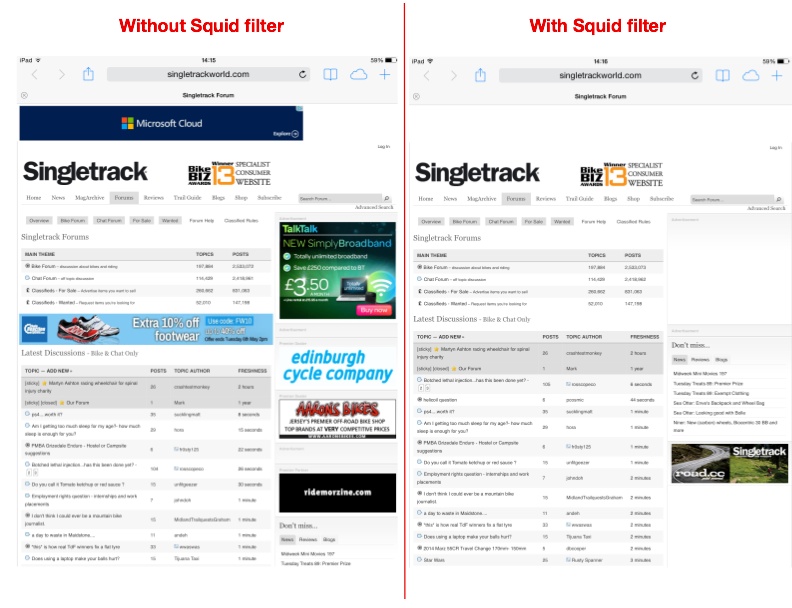
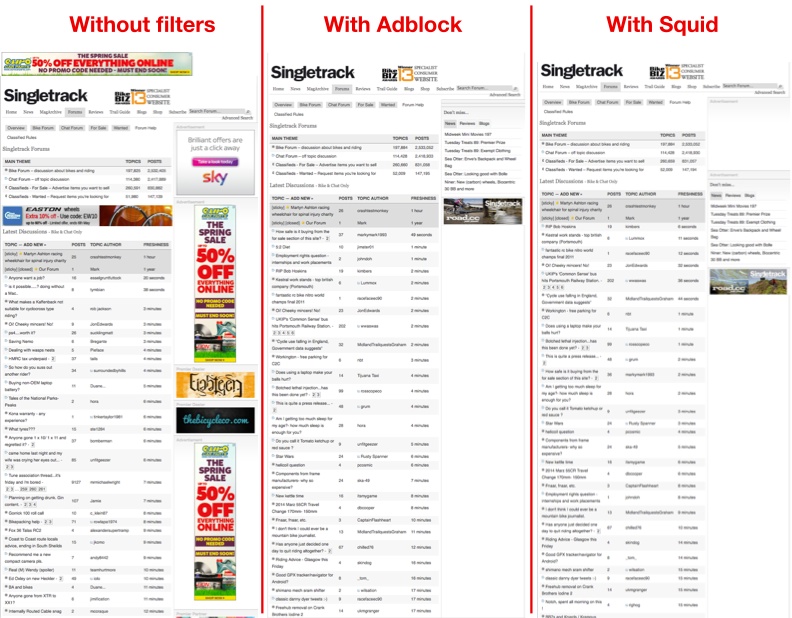
And this is the before and after on my desktop, with a comparison with Adblock too. You can see the benefit of Adblock is it rolls DIV’s up making the presentation a bit neater but the reduction in clutter is still present with Squid alone.
Installation
This setup guide assumes you have a working pfSense router configured and working already. I’m tunneling all my traffic through Air VPN’s servers these days as it continues to afford security without compromising performance.
Install packages
Install the following packages from System->Packages. Note the order which you install them is important as SquidGuard installs some older files which will be updated when you install squid3-dev.
- Install SARG (2.3.6 pkg v0.6.3) N.B You could use Lightsquid if you want but I prefer SARG for easily configuring log rotation and scheduling.)
- Install squidGuard-squid3 (1.4.4 pkg v.1.9.5)
- Install squid3-dev (3.3.10 pkg 2.2.2)
Configure Squid
Accessed from Services->Proxy Server
General tab
Squid General Settings
Set the options as follows:-
- Proxy Interfaces: select AIRVPN_LAN.
- Proxy Port: 3128
- ICP port: leave blank
- Allow users on interface: Ticked
- Patch Captive Portal: unticked
- Resolve DNS v4 first: unticked
- Disable ICMP: unticked
- Use Alternate DNS servers for proxy: unticked
You can if needed select additional interfaces by holding down shift key whilst selecting interfaces. I personally only use squid on my VPN interface preferring to keep my LAN connection clear of any filtering or encryption.
Transparent Proxy Settings
- Transparent HTTP proxy: ticked
- Transparent proxy interfaces: Select AIRVPN_LAN
- Bypass proxy for private address destination: ticked
- Bypass proxy for these source IPs: clear
- Bypass proxy for these designation IPs: clear
SSL man in the middle
- HTTP/SSL interception: unticked
Leave the rest of this section as default, we aren’t going to use this feature.
Logging Settings
- Enabled logging: ticked
- Log Store Directory: /var/squid/logs
- Log rotate: unticked (Sarg will take care of log rotation which we’ll onfigure later)
- visible hostname: localhost (set as per your requirements)
- Administrator email: admin@localhost (set as per your requirements)
- Language: en
- Disable x-forward: unticked
- Log denied pages by Squidguard: unticked
- What to do with requests with whitespace: strip
- Suppress squid version: ticked
- Integrations: This will be empty at this stage but will populate after we have configured the Squid filter next with
redirect_program /usr/pbi/squidguard-squid3-amd64/bin/squidGuard -c /usr/pbi/squidguard-squid3 amd64/etc/squidGuard/squidGuard.conf;redirector_bypass off;url_rewrite_children 5 - Custom ACLS (before auth): empty
- Custom ACLS (after auth): empty
- Save
Select Local Cache tab
Squid Cache General Settings
- Cache replacement policy: Heap LFUDA
- Low water mark %: 90
- High water mark %: 95
- Do not cache: clear
- Enable offline mode: unticked
- External cache managers: unticked
Squid Hard Disk Cache Settings
- Hard disk cache: Start conservatively, e.g 20% of your HD free space. You can increase this later once you have verified caching is working correctly and you have an idea how much data will be stored. You do not want to run out of disk space so be conservative and increase steadily.
- Hard disk cache system: aufs
- Clear cache on log rotate: unticked
- Level 1 subdirectories: 16
- Hard disk cache location: /var/squid/cache
- Minimum obejct size: 0
- Maximum object size: 102400KB
Squid Memory Cache Settings
- Memory cache size: set to no more than 50% of your available RAM after your installed filter sets have loaded (Snort, pfBlocker etc), in my case I use 8192KB.
- Maximum object size in RAM: 128KB (adjust according to mem cache size)
- Memory replacement policy: LRU
Dynamic and Update Content
I understand there are some bugs in this area so I’ve stayed clear from using it.
- Cache dynamic content: unticked
- Ignore the rest of this section as we haven’t enabled this feature.
- Save
Configure SquidGuard
Accessed from Services->Proxy Filter
General Settings
LDAP Options
- Enable LDAP: unticked
- Leave rest of this section as its unused.
Logging options
- Enable GUI log: ticked
- Enable log: ticked
- Enable log rotation: unticked (Sarg will be configured for this later)
Miscellaneous
- Clean advertising: ticked
Blacklist options
- Blacklist: ticked
- Blacklist proxy: empty
- Blacklist URL:
http://www.shallalist.de/Downloads/shallalist.tar.gz - Shalllist is a free for personal use blacklist. Other premium options are available but I’m reviewing if Shalla’s list will suffice before considering moving to a paid for subscription.
- Save
Blacklist tab
- Blacklist update:
http://www.shallalist.de/Downloads/shallalist.tar.gz - Click on ‘download’
Target Categories
I create two lists, one to specifically whitelist some websites, and another to blacklist additional sites which may be specific to my needs and where Shalla’s list may not inlude a particular location in their default rules.
Click ‘+’ to add a new target category for our whitelist
- Name: Whitelist
- Order:
---- - Domain List: blank
- URL list: blank
- Regular Expression: blank
- Redirect: blank
- Description: Whitelist sites
- Save
Click ‘+’ to add a new target category for our blacklist
- Name: Blacklist
- Order:
---- - Domain List: blank
- URL list: blank
- Regular Expression: Enter your own additions in here. For my example used at the top of the page I had to add
ad.singletrack.comhere. - Redirect: blank
- Description: Blacklist sites
- Save
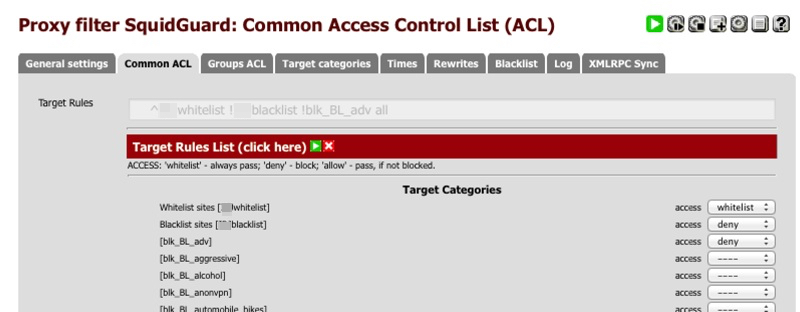
Common ACL tab
I’ve taken the option to permit all traffic and only block specfic areas, you can alternatively by default block everything and secifically allow sites if desired.
Click on target rules List
- Whitelist: Allow
- Blacklist: Deny
- blk_BL_adv: Deny
- default access all: allow
- Do not allow IP-addresses in URL: unticked
- Proxy denied error: blank (you can insert a warning string here)
- Redirect mode: int error page
- redirect info: blank
- Use safeguard engine: unticked
- Rewrite: none
- Log: ticked
- Save
The target rules box at the top of this page confirms the processing rule, the order is important. Edit the order using the Target Caegroies rules ‘order’ dropdown to ensure the order is Whitelist, Blacklist, Shalla groups, Default Access.
Configure Sarg
Accessed from Status->Sarg reports
General
Report Settings
- Proxy server: Squid
- Report Options (use ctrl to select more than one)
- Use graphics where possible
- Remove temporary files from root directory report
- generate main index html
- generate the index tree file
- Use comma instead point in reports
- Show download volume on Date/Time reports
- Report to generate
- Select All, or highlight the ones you are interested in.
- Date format: European
- Report charset: UTF-8 (Default)
- Host alias: blank
- Limit settings
- Max elapsed: 0
- Reports last limits: 0
- Report days limits: 0
- Top user limits: 0
- Denied Limit: 0
- Auth Fail limit: 0
- User report limit: 0
- Exlude settings
- Exclude string: blank
- Exclude hosts: blank
- Exclude codes: blank
- Save
Schedule tab
Click + to create new rule
- Enable: ticked
- Description: Daily report
- Sarg args:
-d `date +%d/%m/%Y` - frequency: 23h
- Action after sarg: none
- Enable compression: ticked
- Compression level: default
- Find limit: 60
- Save
Click + to create new rule
- Enable: ticked
- Description: Weekly report
- Sarg args:
-d `date -v-1w +%d/%m/%Y`- `date -v-1d +%d/%m/%Y` - frequency: 7d
- Action after sarg: none
- Enable compression: ticked
- Compression level: default
- Find limit: 60
- Save
Click + to create new rule
- Enable: ticked
- Description: Monthly report
- Sarg args:
-d `date -v-1m +01/%m/%Y`-`date -v-1m +31/%m/%Y` - frequency: 30d
- Action after sarg: none
- Enable compression: ticked
- Compression level: default
- Find limit: 60
- Save
Verify you see three rules displayed summarising the above entries.
- Save
Verifying functionality
Status dashboard
Verify the Proxy server service and Proxy Server filter service have green running icons next to them. Check system log for possible reason why they may have failed to start if they have red crosses next to them.
Go to Services->Proxy Server, Real time tab
A scrolling window will summarise cache hit status of any access. Look for some TCP_HIT or TCP_MEM_HITs to verify caching is working correctly.
Alternatively, open up a SSH session and enter tail -f /var/squid/logs/access.log to observe cache accesses.
Sarg reports
Go to Status->Sarg Reports, View Report and select the latest report.
You should see a IN-CACHE-OUT column which will summarise the percentage access which are both in and out of cache.
I didnt see huge amounts of postive caching activity immediately but it has slowly improved as my cache has become populated during normal use. I’m currently seeing just under 10% after 24 hours of population.
Advert removal
Remember to disable any Adblock software you may be running if testing on a PC.
Verify functionality is correct by loading a web page which you know displays adverts and verify they are no longer displayed.