pfSense remote access via OpenVPN
Revised 20 February 2021.
Contents
- Introduction
- Dynamic DNS
- Secure OpenVPN
- Configure OpenVPN server
- Assign OpenVPN interface
- Configure OpenVPN gateway
- Configure firewall rules
- Open VPN WAN port
- Configure DNS resolution
- Configure Network Address Translation (NAT)
- Update aliases
- Generate VPN user certificate
- Install OpenVPN Client Export wizard
- Export user certificate
- Install client software
- Verification of functionality and performance
- Revoking certificates
- References
- Changelog
Introduction
Small home or office (SOHO) setups often involve services that a user wants to access when away from the home or office, security cameras, media collections and system monitoring tools for example. One solution to access these remotely is to open a number of firewall ports. An alternative and more secure method used is to open a single port and enable access through an OpenVPN connection. This guide will build upon the pfSense baseline guide and illustrate how to configure pfSense and an iOS device to enable secure remote access.
Dynamic DNS
Most non-business internet connections provide service through a dynamic IP address as opposed to a static one. To enable remote devices to locate and access our network we can use a dynamic DNS service that can keep a DNS record updated with our networks current local WAN address. PFsense has such a service that supports a wide variety of DNS services. This guide will use Amazon’s Route 53 but the same principles apply to the other services although the authorisation settings may vary slightly.
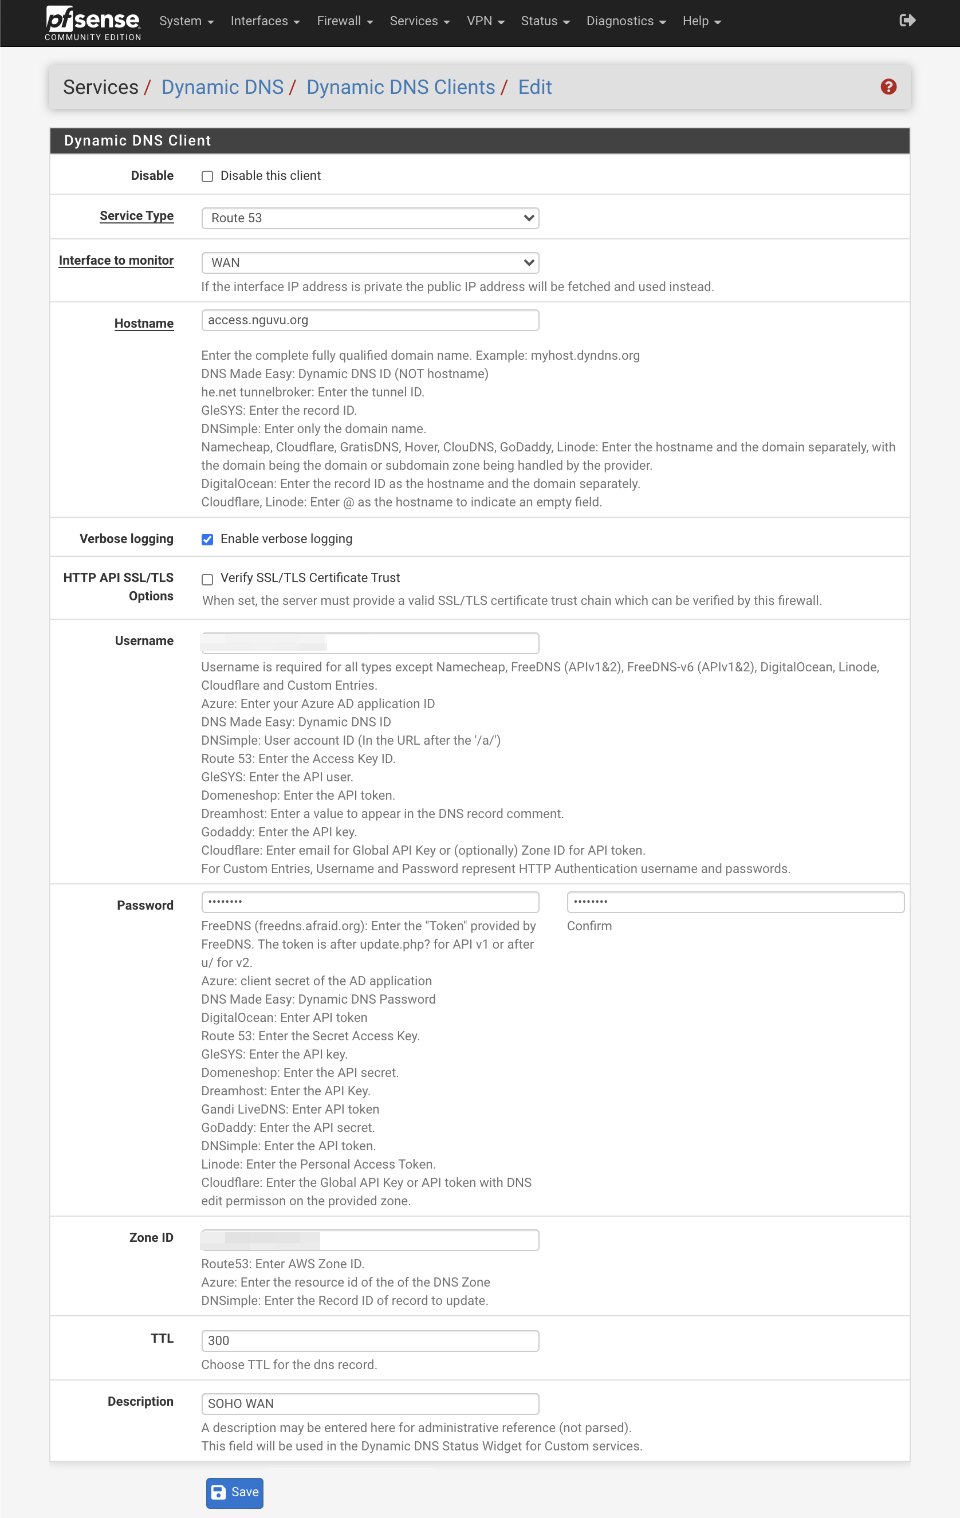
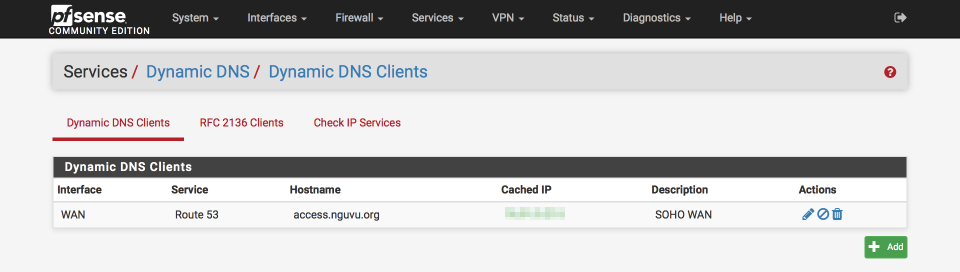
Dynamic DNS Configuration
Navigate to Services > Dynamic DNS and Click Add
- Service Type: Route53
- Interface to monitor: WAN
- Hostname: access.nguvu.org (replace with your domain)
- Verbose logging:
- HTTP API SSL/TLS Options:
- Username: Route53 Access Key ID
- Password & Password confirmation: Route53 Secret Access Key
- Zone ID: Zone ID that you received when you created your domain in Route 53
- TTL: 300
- Description: VPN access
Click Save and then Force Update
If everything is correct, your Dynamic DNS record will be updated to your WAN address. We will use this record in our VPN tunnel connection settings later.
Dynamic DNS Verification
From the command line, perform a DNS lookup to verify the correct address is correctly being returned (I’ve obfuscated the Address response below)
$ nslookup access.nguvu.org
Server:         8.8.8.8
Address:        8.8.8.8#53

Non-authoritative answer:
Name:   access.nguvu.org
Address: xxx.xxx.xxx.xxx
Secure OpenVPN
To provide secure access through OpenVPN we need to provision a Certificate Authority (CA) and generate a suitable certificate. The CA issues and validates the certificates that will secure the VPN.
Cipher selection
I decided to leave my recommendation as is for a 4096 bit RSA based system rather than a more modern elliptical curve based method for a couple of reasons.
- RSA is a proven technology and at 4096 bits, is considered secure against current compute hardware.
- Elliptical curve ciphers are less mature and haven’t been subjected to the same extensive and rigorous testing as RSA. There could be undiscovered design flaws or erroneous implementations still to be discovered.
- Snowden documents suggested that the NSA actively tried to enable surveillance by embedding weaknesses in commercially-deployed technology including at least one NIST standard.
- Several experts question the constants and believe the NSA has manipulated them.
I’ve added some links in the reference section below for further reading. I welcome feedback and suggestions as this is an area I’m actively researching.
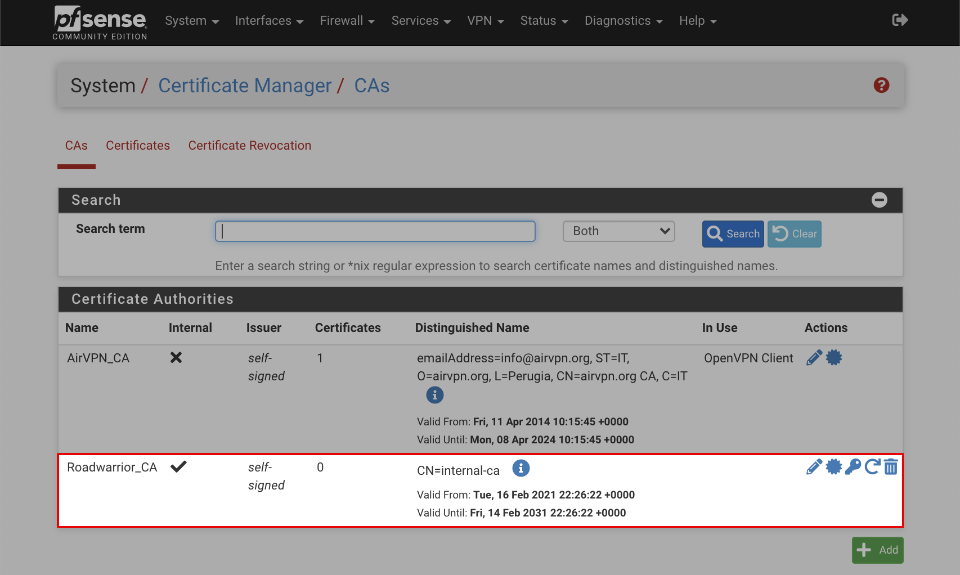
Configure Certificate Authority (CA)
Navigate to System > Cert Manager > CAs
- Click +Add
Create / Edit CA
- Descriptive Name = Roadwarrior_CA
- Method = Create an Internal Certificate Authority
- Trust Store: Add this Certificate Authority to the Operating System Trust Store:
- Randomize Serial: Use random serial numbers when signing certificates:
Internal Certificate Authority
- Key Type: RSA, 4096
- Key Length: 4096
- Digest Algorithm: SHA512
- Lifetime (Days): 3650
- Common Name: internal-ca
- Country Code: Your country or blank
- State or province: Your State or blank
- City: Your City or blank
- Organization: Your Company or blank
- Organizational Unit: Your department name or blank
Save
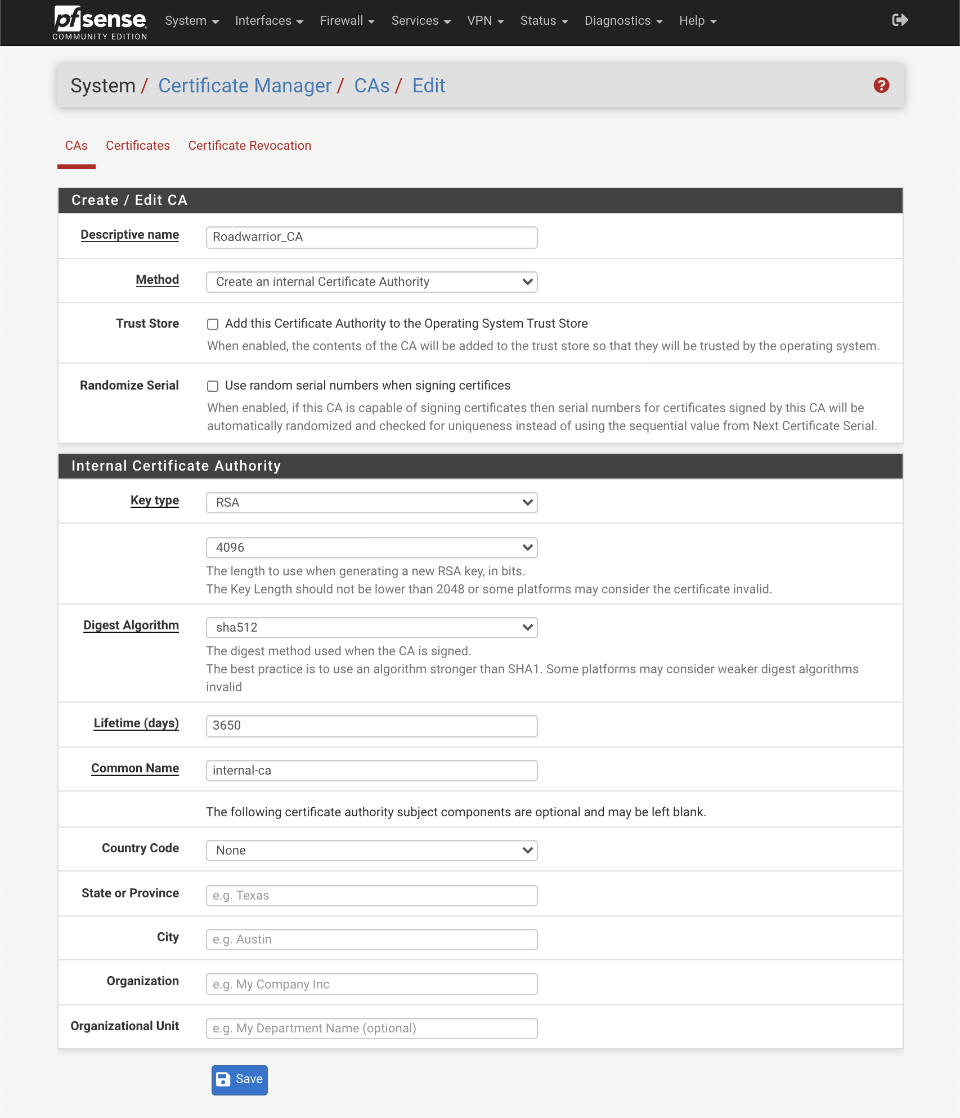
Verify your certificate authority looks like this when done
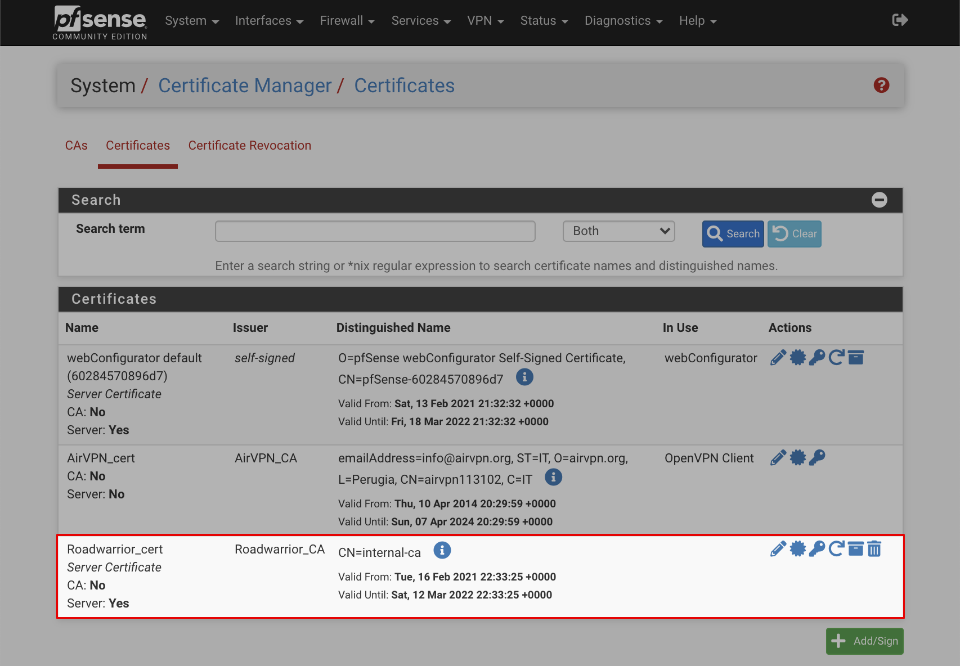
Generate certificate
Navigate to System > Cert Manager > Certificates
-
Click Add/Sign
- Method: Create an internal certificate
- Descriptive name: Roadwarrior_cert
Internal Certificate
- Certificate authority: Roadwarrior_CA
- Key Type: RSA, 4096
- Digest Algorithm: SHA512
- Lifetime (Days): 398 (Server certificates should not have a lifetime over 398 days or some platforms may consider the certificate invalid)
- Common Name: internal-ca
- Country Code: Your country or blank
- State or province: Your State or blank
- City: Your City or blank
- Organization: Your Company or blank
- Organizational Unit: Your department name or blank
Certificate Attributes
- Certificate Type = Server certificate
- Alternative names
- Type: FQDN or Hostname
- Value: empty
Save
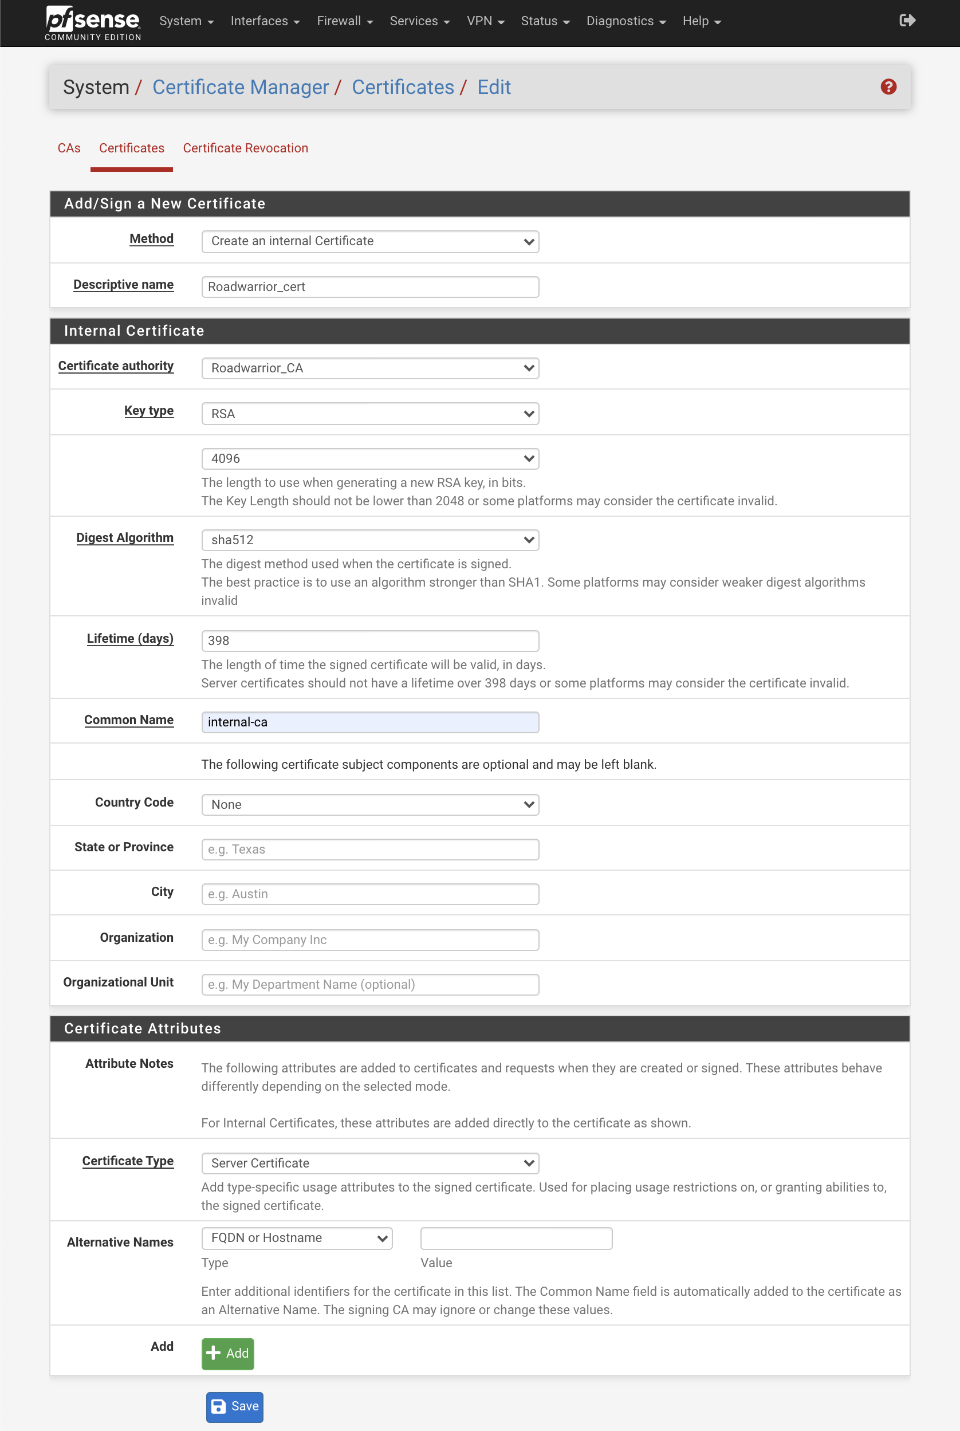
Verify your certificate looks like this when done
Configure Certificate Revocation List
The Certificate Revocation List (CRL) will allow certificates to be expired.
Navigate to System > Certificates > Certificate Revocation
- Next to Roadwarrior_CA, Click on Add or Import CRL
- Method = Create an internal Certificate Revocation List
- Descriptive name = Roadwarrior CRL
- Certificate Authority: Roadwarrior_CA
Internal Certificate Revocation List
- Lifetime Days = 9999
- Serial 0
Click Save
Configure OpenVPN server
This section will configure a secure OpenVPN server running on port 443 rather than the default OpenVPN port of 1194. This reduces the likelihood of a remote network preventing access to your local infrastructure because port 1194 is not permitted or open.
Navigate to VPN > OpenVPN > Server
Click +Add
General Information
- Disabled:
- Server Mode: Remote Access (SSL/TLS)
- Protocol: UDP on IPv4 only
- Device mode: tun Layer 3 Tunnel Mode
- Interface: WAN
- Port: 443
- Description: Roadwarrior VPN
Cryptographic settings
- TLS Configuration:
- Automatically generate a shared TLS authentication key =
- Peer certificate authority = Roadwarrior_CA
- Peer certificate revocation list = Roadwarrior_CRL (CA: Roadwarrior_CA)
- OSCP Check: Check client certificates with OCSP
- Server certificate: Roadwarrior_cert (Server Yes, CA: Roadwarrior_CA)
- DH Parameter Length: 4096 bit
- ECDH curve: Use Default
- Data Encryption Negotiation:
- Allowed Data Encryption Algorithms: AES-256-GCM
- Fallback Data Encryption Algorithm: AES-256-CBC
- Auth Digest algorithm: SHA512 (512 bit)
- Hardware crypto: Intel RDRAND engine - RAND
- Certificate Depth: One (Client + Server)
Tunnel Settings
- IPv4 Tunnel: 192.168.200.0/24
- IPv6 Tunnel: blank
- Redirect IPv4 Gateway: Force all client generated traffic through the tunnel.
- Redirect IPv6 Gateway:
- IPv4 Local network(s): empty
- IPv6 Local network(s): empty
- Concurrent Connections: empty
- Compression: Refuse any non-stub compression (most secure)
- Push compression:
- Type-of-service:
- Inter-client communication:
- Duplicate Connection:
Client Settings
- Dynamic IP: Allow connected clients to retain their connections if their IP address changes.
- Topology: Subnet - One IP address per client in common subnet
Ping Settings
- Inactive: 0
- Ping method: keepalive - use keepalive helper to define ping configuration
- Interval: 5
- Timeout: 30
Advanced Client Settings
- DNS Default Domain:
- DNS Default Domain: local.lan
- DNS Server enable:
- DNS Server 1: 192.168.200.1
- DNS Server 2: empty
- DNS Server 3: empty
- DNS Server 4: empty
- Block Outside DNS:
- Force DNS cache update:
- NTP Server Enable:
- NTP Server 1: 192.168.200.1
- NTP Server 2: blank
- NetBIOS enable:
Advanced Configuration
- Custom options =
mute-replay-warningsmaybe beneficial if you replay warnings in the OpenVPN logs - UDP Fast I/O =
- Exity notify: Reconnect to this server, retry once
- Send/receive buffer = 512KiB
- Gateway creation: IPv4 only
- Verbosity level: default
- Save

Assign OpenVPN interface
Create an interface for the OpenVPN server to support the configuration of firewall rules and enable other services such as NTP & DNS.
Navigate to Interfaces > Assign
Select ‘ovpns4 (Roadwarrior VPN)’
Click Add
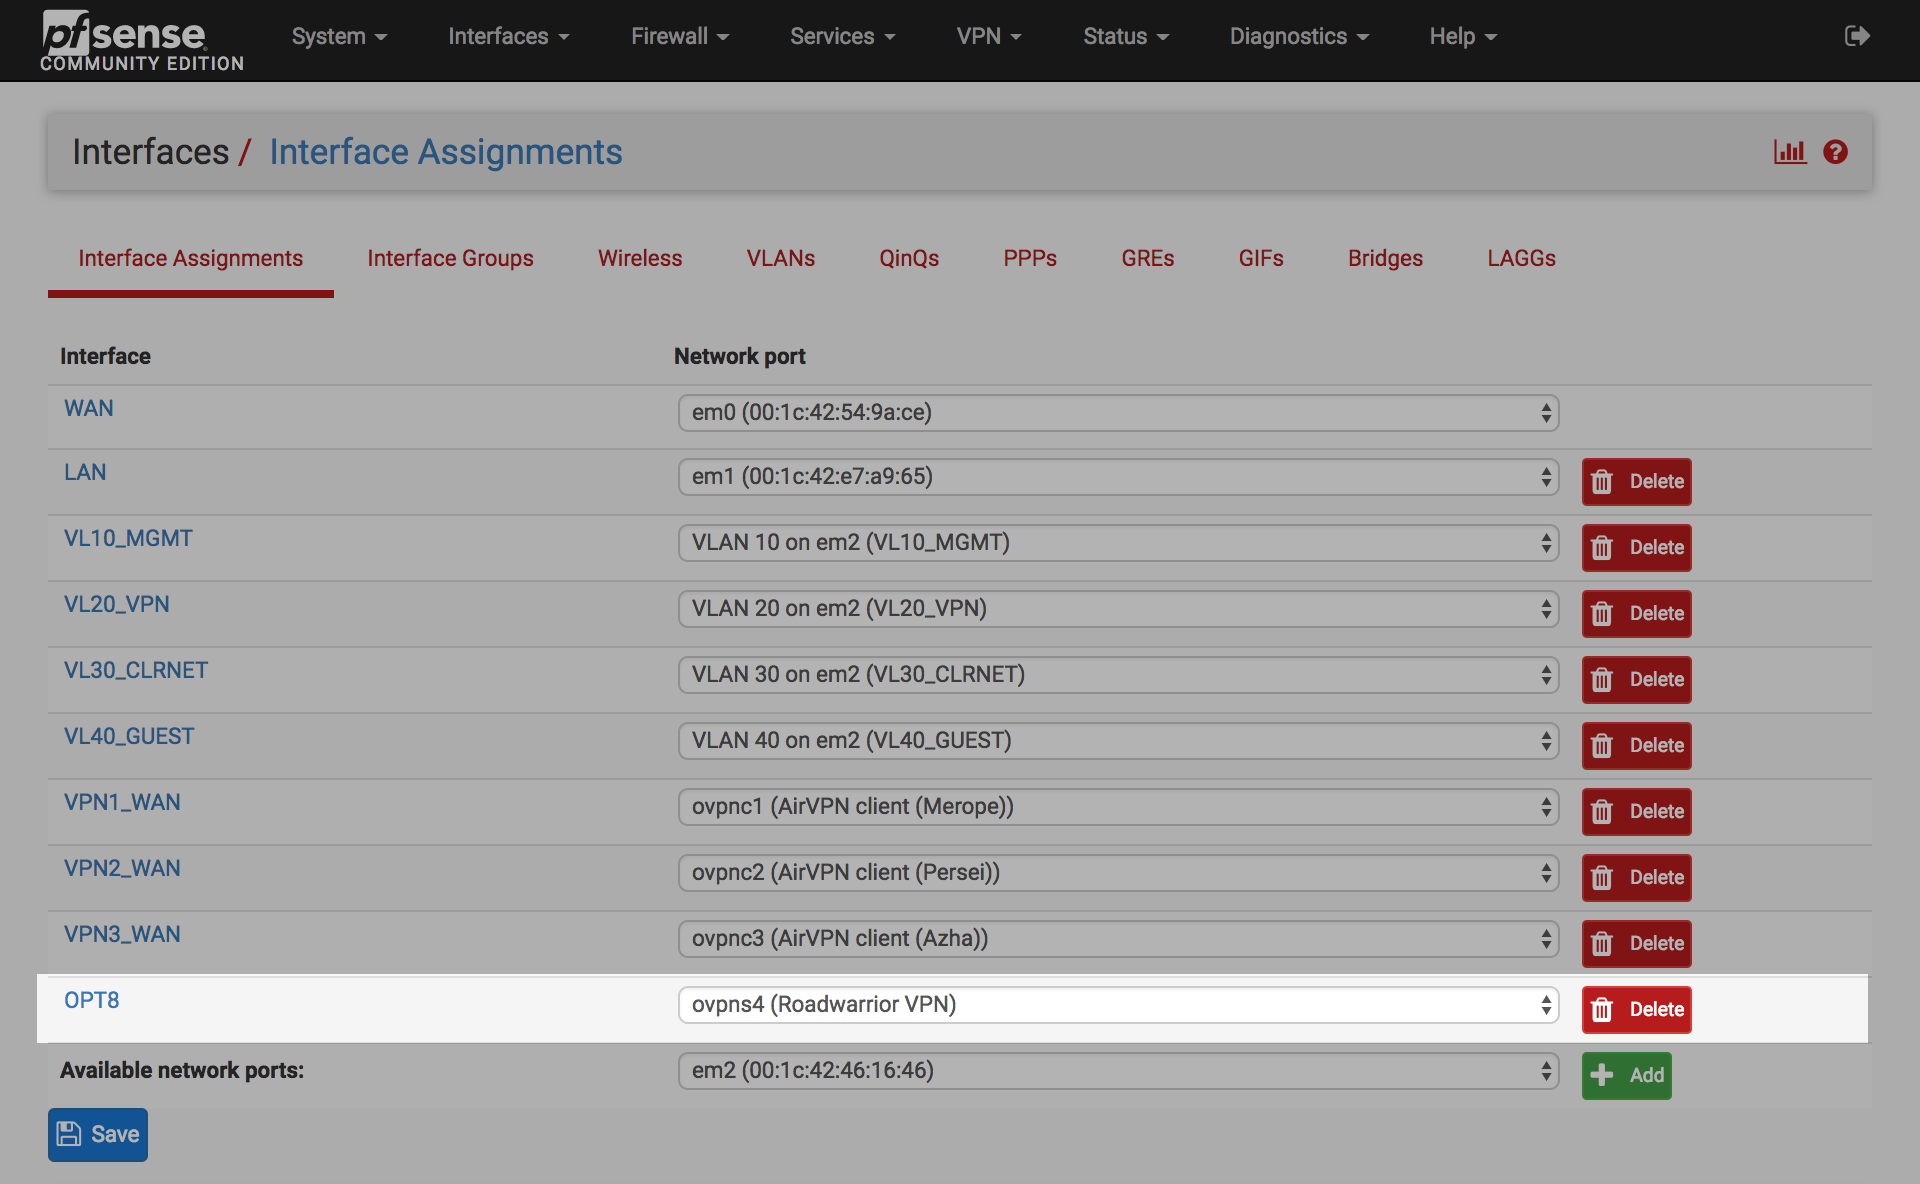
Click on the OPTx interface next to Roadwarrior VPN Network port
- Enable =
- Description = RW_VPN
- IPv4 Configuration Type = None
- IPv6 Configuration Type = None
- Mac controls : Blank
- MTU = blank
- MSS = blank
- Block private networks =
- Block bogon networks =
- Save & Apply changes
After saving and applying the configuration, the interface should look similar to this

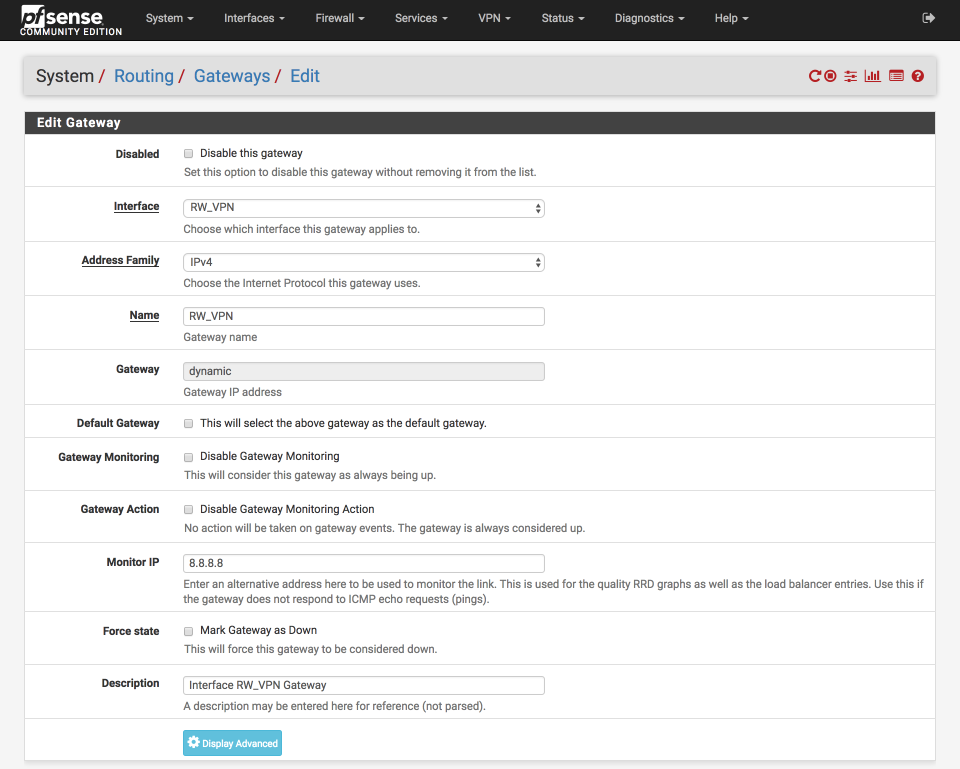
Configure OpenVPN gateway
Navigate to System > Routing
Click ‘copy gateway’ icon next to RW_VPN_VPNV4 gateway
- Disabled =
- Interface = RW_VPN
- Address Family = IPv4
- Name = RW_VPN
- Gateway = Dynamic
- Default Gateway =
- Gateway Monitoring =
- Gateway Action =
- Monitor IP = 8.8.8.8 or use another reliable public DNS server
- Description = Interface RW_VPN Gateway
- Save & Apply
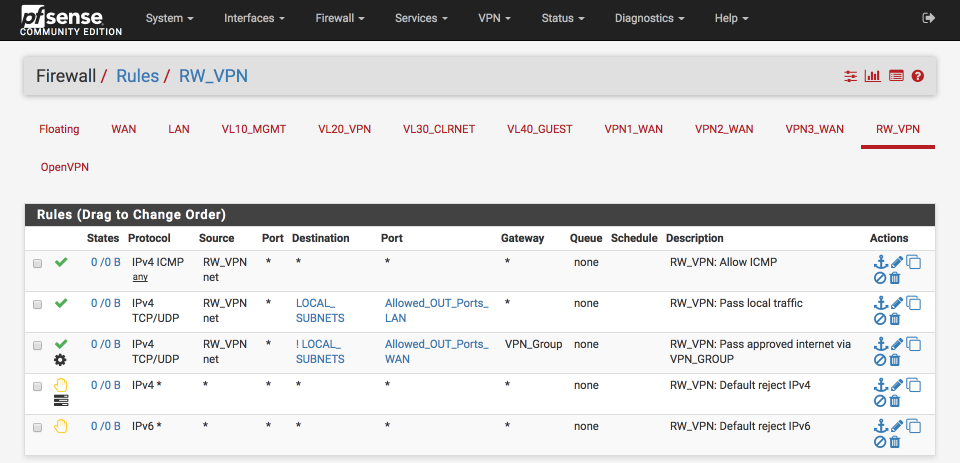
Configure firewall rules
This section makes uses of several aliases that were configured as part of my pfSense baseline guide.
This section will setup firewall rules for the OpenVPN interface to provide the following access:-
- Allow ping for network debugging
- Allow access to
LOCAL_SUBNETSonly on approved ports (Allowed_OUT_ports_LAN) - Allow internet access via the VPN gateway group only on approved ports (
Allowed_OUT_ports_WAN)
Navigate to Firewall > Rules and select RW_VPN
Allow Pings for network diagnostics
- Click ‘↴+’
- Action: Pass
- Disabled:
- Interface: RW_VPN
- Address Family: IPv4
- Protocol: ICMP
- ICMP Type: Any
- Source: RW_VPN net
- Destination: Any
- Log:
- Description: RW_VPN: Pass ICMP
- Click [Save]
Allow traffic to local subnets (LOCAL_SUBNETS) on permitted ports (Allowed_OUT_ports_LAN).
- Click ‘↴+’
- Action: Pass
- Disabled:
- Interface: RW_VPN
- Address Family: IPv4
- Protocol: TCP/UDP
- Source: RW_VPN net
- Destination:
- invert match:
- Single host or alias
- LOCAL_SUBNETS - Destination Port Range:
- From: Other
- Custom: Allowed_OUT_ports_LAN
- To: Other
- Custom: Allowed_OUT_ports_LAN - Log:
- Description: RW_VPN: Pass local traffic
- Click [Save]
Pass approved internet bound traffic out the VPN gateway
- Click ‘↴+’
- Action: Pass
- Disabled =
- Interface: RW_VPN
- Address Family: IPv4
- Protocol: TCP/UDP
- Source: RW_VPN net
- Destination:
- Invert Match:
- Single host or alias
- Address: LOCAL_SUBNETS - Destination Port Range:
- From: Other
- Custom: Allowed_OUT_ports_WAN
- To: Other
- Custom: Allowed_OUT_ports_WAN - Log =
- Description: RW_VPN: Pass approved internet via VPN_GROUP
- Click Advanced Options
- Gateway: VPN_Group
- Click [Save]
Default Block & log IPv4
- Click ‘↴+’
- Action: Reject
- Disabled =
- Interface: RW_VPN
- Address Family: IPv4
- Protocol: any
- Source: Any
- Destination: Any
- Log:
- Description: RW_VPN: Default reject IPv4
- Click [Save]
Block default IPv6
- Click ‘↴+’
- Action: Reject
- Disbaled =
- Interface: RW_VPN
- Address Family: IPv6
- Protocol: any
- Source: Any
- Destination: Any
- Log:
- Description: RW_VPN: Default reject IPv6
- Click [Save]
The RW_VPN interface should look this this complete.
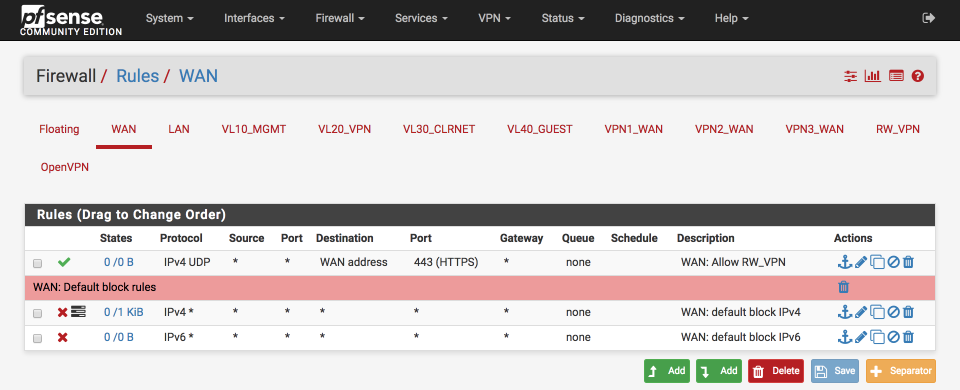
Open VPN WAN port
To enable devices to connect to the OpenVPN server the firewall needs port 443 opening.
Navigate to Firewall > WAN
Select ↑Add
- Action: Pass
- Disabled:
- Interface: WAN
- Address family: IPv4
- Protocol: UDP
- Source: Any
- Destination:
- Invert match:
- Address: WAN address - Destination Port Range:
- From: HTTPS (443)
- To: HTTPS (443) - Log:
- Description: WAN: Allow RW_VPN
- Save & Apply
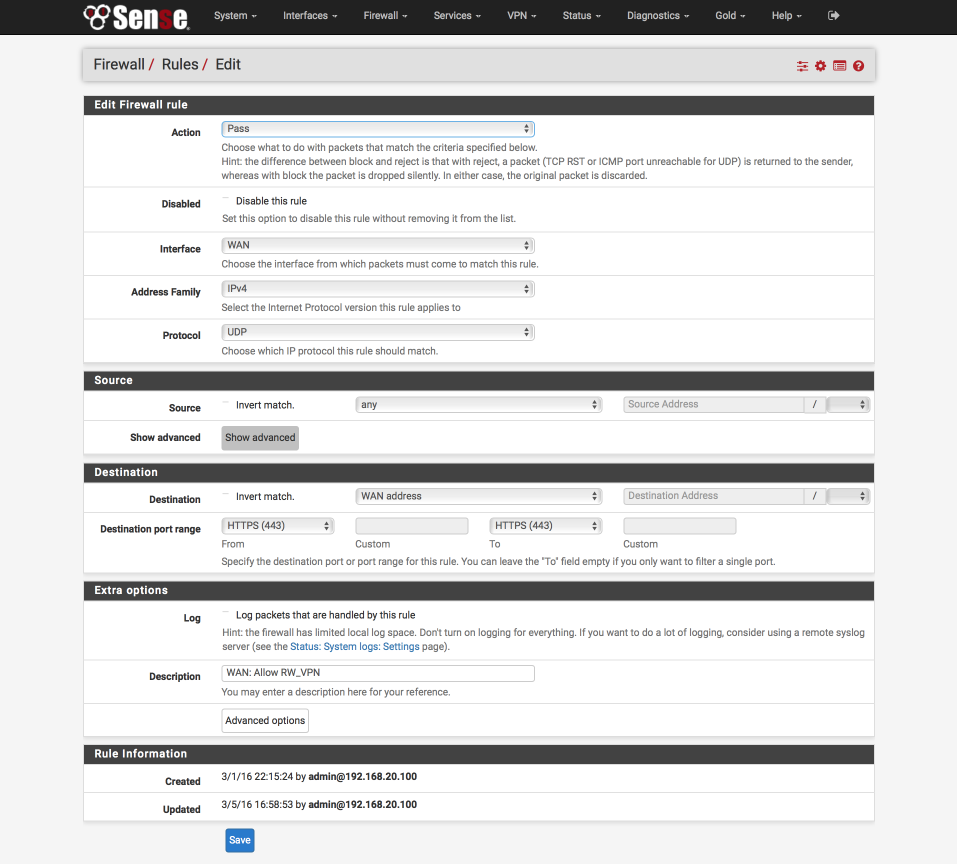
Your WAN interface should look this this when done.
Configure DNS resolution
Navigate to Services > DNS Resolver
Under Network interfaces dropdown, verify and add the RW_VPN is selected
Save & Apply
Configure Network Address Translation (NAT)
NAT is needed to convert private local IP addresses (192.168.200.0/24) to the global address space for broadcast on the internet. This section will illustrate how to configure this for our VPN_WAN gateway (or gateways if you have already followed my multiple-VPN failover guide).
Navigate to Firewall > NAT and select the Outbound tab
Create ‘RW_VPN to VPN_WAN` NAT
Click ↴Add
- Disabled:
- Do not NAT:
- Interface: VPN_WAN
- Protocol: any
- Source
- Type: Network
- Source Network: 192.168.200.0 / 24
- Source port: Blank - Destination
- Type: Any
- Address: Blank
- Destination Port: Blank - Not :
- Translation
- Address: Interface Address
- Port: - Miscellaneous
- Description: RW_VPN to VPN_WAN - Click Save
Create ‘RW_VPN to VPN2_WAN` NAT
Click ↴Add
- Disabled:
- Do not NAT:
- Interface: VPN2_WAN
- Protocol: any
- Source
- Type: Network
- Source Network: 192.168.200.0 / 24
- Source port: Blank - Destination
- Type: Any
- Address: Blank
- Destination Port: Blank - Not :
- Translation
- Address: Interface Address
- Port: - Miscellaneous
- Description: RW_VPN to VPN2_WAN - Click Save
Create ‘RW_VPN to VPN_WAN` NAT
Click ↴Add
- Disabled:
- Do not NAT:
- Interface: VPN3_WAN
- Protocol: any
- Source
- Type: Network
- Source Network: 192.168.200.0 / 24
- Source port: Blank - Destination
- Type: Any
- Address: Blank
- Destination Port: Blank - Not :
- Translation
- Address: Interface Address
- Port: - Miscellaneous
- Description: RW_VPN to VPN3_WAN - Click Save
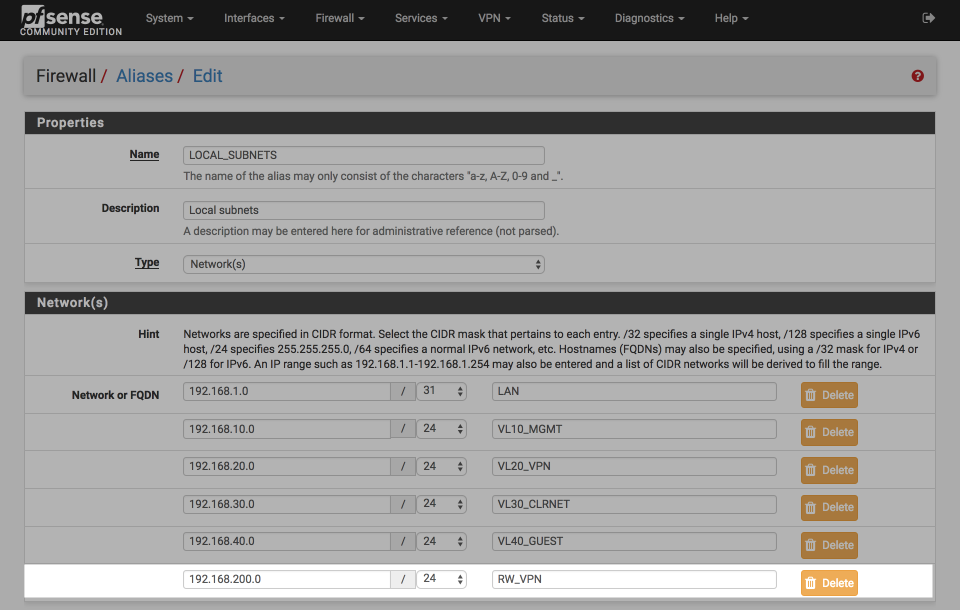
Update aliases
The LOCAL_SUBNETS alias is used to identify internal and external networks. Verify the RW_VPN address range (192.168.200.0/24) is included in the alias so policy routing continues to function correctly. If you followed a later revision of my baseline guide, you may instead have a 192.168.0.0/16 entry, if so this already includes the `192.168.200.0/24 subnet.
Navigate to Firewall > Aliases
Click the pencil icon next to the LOCAL_SUBNETS alias to edit the list
Add the RW_VPN address range, i.e
- 192.168.200.0 / 24 “RW_VPN”
Click Save & Apply
Your LOCAL_SUBNETS alias should look this this when done.
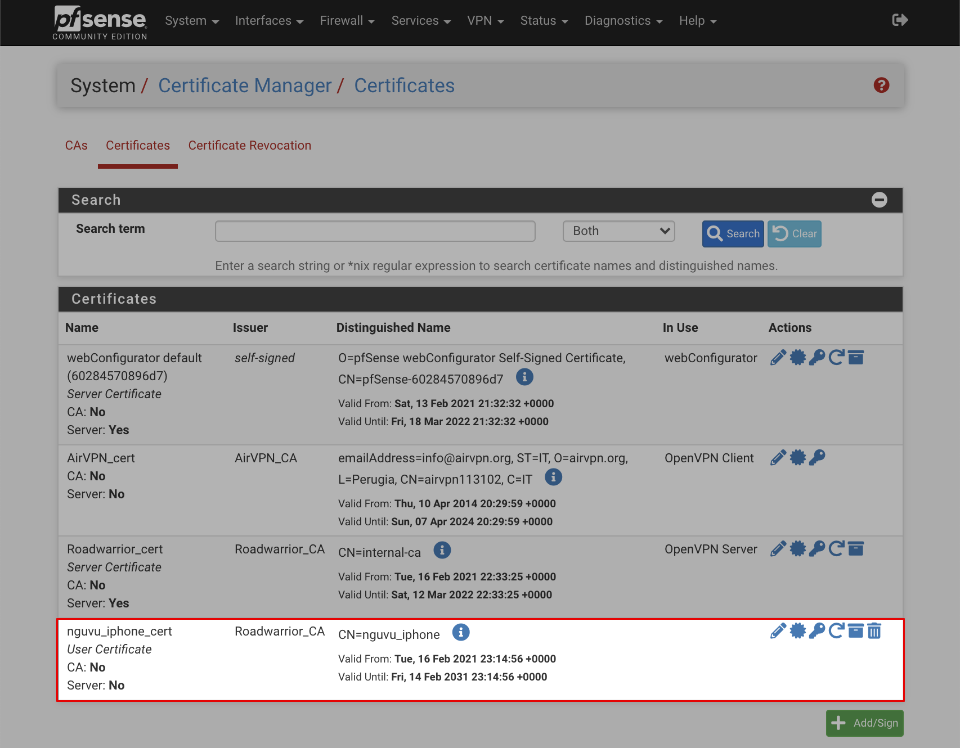
Generate VPN user certificate
This section will illustrate how to create a client certificate suitable for an specific user or device to connect remotely. Although its possible to configure OpenVPN to accept the same certificate from multiple clients, its a less secure solution and avoided here.
Navigate to System > Cert Manager > Certificates
Click Add/Sign
- Method: Create an internal certificate
- Descriptive name: nguvu_iphone_cert
Internal Certificate
- Certificate authority: Roadwarrior_CA
- Key type: RSA, 4096
- Digest Algorithm: SHA512
- Lifetime (Days): 3650
- Common Name: memorable name for this certificate, e.g nguvu_iphone
- Country Code: Your country or blank
- State or province: Your State or blank
- City: Your City or blank
- Organization: Your Organisation or blank
- e-mail Address: Your email or blank
Certificate Attributes
- Certificate Type: User certificate
- Alternative names: FQDN or Hostname blank
- Save
When complete the certificate summary should look similar to this.
Install OpenVPN Client Export wizard
The Client Export Wizard simplifies the export of client certificates in a format compatible with a number of devices and software packages.
Navigate to System > Packages > Available packages and click Install next to the OpenVPN-client-export to install the utility.
A window will display installation progress…
>>> Installing pfSense-pkg-openvpn-client-export...
Updating pfSense-core repository catalogue...
pfSense-core repository is up to date.
Updating pfSense repository catalogue...
pfSense repository is up to date.
All repositories are up to date.
The following 4 package(s) will be affected (of 0 checked):

New packages to be INSTALLED:
        openvpn-client-export: 2.5.0 [pfSense]
        p7zip: 16.02_3 [pfSense]
        pfSense-pkg-openvpn-client-export: 1.5_5 [pfSense]
        zip: 3.0_1 [pfSense]

Number of packages to be installed: 4

The process will require 23 MiB more space.
16 MiB to be downloaded.
[1/4] Fetching pfSense-pkg-openvpn-client-export-1.5_5.txz: ... done
[2/4] Fetching openvpn-client-export-2.5.0.txz: .......... done
[3/4] Fetching zip-3.0_1.txz: .......... done
[4/4] Fetching p7zip-16.02_3.txz: .......... done
Checking integrity... done (0 conflicting)
[1/4] Installing openvpn-client-export-2.5.0...
[1/4] Extracting openvpn-client-export-2.5.0: .......... done
[2/4] Installing zip-3.0_1...
[2/4] Extracting zip-3.0_1: .......... done
[3/4] Installing p7zip-16.02_3...
[3/4] Extracting p7zip-16.02_3: .......... done
[4/4] Installing pfSense-pkg-openvpn-client-export-1.5_5...
[4/4] Extracting pfSense-pkg-openvpn-client-export-1.5_5: .......... done
Saving updated package information...
done.
Loading package configuration... done.
Configuring package components...
Loading package instructions...
Custom commands...
Writing configuration... done.
>>> Cleaning up cache... done.
Success
Export user certificate
Navigate to VPN > OpenVPN and select Client Export tab. Configure as follows:-
OpenVPN Server
- Remote Access Server: Roadwarrior VPN UDP:443
Client Connection Behaviour
- Host name Resolution: Other
- hostname: access.nguvu.org (replace with your dynamic hostname you setup earlier)
- Verify Server CN: Automatic - Use verify-x509-name where possible
- Block outside DNS:
- Legacy Client:
- Silent Installer:
- Use Random local port:
Certificate export options
- PKCS#11 Certificate storage: Use PKCS#11 storage device (cryptographic token, HSM, smart card) instead of local files.
- Microsoft certificate storage: Use Microsoft Certificate Storage instead of local files.
- Password protect certificate: Use a password to protect the pkcs12 file contents or key in Viscosity bundle.
Proxy Options
- Use a proxy: Use proxy to communicate with the OpenVPN server.
Advanced
- Additional configuration options: empty
Click Save as default
Certificates can be exported by selecting one of the options to the right of each certificate.
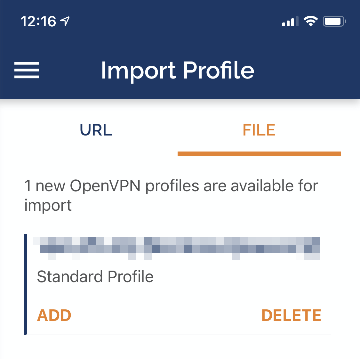
Click on OpenVPN connect (Android or iOS) and a .ovpn configuration file will be downloaded to your desktop.
Install client software
The official OpenVPN connect client (iOS & Android) applications provide easy to use and secure OpenVPN functionality and can utilise the the exported .ovpn configuration file.
There are many ways to transfer the configuration file to your device. Please be mindful of the security risks transferring this file via a third party service such as email or dropbox. This file contains all the details needed to access your network remotely so its worth taking precautions to prevent it being compromised. Consider using self hosted file storage systems such as Seafile or direct connection utilities such as Instashare.
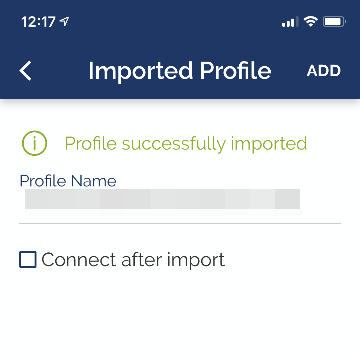
Having transferred the configuration file to the mobile device, there wll be a prompt to add the connection profile.
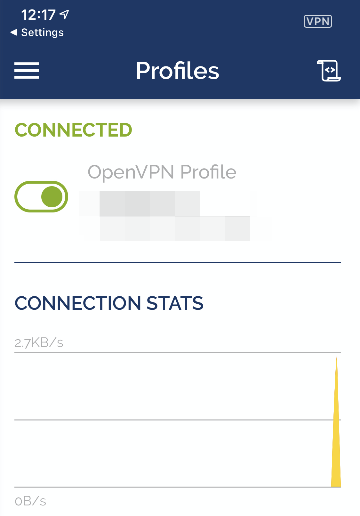
Once imported its possible to finally connect.
Assuming everything has gone well, your mobile device should connect to your OpenVPN server.
If the connection isn’t successful, inspect the logs available within the application.

Here’s a log example for reference
2021-02-16 15:23:35 ----- OpenVPN Start -----
OpenVPN core 3.git::58b92569 ios arm64 64-bit
2021-02-16 15:23:35 OpenVPN core 3.git::58b92569 ios arm64 64-bit
2021-02-16 15:23:35 Frame=512/2048/512 mssfix-ctrl=1250
2021-02-16 15:23:35 UNUSED OPTIONS
0 [persist-tun]
1 [persist-key]
2 [data-ciphers] [AES-256-GCM:AES-256-CBC]
3 [data-ciphers-fallback] [AES-256-CBC]
5 [tls-client]
8 [block-outside-dns]
9 [lport] [0]
10 [verify-x509-name] [internal-ca] [name]

2021-02-16 15:23:35 EVENT: RESOLVE
2021-02-16 15:23:35 Contacting [xxx.xxx.xxx.xxx]:443/UDP via UDP
2021-02-16 15:23:35 EVENT: WAIT
2021-02-16 15:23:35 Connecting to [access.nguvu.org]:443 (xxx.xxx.xxx.xxx) via UDPv4
2021-02-16 15:23:35 EVENT: CONNECTING
2021-02-16 15:23:35 Tunnel Options:V4,dev-type tun,link-mtu 1585,tun-mtu 1500,proto UDPv4,cipher BF-CBC,auth SHA512,keysize 128,key-method 2,tls-client
2021-02-16 15:23:35 Creds: UsernameEmpty/PasswordEmpty
2021-02-16 15:23:35 Peer Info:
IV_VER=3.git::58b92569
IV_PLAT=ios
IV_NCP=2
IV_TCPNL=1
IV_PROTO=2
IV_IPv6=0
IV_AUTO_SESS=1
IV_GUI_VER=net.openvpn.connect.ios_3.2.3-3760
IV_SSO=openurl
IV_BS64DL=1

2021-02-16 15:23:35 VERIFY OK: depth=1, /CN=internal-ca
2021-02-16 15:23:35 VERIFY OK: depth=0, /CN=internal-ca
2021-02-16 15:23:35 SSL Handshake: CN=internal-ca, TLSv1.3, cipher TLSv1.3 TLS_AES_256_GCM_SHA384
2021-02-16 15:23:35 Session is ACTIVE
2021-02-16 15:23:35 EVENT: GET_CONFIG
2021-02-16 15:23:35 Sending PUSH_REQUEST to server...
2021-02-16 15:23:35 OPTIONS:
0 [dhcp-option] [DOMAIN] [local.lan]
1 [dhcp-option] [DNS] [192.168.200.1]
2 [block-outside-dns]
3 [register-dns]
4 [dhcp-option] [NTP] [192.168.200.1]
5 [redirect-gateway] [def1]
6 [route-gateway] [192.168.200.1]
7 [topology] [subnet]
8 [ping] [5]
9 [ping-restart] [30]
10 [ifconfig] [192.168.200.2] [255.255.255.0]
11 [peer-id] [0]
12 [cipher] [AES-256-GCM]
13 [block-ipv6]

2021-02-16 15:23:35 PROTOCOL OPTIONS:
  cipher: AES-256-GCM
  digest: NONE
  compress: NONE
  peer ID: 0

2021-02-16 15:23:35 EVENT: ASSIGN_IP
2021-02-16 15:23:35 NIP: preparing TUN network settings
2021-02-16 15:23:35 NIP: init TUN network settings with endpoint: xxx.xxx.xxx.xxx
2021-02-16 15:23:35 NIP: adding IPv4 address to network settings 192.168.200.2/255.255.255.0
2021-02-16 15:23:35 NIP: adding (included) IPv4 route 192.168.200.0/24
2021-02-16 15:23:35 NIP: redirecting all IPv4 traffic to TUN interface
2021-02-16 15:23:35 NIP: adding match domain local.lan
2021-02-16 15:23:35 NIP: adding DNS 192.168.200.1
2021-02-16 15:23:35 NIP: blocking all IPv6 traffic
2021-02-16 15:23:35 Connected via NetworkExtensionTUN
2021-02-16 15:23:35 EVENT: CONNECTED access.nguvu.org:443 (xxx.xxx.xxx.xxx) via /UDPv4 on NetworkExtensionTUN/192.168.200.2/ gw=[/]
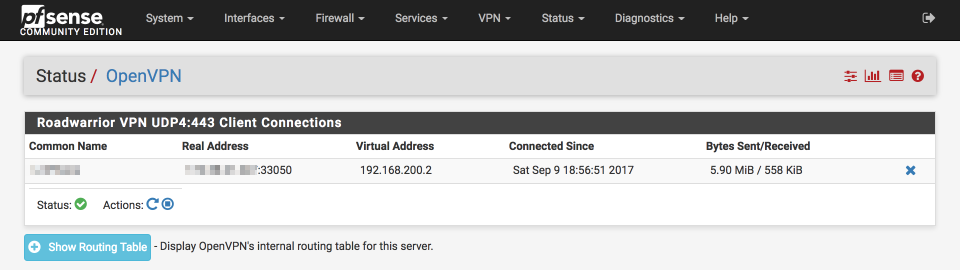
Verification of functionality and performance
Navigate to Status > OpenVPN
Verify the OpenVPN tunnel is connected as expected
Revoking certificates
To expire a certificate, Navigate to System > Cert Manager > Cert Revocation
- Click Edit CRL next to Roadwarrior_CRL
Select the certificate to expire, enter a reason and select ‘Add’
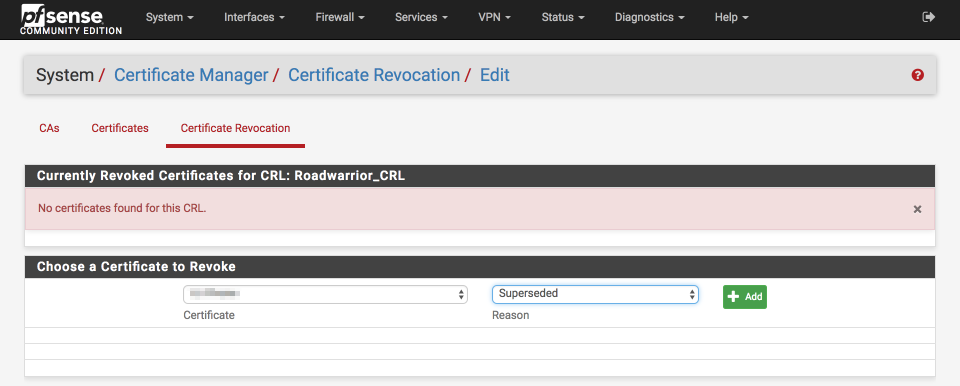
The certificate will now be revoked and access denied. It is possible to reinstall the certificate by deleting the revocation with the blue ‘x’ on the right of the screen.
References
torproject: NIST approved crypto in Tor
Wikipedia:Dual_EC_DRBG
New York Times: N.S.A. Able to Foil Basic Safeguards of Privacy on Web
CryptoExchange: Should we trust the NIST-recommended ECC parameters
Safecurves
Changelog
20 February 2021
Updates for pfSense 2.5
Updates for OpenVPN 2.5
Added reasoning around RSA preferences over ECC ciphers
15 January 2018
Fixed error in certificate export instruction
Fixed typos
2 November 2017
Fixed roadwarrior certificate server type error
Fixed RW_VPN NAT section