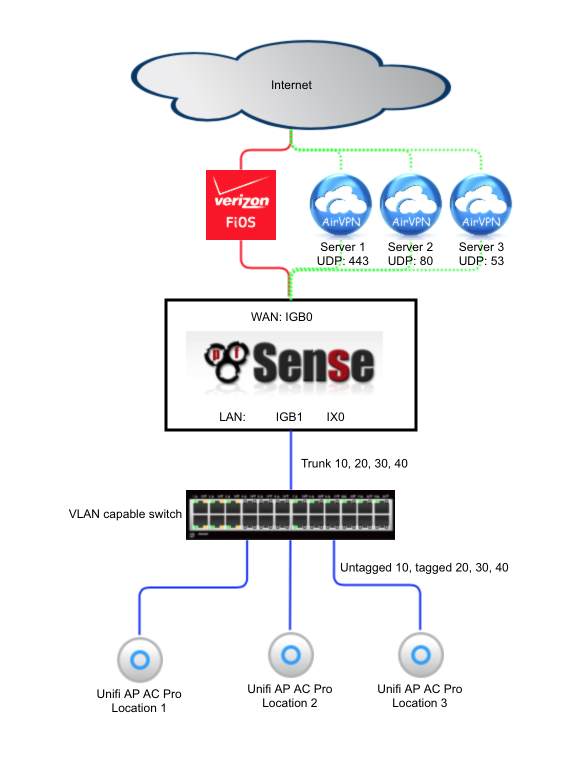
pfSense multi VPN WAN.
Last revised 20 February 2021.
Contents
- Introduction
- Identify optimal servers
- Create VPN connections
- Create VPN interfaces
- Create Gateways
- Create NAT rules
- Create firewall rules
- Update DNS servers
- Create gateway group
- Sticky connections
- Validate functionality and performance
- Verify DNS results and leak test
Introduction
AirVPN supports up to five simultaneous VPN connections per account. Appropriately configured this can provide some degree of failover protection from an AirVPN server suffering an outage or degraded service. One item to note is that OpenVPN is single-threaded so regardless of how many processors or threads are provided by the CPU, OpenVPN will be limited to a single thread. It can be beneficial, especially on lower specification processors, to load balance across multiple OpenVPN connections to maximize throughput.
This guide will illustrate how to configure three OpenVPN servers and load-balance traffic across the group.
Identify optimal servers
The first requirement is to identify the optimal servers. I select servers that reside in a variety of datacenters, and those with the lowest latencies from my location. ping can be used to establish response times either from the command line, or from pfSense’s Diagnostics > Ping menu.
$ ping -c 3 sabik.airvpn.org
PING sabik.airvpn.org (199.241.147.34): 56 data bytes
64 bytes from 199.241.147.34: icmp_seq=0 ttl=51 time=40.013 ms
64 bytes from 199.241.147.34: icmp_seq=1 ttl=51 time=25.806 ms
64 bytes from 199.241.147.34: icmp_seq=2 ttl=51 time=37.330 ms

--- sabik.airvpn.org ping statistics ---
3 packets transmitted, 3 packets received, 0.0% packet loss
round-trip min/avg/max/stddev = 25.806/34.383/40.013/6.163 ms
This process generated the following table for a selection of USA based servers. Avoid selecting multiple servers in the same data center, usually identified by similar IP address, for example 199.241.146.162 and 199.241.146.178 are likely to be collocated. Spreading traffic across multiple-data centers reduces the impact if one datacenter suffers an outage or degraded service.
| Server | Location | IP address | Ping (ms) |
|---|---|---|---|
| Merope | Los Angeles | 199.241.146.162 | 21.334 |
| Alkes | Los Angeles | 199.241.146.178 | 24.633 |
| Persei | Fremont | 94.100.23.162 | 27.671 |
| Sabik | Los Angeles | 199.241.147.34 | 34.383 |
| Heze | Fremont | 46.21.151.106 | 43.066 |
| Chamaeleon | Dallas | 199.249.230.41 | 56.46 |
| Azha | Atlanta | 104.129.24.186 | 64.731 |
| Alberio | Atlanta | 104.129.24.178 | 66.018 |
| Draco | Dallas | 64.120.63.90 | 76.003 |
| Alkaid | Chicago | 46.21.154.82 | 84.540 |
| Aquarius | Chicago | 173.234.62.154 | 90.624 |
| Pavonis | Chicago | 149.255.33.154 | 93.368 |
| Pollux | Jacksonville | 198.203.28.42 | 94.217 |
| Metallah | Pennsylvania | 104.243.24.235 | 98.978 |
| Yildun | Miami | 173.44.55.178 | 110.120 |
| Cursa | Miami | 96.47.229.58 | 112.890 |
| Acamar | Miami | 173.44.55.154 | 119.834 |
| Miaplacidus | Newark | 173.234.159.194 | 142.167 |
Create VPN connections
To reduce routing complexity each server connection will be via a different port number providing a different subnet. UPD connections are preferred as these offer greater performance over TCP connections.
| Connection | IP | Server | Port & Protocol | IP | DNS | |
|---|---|---|---|---|---|---|
| 1 | Merope | Los Angeles | 199.241.146.162 | 443, UDP | 10.4.x.x | 10.4.0.1 |
| 2 | Persei | Fremont | 94.100.23.162 | 80, UDP | 10.6.x.x | 10.6.0.1 |
| 3 | Azha | Atlanta | 104.129.24.186 | 2018, UDP | 10.8.x.x | 10.8.0.1 |
Create the first OpenVPN connection
If you followed the pfSense baseline guide and already have a working single VPN system, skip this step and move forward create the second connection.
Navigate to VPN > OpenVPN and select Clients
- Click ‘+ Add’
General Information
- Disable this client:
- Server Mode: Peer to Peer (SSL/TLS)
- Protocol: UDP on IPv4 only
- Device mode: tun - Layer 3 Tunnel Mode
- Interface: WAN
- Local Port: empty
- Server host: 199.241.146.162
- Server port: 443
- Proxy host or address: empty
- Proxy Port: empty
- Proxy authentication: none
- Description: AirVPN client
User Authentication Settings
- Username: Empty
- Password: Empty
- Authentication Retry:
Cryptographic settings
- TLS Configuration: Use a TLS Key
- Automatically generate a TLS Key:
- TLS Key: Paste contents of the ta.key downloaded here
- TLS Key Usage Mode: TLS Encryption and Authentication
- TLS keydir direction: use default direction
- Peer certificate authority: AirVPN_CA
- Peer certificate revocation list: No Lists defined
- Client certificate: AirVPN_cert (CA: AirVPN_CA)
- Data Encrpytion Negotiation:
- Allowed NCP Encryption Algorithms: AES-256-GCM
- Fallback Data Encryption Algorithm: AES-256-CBC
- Auth digest Algorithm: SHA512 (512-bit)
- Hardware crypto: Intel RDRAND (assuming you have an Intel processor)
Tunnel Settings
- IPv4 Tunnel Network: Empty
- IPv6 Tunnel Network: Empty
- IPv4 Remote Network(s): Empty
- IPv6 Remote Network(s): Empty
- Limit outgoing bandwidth: Default
- Allow Compression: Refuse any non-stub compression (most secure)
- Topology: Subnet - One IP address per client in a common subnet
- Type-of-Service:
- Dont pull routes:
- Dont add/remove routes:
Ping Setting
- Inactive: 0
- Ping method: keepalive
- Interval: 5
- Timeout: 30
Advanced Configuration
- Custom Options:
client; persist-key; persist-tun; remote-cert-tls server; prng sha256 64; mlock; auth-nocache; - UDP Fast I/O:
- Exit notify: Retry 5x
- Send/Receive Buffer: 512KiB (tweak depending on available RAM and performance testing)
Gateway Creation: IPv4 - Verbosity: Default (adjust as needed for debugging / production use etc)
- Click Save
Create the second OpenVPN connection
Navigate to VPN > OpenVPN and select Clients
- Click ‘+ Add’
General Information
- Disable this client:
- Server Mode: Peer to Peer (SSL/TLS)
- Protocol: UDP on IPv4 only
- Device mode: tun - Layer 3 Tunnel Mode
- Interface: WAN
- Local Port: empty
- Server host: 94.100.23.162
- Server port: 80
- Proxy host or address: empty
- Proxy Port: empty
- Proxy authentication: none
- Description: AirVPN client
User Authentication Settings
- Username: Empty
- Password: Empty
- Authentication Retry:
Cryptographic settings
- TLS Configuration: Use a TLS Key
- Automatically generate a TLS Key:
- TLS Key: Paste contents of the ta.key downloaded here
- TLS Key Usage Mode: TLS Encryption and Authentication
- TLS keydir direction: use default direction
- Peer certificate authority: AirVPN_CA
- Peer certificate revocation list: No Lists defined
- Client certificate: AirVPN_cert (CA: AirVPN_CA)
- Data Encryption Negotiation:
- Allowed NCP Encryption Algorithms: AES-256-GCM
- Fallback Data Encryption Algorithm: AES-256-CBC
- Auth digest Algorithm: SHA512 (512-bit)
- Hardware crypto: Intel RDRAND (assuming you have an Intel processor)
Tunnel Settings
- IPv4 Tunnel Network: Empty
- IPv6 Tunnel Network: Empty
- IPv4 Remote Network(s): Empty
- IPv6 Remote Network(s): Empty
- Limit outgoing bandwidth: Default
- Allow Compression: Refuse any non-stub compression (most secure)
- Topology: Subnet - One IP address per client in a common subnet
- Type-of-Service:
- Dont pull routes:
- Dont add/remove routes:
Ping Setting
- Inactive: 0
- Ping method: keepalive
- Interval: 5
- Timeout: 30
Advanced Configuration
- Custom Options:
client; persist-key; persist-tun; remote-cert-tls server; prng sha256 64; mlock; auth-nocache; - UDP Fast I/O:
- Exit notify: Retry 5x
- Send/Receive Buffer: 512KiB (tweak depending on available RAM and performance testing)
Gateway Creation: IPv4 - Verbosity: Default (adjust as needed for debugging / production use etc)
- Click Save
Create the third OpenVPN connection
Navigate to VPN > OpenVPN and select Clients
- Click ‘+ Add’
General Information
- Disable this client:
- Server Mode: Peer to Peer (SSL/TLS)
- Protocol: UDP on IPv4 only
- Device mode: tun - Layer 3 Tunnel Mode
- Interface: WAN
- Local Port: empty
- Server host: 104.129.24.186
- Server port: 2018
- Proxy host or address: empty
- Proxy Port: empty
- Proxy authentication: none
- Description: AirVPN client
User Authentication Settings
- Username: Empty
- Password: Empty
- Authentication Retry:
Cryptographic settings
- TLS Configuration: Use a TLS Key
- Automatically generate a TLS Key:
- TLS Key: Paste contents of the ta.key downloaded here
- TLS Key Usage Mode: TLS Encryption and Authentication
- TLS keydir direction: use default direction
- Peer certificate authority: AirVPN_CA
- Peer certificate revocation list: No Lists defined
- Client certificate: AirVPN_cert (CA: AirVPN_CA)
- Data Encryption Negotiation:
- Allowed NCP Encryption Algorithms: AES-256-GCM
- Fallback Data Encryption Algorithm: AES-256-CBC
- Auth digest Algorithm: SHA512 (512-bit)
- Hardware crypto: Intel RDRAND (assuming you have an Intel processor)
Tunnel Settings
- IPv4 Tunnel Network: Empty
- IPv6 Tunnel Network: Empty
- IPv4 Remote Network(s): Empty
- IPv6 Remote Network(s): Empty
- Limit outgoing bandwidth: Default
- Allow Compression: Refuse any non-stub compression (most secure)
- Topology: Subnet - One IP address per client in a common subnet
- Type-of-Service:
- Dont pull routes:
- Dont add/remove routes:
Ping Setting
- Inactive: 0
- Ping method: keepalive
- Interval: 5
- Timeout: 30
Advanced Configuration
- Custom Options:
client; persist-key; persist-tun; remote-cert-tls server; prng sha256 64; mlock; auth-nocache; - UDP Fast I/O:
- Exit notify: Retry 5x
- Send/Receive Buffer: 512KiB (tweak depending on available RAM and performance testing)
Gateway Creation: IPv4 - Verbosity: Default (adjust as needed for debugging / production use etc)
- Click Save
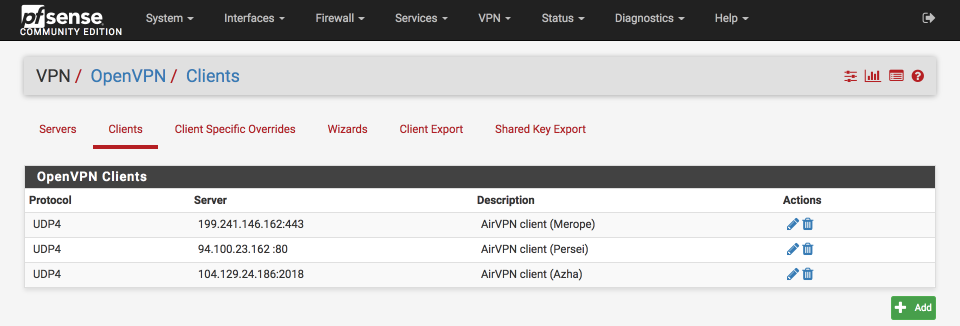
Your three VPN connections should be displayed as follows:
Create VPN interfaces
Navigate to Interfaces > Assignments
This is optional step but makes for tidier displays later as we add further gateways, rename VPN_WAN to VPN1_WAN.
Click on VPN_WAN to edit the interface and set
- Description: VPN1_WAN
- Save & Apply changes
Navigate to Interfaces > Assignments
Select the second OpenVPN interface, ovpnc2 (AirVPN client) from the available network ports dropdown and click add.
Click the OPTx label to edit this interface. Configure it as below
- Enable Interface:
- Description: VPN2_WAN
- MAC Address: empty
- MTU: Empty
- MSS: Empty
- Block private networks:
- Block bogon networks:
- Save & Apply changes
Navigate to Interfaces > Assign again
Select the second OpenVPN interface, ovpnc3 (AirVPN client) from the available network ports dropdown and click add.
Click the OPTx label to edit this interface. Configure it as below
- Enable Interface:
- Description: VPN3_WAN
- MAC Address: empty
- MTU: Empty
- MSS: Empty
- Block private networks:
- Block bogon networks:
- Save & Apply changes
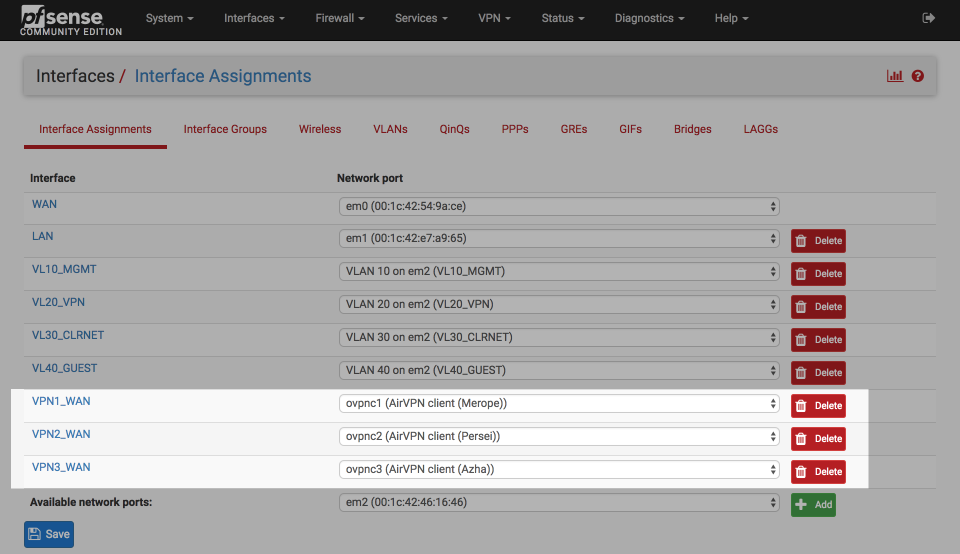
Navigate to Interfaces > Assign and verify your settings look something like this
Create Gateways
With the interfaces created, now create the respective WAN gateways.
Its possible to utilise external services like DNS servers (4.2.2.1 etc) to validate gateway status and provide telemetry on VPN performance. Each interface will need a separate server.
Create first VPN connection gateway
Navigate to System > Routing
Click the ‘Copy Gateway’ icon next to the VPN1_WAN_VPNV4 gateway and edit the parameters as those below
Interface: VPN1_WAN
Address Family: IPv4
Name: VPN1_WAN
Gateway: dynamic
Gateway Monitoring:
Gateway Action:
Monitor IP: 4.2.2.1
Force State:
Description: Interface VPN1_WAN Gateway
Save & Apply
Create second VPN connection gateway
Click the ‘Copy Gateway’ icon next to the VPN2_WAN_VPNV4 gateway and edit the parameters as those below
Interface: VPN2_WAN
Address Family: IPv4
Name: VPN2_WAN
Gateway: dynamic
Gateway Monitoring:
Gateway Action:
Monitor IP: 4.2.2.2
Force State:
Description: Interface VPN2_WAN Gateway
Save & Apply
Create third VPN connection gateway
Navigate to System > Routing
Click the ‘Copy Gateway’ icon next to the VPN3_WAN_VPNV4 gateway and edit the parameters as those below
Interface: VPN3_WAN
Address Family: IPv4
Name: VPN3_WAN
Gateway: dynamic
Gateway Monitoring:
Gateway Action:
Monitor IP: 4.2.2.3
Force State:
Description: Interface VPN3_WAN Gateway
Save & Apply
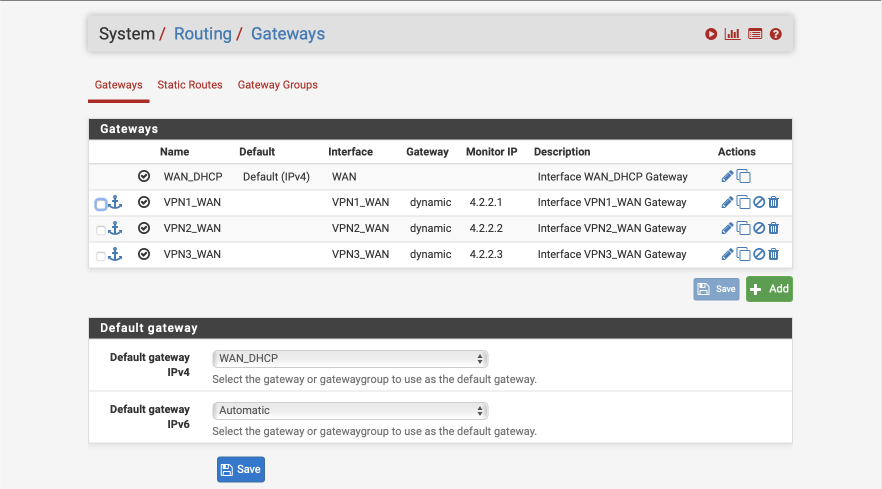
Verify that you have three VPN WAN gateways and that the default gateways is still WAN_DHCP as shown below.
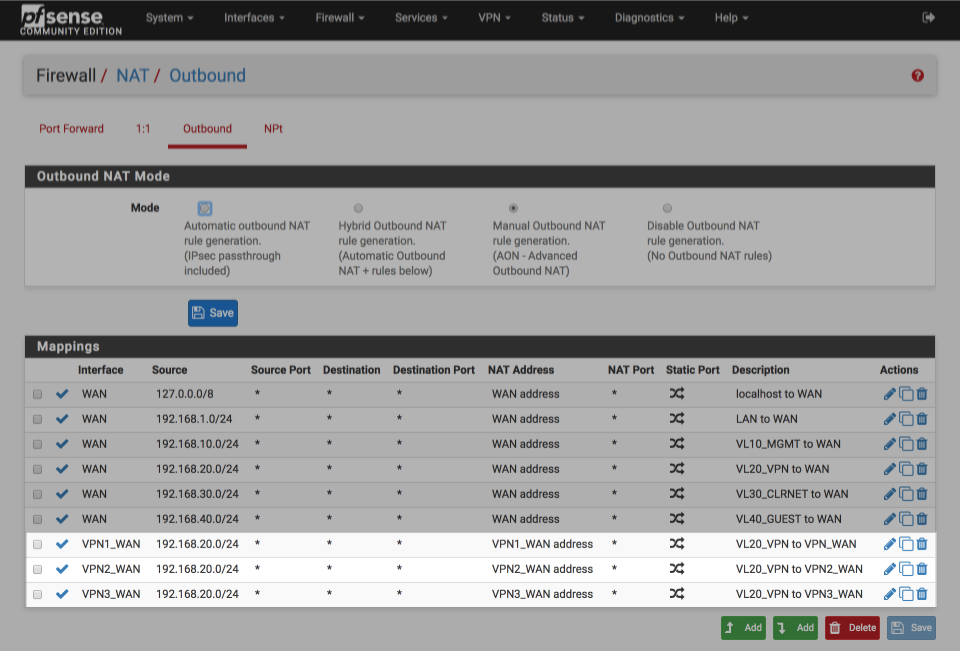
Create NAT rules
Create the NAT rules which enable traffic on newly added OpenVPN interfaces to traverse to the Internet’s public address space. If you followed my pfSense baseline configuration guide you will already have a VL20_VPN to VPN1_WAN rule. You can leverage this to simplify the creation the NAT rules for the second and third interfaces.
Create the VPN2_WAN NAT rule
Navigate to Firewall > NAT > Outbound
Click ‘Add↴’ and setup the new NAT rule as follows:
Advanced Outbound NAT entry
- Disabled:
- Do not NAT:
- Interface: VPN2_WAN
- Protocol: Any
- Source: Network
- Address: 192.168.20.0 / 24 - Destination: Any
- Not:
Translation
- Address: Interface Address
- Port: Empty
Misc
- No XMLRPC:
- Description: VL20_VPN to VPN2_WAN
- Click Save and Apply
Create the VPN3_WAN NAT rule
Click ‘Add↴’ and setup the new NAT rule as follows:
Advanced Outbound NAT entry
- Disabled:
- Do not NAT:
- Interface: VPN3_WAN
- Protocol: Any
- Source: Network
- Address: 192.168.20.0 / 24 - Destination: Any
- Not:
Translation
- Address: Interface Address
- Port: Empty
Misc
- No XMLRPC:
- Description: VL20_VPN to VPN3_WAN
- Click Save and Apply
Verify that your outbound NAT rules look similar to below
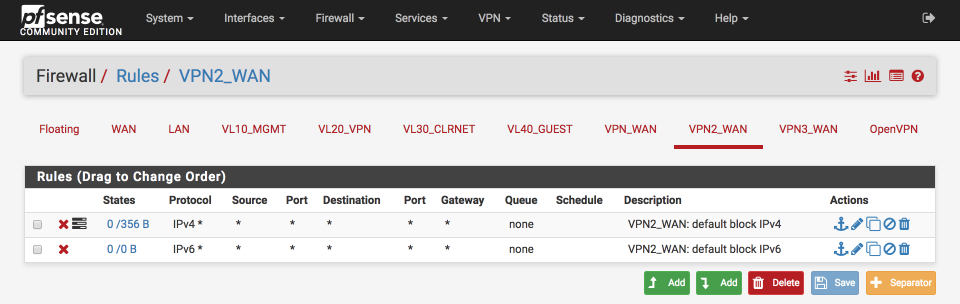
Create Firewall rules
Create the firewall rules which block and log unauthorised inbound traffic. If you followed my previous foundation guide you will already have a set of rules associated with the VPN1_WAN interface. We’ll duplicate these for the second and third OpenVPN interfaces.
VPN2_WAN rules
Navigate to Firewall > Rules > VPN2_WAN and create the following rules:
Block and log IPv4 traffic
- Click ‘↴+’
- Action: Block
- Disabled =
- Interface: VPN2_WAN
- Address Family: IPv4
- Protocol: Any
- Source: Any
- Destination: Any
- Log:
- Description: VPN2_WAN: default block IPv4
- Click [Save]
Block IPv6 traffic
- Click ‘↴+’
- Action: Block
- Disabled =
- Interface: VPN2_WAN
- Address Family: IPv6
- Protocol: Any
- Source: Any
- Destination: Any
- Log:
- Description: VPN2_WAN: default block IPv6
- Click [Save]
VPN3_WAN rules
Navigate to Firewall > Rules > VPN3_WAN and create the following rules:
Block and log IPv4 traffic
- Click ‘↴+’
- Action: Block
- Disabled =
- Interface: VPN3_WAN
- Address Family: IPv4
- Protocol: Any
- Source: Any
- Destination: Any
- Log:
- Description: VPN3_WAN: default block IPv4
- Click [Save]
Block IPv6 traffic
- Click ‘↴+’
- Action: Block
- Disabled =
- Interface: VPN3_WAN
- Address Family: IPv6
- Protocol: Any
- Source: Any
- Destination: Any
- Log:
- Description: VPN3_WAN: default block IPv6
- Click [Save]
Your VPN2_WAN & VPN3_WAN interfaces should look similar to this when complete.
<a name=”Update DNS servers” </a> Update DNS servers
To utilise the additional VPN connections for DNS resolution, add them to the DNS Resolver’s outgoing network interfaces setting.
Navigate to Services > DNS Resolver
In the outgoing interface selection, ensure the VPN1_WAN, VPN2_WAN & VPN3_WAN are all selected.

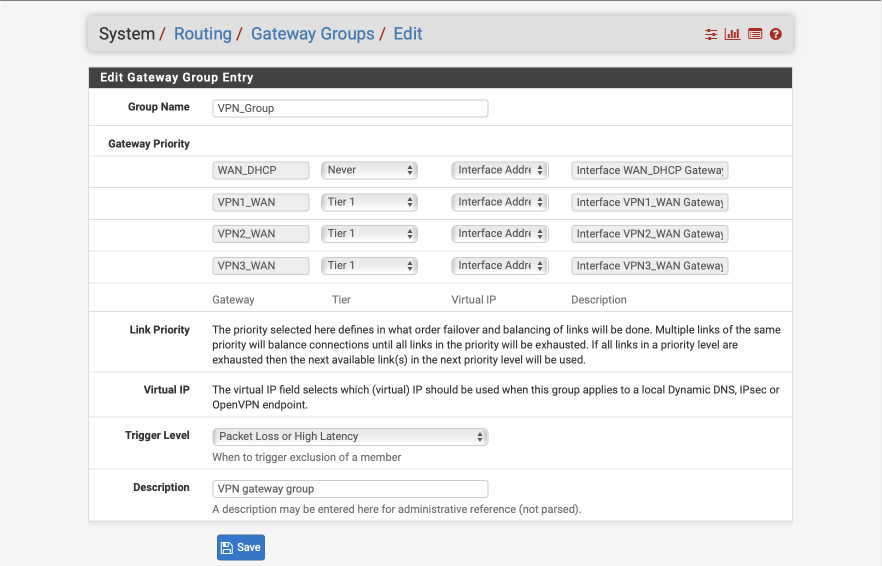
<a name=”Create gateway group” </a> Create gateway group
We now connect the three individual OpenVPN connections into a single routing interface that pfSense can load balance across, as well as drop individual connections if there are any problems affording failover protection at the same time.
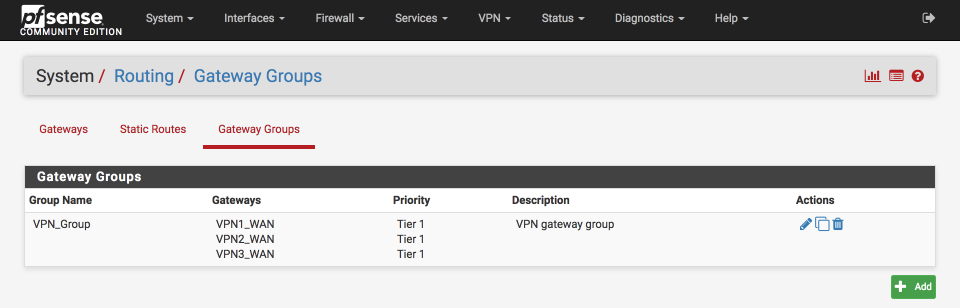
Navigate to System > Routing > Gateway Groups
- Click Add
- Group Name: VPN_Group
- Set the three VPN WAN interfaces as Tier 1
- Set WAN_DHCP as Never
- Trigger Level: Packet Loss or High latency
- Description: VPN gateway group
- Click Save & Apply Changes
Verify it looks like this before saving.
Verify the summary page after saving
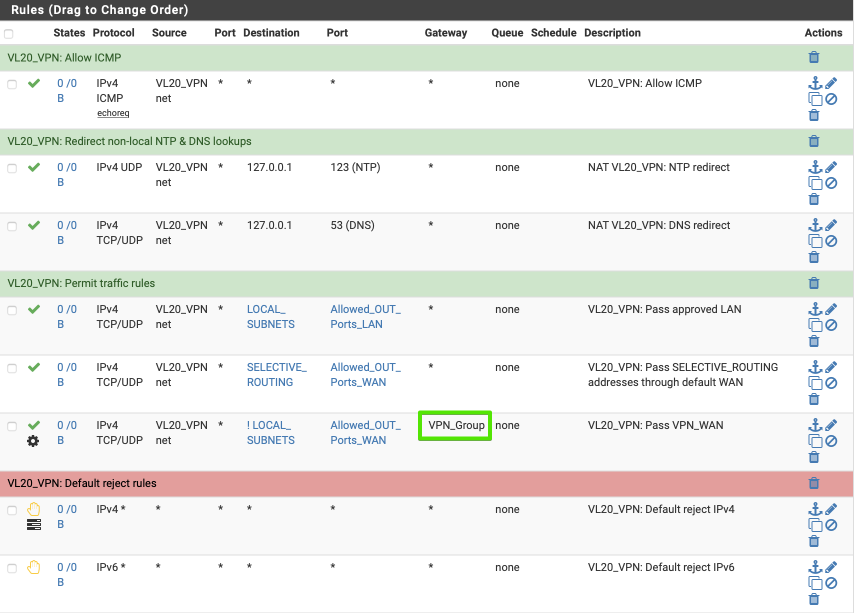
Update VL20_VPN firewall rule
Update the VPN20_VPN firewall rule to direct egress traffic out of the gateway group.
Navigate to Firewall > Rules > VL20_VPN
- Click the pencil besides the VL20_VPN to VPN WAN rule to edit it.
- Description: VL20_VPN: Pass VL20_VPN via VPN_Group
- Click on Advanced Options
- Change the Gateway to VPN_Group
- Click Save & Apply changes.
Verify your revised rule looks like this when complete
<a name=”Sticky connections” </a> Sticky connections
Some sites react poorly to inbound traffic appearing from a number of IP addresses. Enabling sticky connections can help reduce the impact of this by ensuring traffic within a session is sent via the sane gateway. It may be useful to adjust the the time-out parameter to increase the duration of the session state.
Navigate to System > Advanced > Miscellaneous
Load Balancing:
Source tracking timeout = 0
Default gateway switching:
<a name=”Validate functionality and performance” </a> Validate functionality and performance
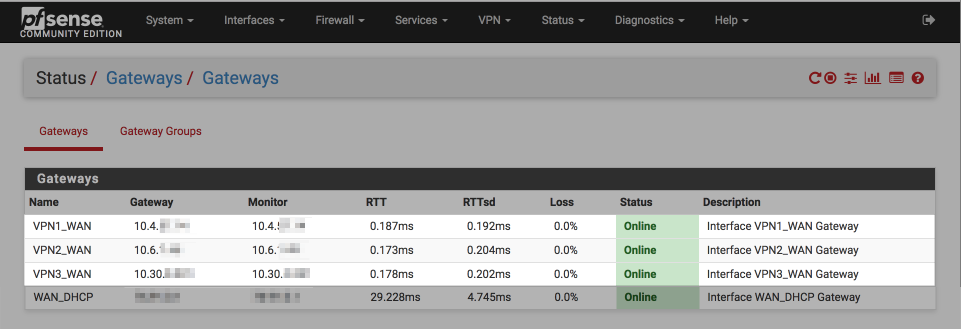
Navigating to Status > Gateways and validate the gateway are online and not demonstrating any loss or increased latency. Above 20% loss a gateway will be dropped from the group. Its possible to add the gateway status display to the pfSense dashboard too.
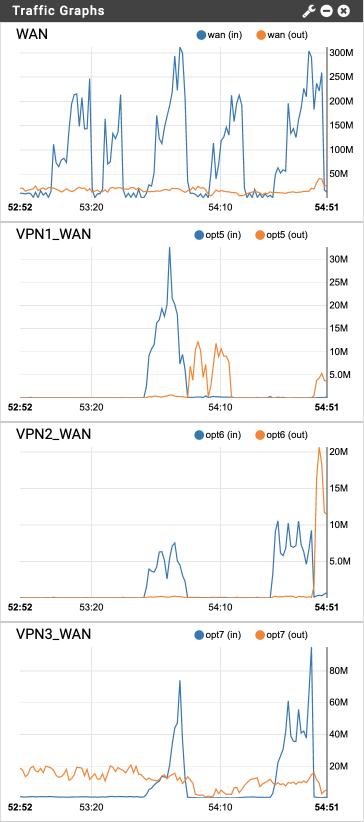
use the dashboard Traffic Graphs display to verify traffic is distributed across the various VPN connections.
<a name=”Verify DNS results and leak test” </a> Verify DNS results and leak test
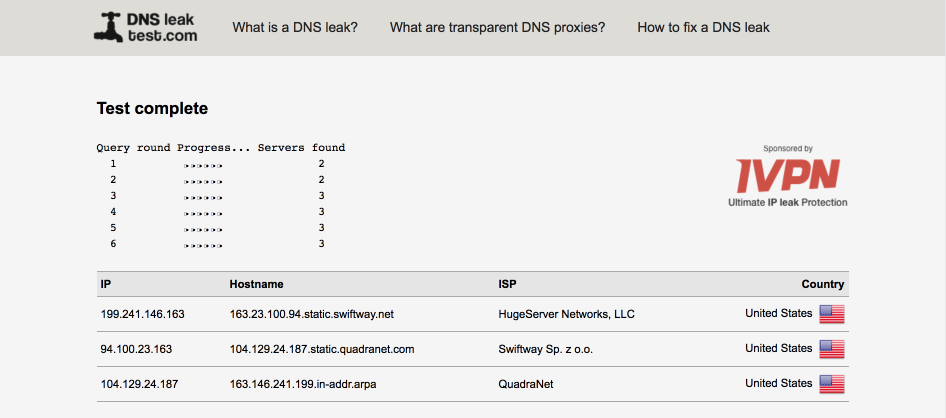
Open a web browser and navigate to to DNSLeaktest.com.
Run an extended test on each subnet to verify functionality. If the test doesn’t start correctly, try disabling ‘Experimental Bit 0x20 Support’ under the DNS Resolver’s advanced settings.
Verify your VL20_VPN subnet displays an appropriate DNS server per VPN connection, and isn’t leaking any additional details.
Changelog
20 February 2021
Updates for pfSense 2.5.0
Updates for OpenVPN 2.5.0
28 March 2020
Updated for pfSense 2.4.5
19 March 2020
Updated to reflect current AirVPN capabilities
Minor readability changes
21 Novemeber 2017
Fixed DNSLeakTest link
5 September 2017
Fixed naming error in server ping table