Proxmox 4.2 install
Last revised 16 July 2016.
Contents
- Install Proxmox
- Configure NTP
- Configure Network UPS Tools (NUT)
- Configure Postfix Mail reporting
- Configure additional VLAN networking
- Configure SMART disk monitoring
- Enable PCI passthrough
Introduction
I’ve noticed a few issues in apps I’ve been running in FreeNAS jails recently introduced I’m sure during IX systems upgrading to FreeBSD 10.3 so I decided it was for the time to migrate to a dedicated hypervisor and avoid any further issues. I decided to go with Proxmox largely because it is open source, free, supports high availability clusters, multiple storage formats and containers.
This will be my baseline install that I’ll build upon with guides for other applications soon.
I initially installed Proxmox onto a spare Intel 750 NVMe PCI SSD I had lying around and discovered some issues getting it to boot. I’m going to cover those steps in this guide for others who may want to go down this path. For those who are installing to a SATA drive, traditional or SSD, you won’t need to jump through all these hoops so feel free to skim over them.
Install Proxmox
Download the installation .iso file from Proxmox downloads and create a bootable USB stick. For NVMe boot support Proxmox needs to be at least version 4.2-725d76f0-28 which was released on the 27th April 2016.
Set the BIOS of your PC to boot from the USB key and proceed to boot.
When prompted, select Install Proxmox VE

Accept the EULA agreement by clicking Next.

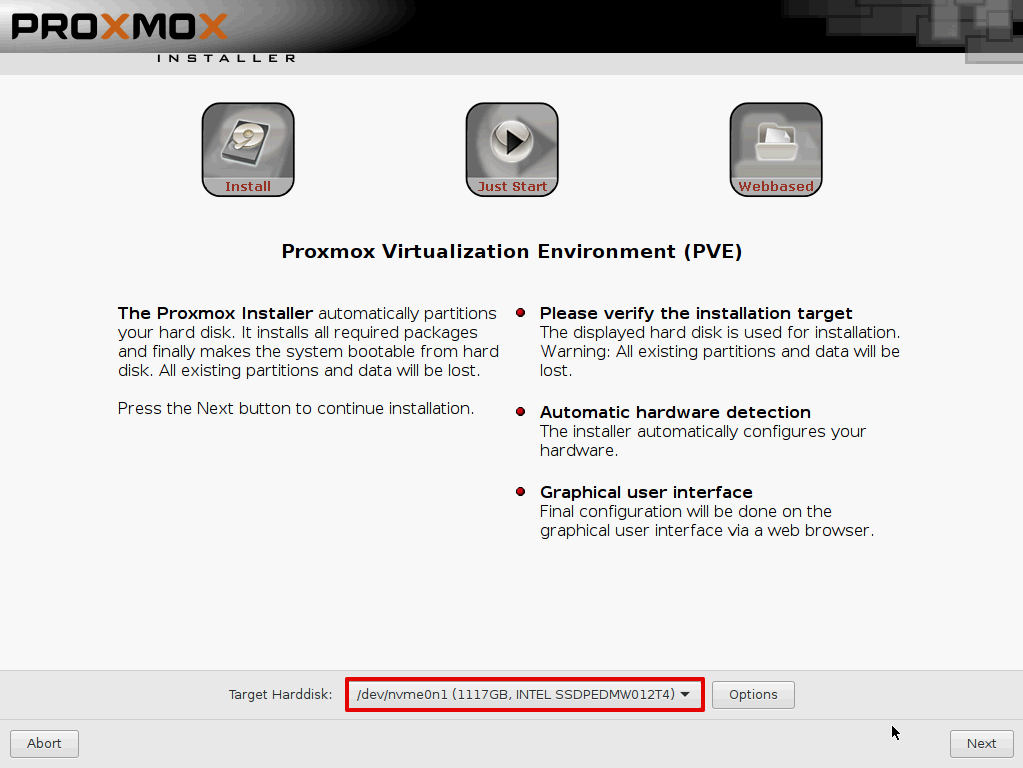
Select the hard disk you wish to install to and click Next. Here I am installing to my Intel 750 NVMe PCI drive. Booting from NVMe devices is a recent addition to Proxmox and I’ll go over whats required to enable this later on in this guide. Feel free to leave the options as default.
Set Country, timezone and keyboard layout then click Next

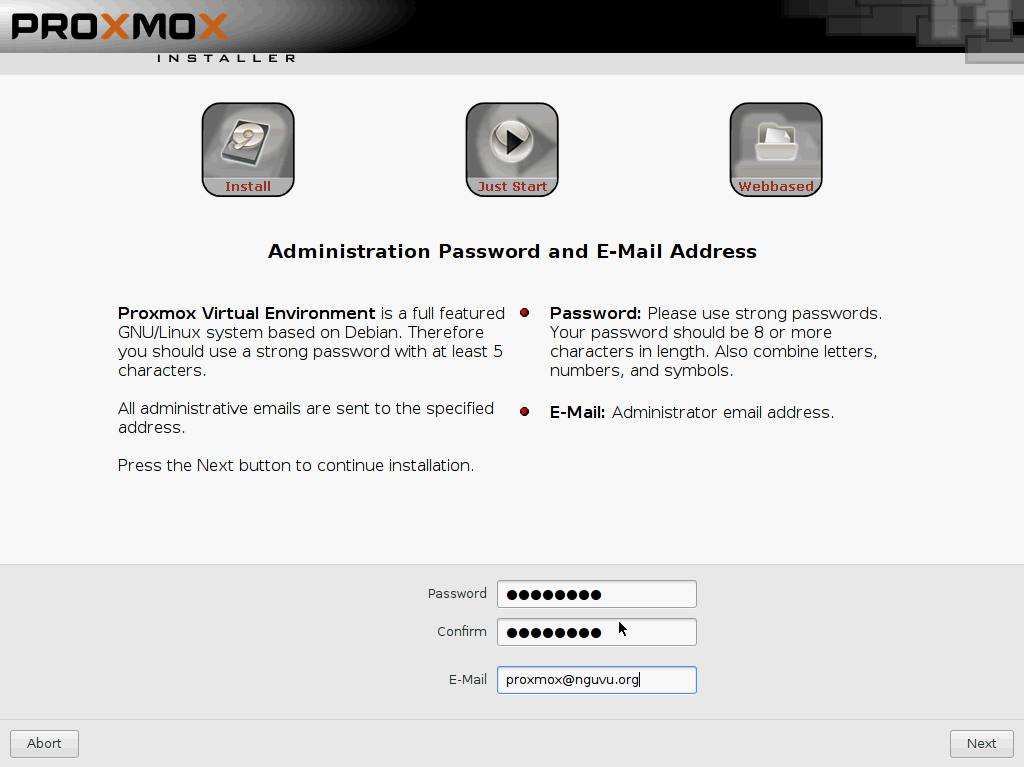
Enter a strong password and an email address. Its worth using a valid email address as this can be used to reset your password in future should you need to for any reason.
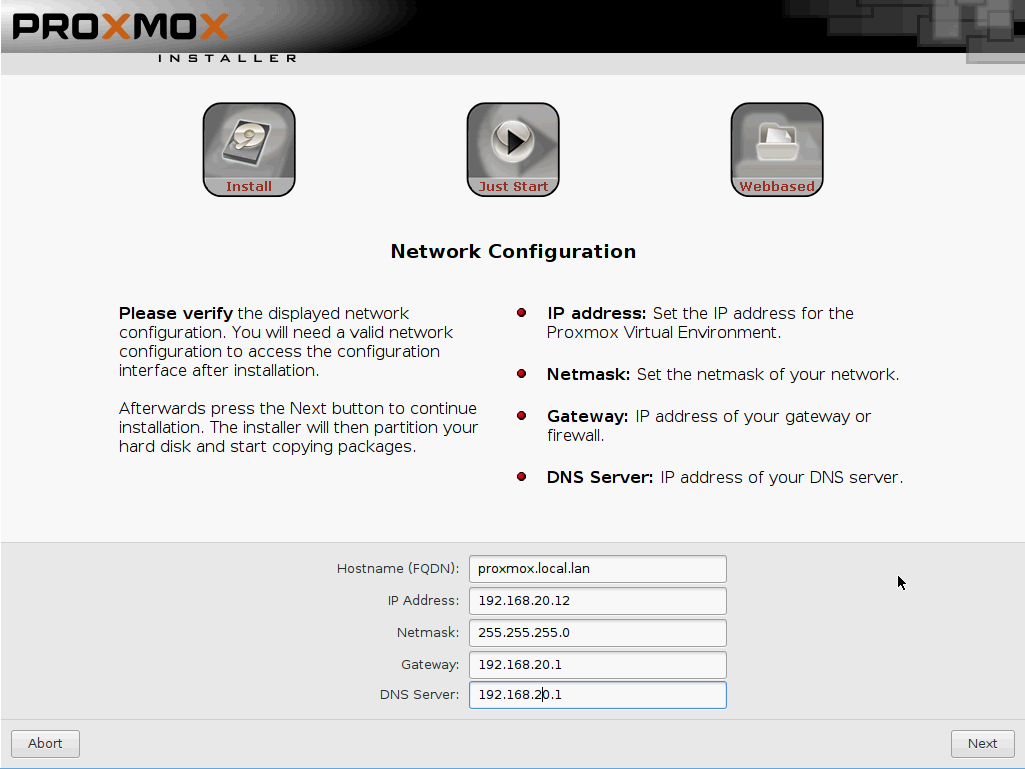
Setup the network as per your local requirements, here I am connecting to my VL20_VPNLAN with a fixed address in the range I use for critical production servers.
- Hostname = proxmox.local.lan
- IP Address = 192.168.20.12
- Netmask = 255.255.255.0
- Gateway = 192.168.20.1
- DNS = 192.168.20.1
Click next to proceed.
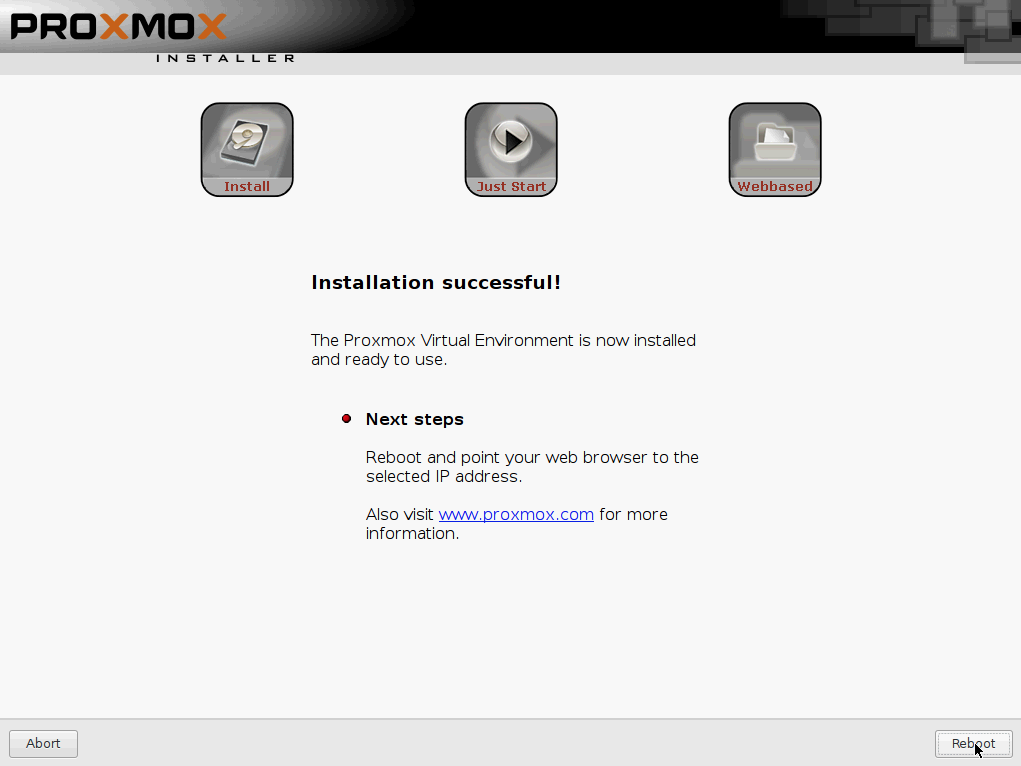
Reboot and remove CD/USB when prompted and click Next to restart.
Set BIOS for Intel 750 NVMe booting
If you are booting from a conventional SATA hard disk, these steps wont be necessary, its only if you are using one of the newer NVMe devices like the Intel 750 or Samsung 950 will you need to follow these steps to enable Proxmox to boot successfully.
Once the PC reboots, enter the BIOS to set the desired hard disk as the boot device.
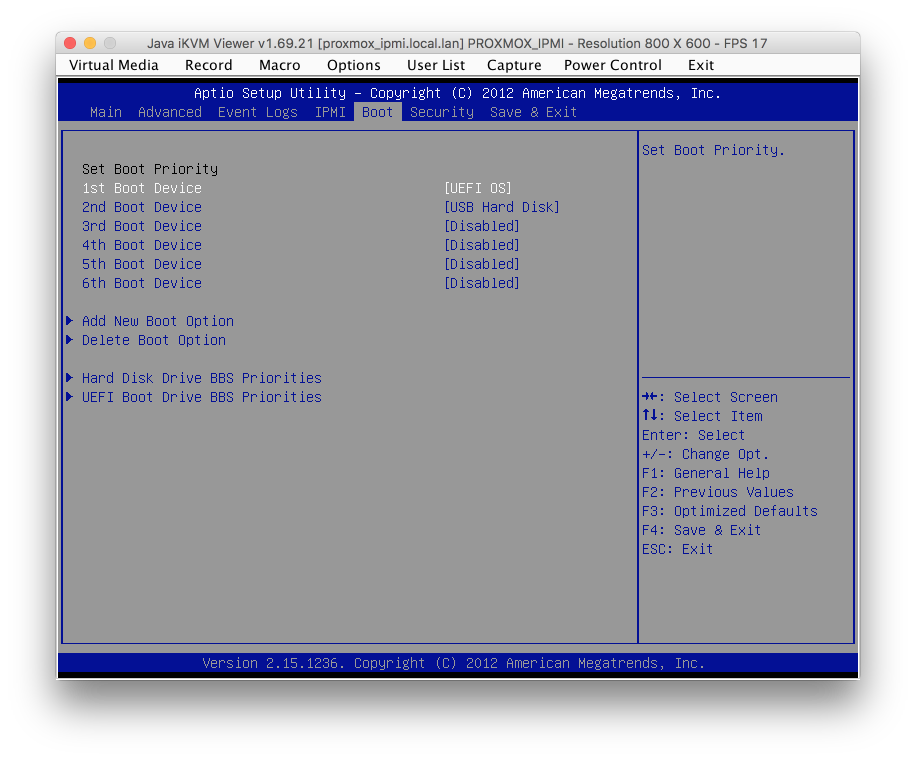
I’m sure there’s a large variation in how this is accomplished on various motherboards. On the Supermicro X9SRL-F motherboard I was using for testing, I had to set the UEFI boot device to the UEFI OS first
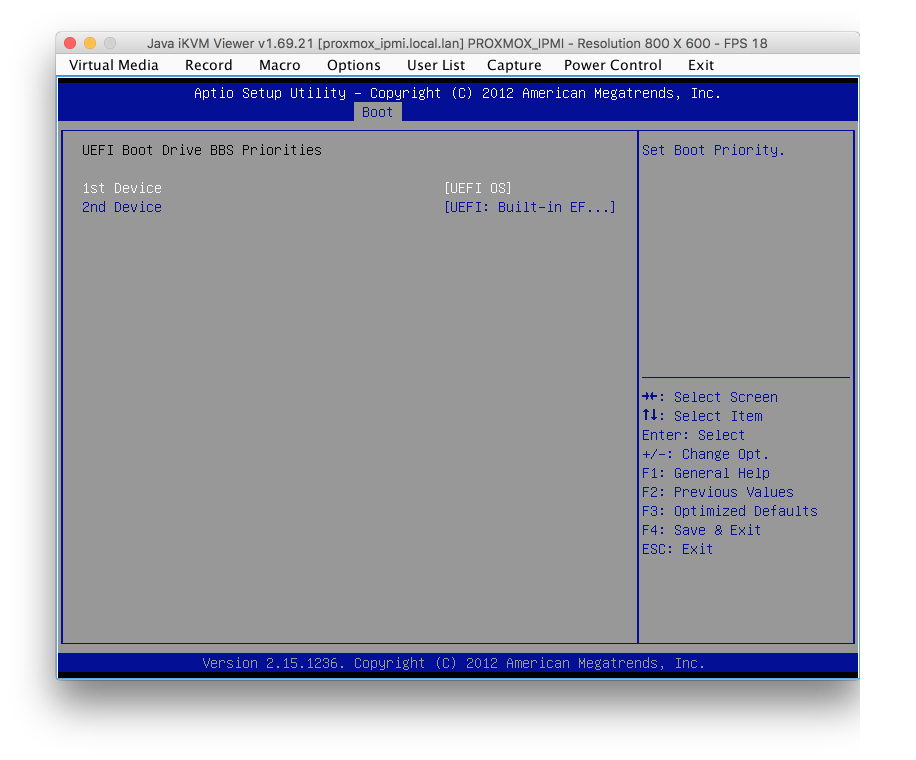
and then on the Boot priority page, set UEFI OS as top priority.
Press F4 to Save & Exit
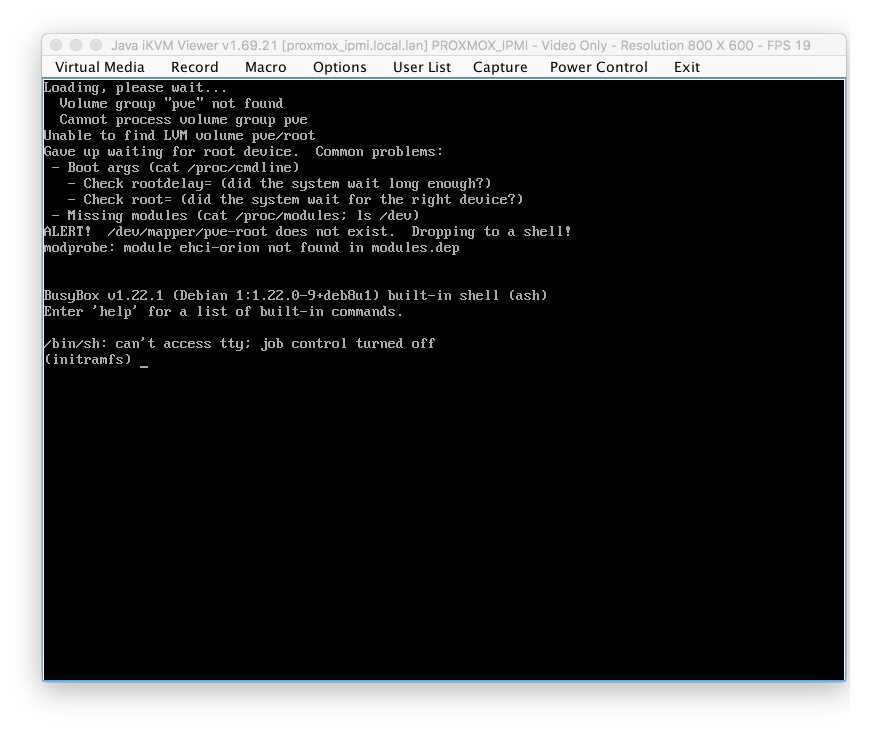
If you attempt to boot into Proxmox at this stage you will see likely the error screen as shown below as the NVMe drive hasn’t had time to complete its initialisation to be able to support mounting the correct volumes.
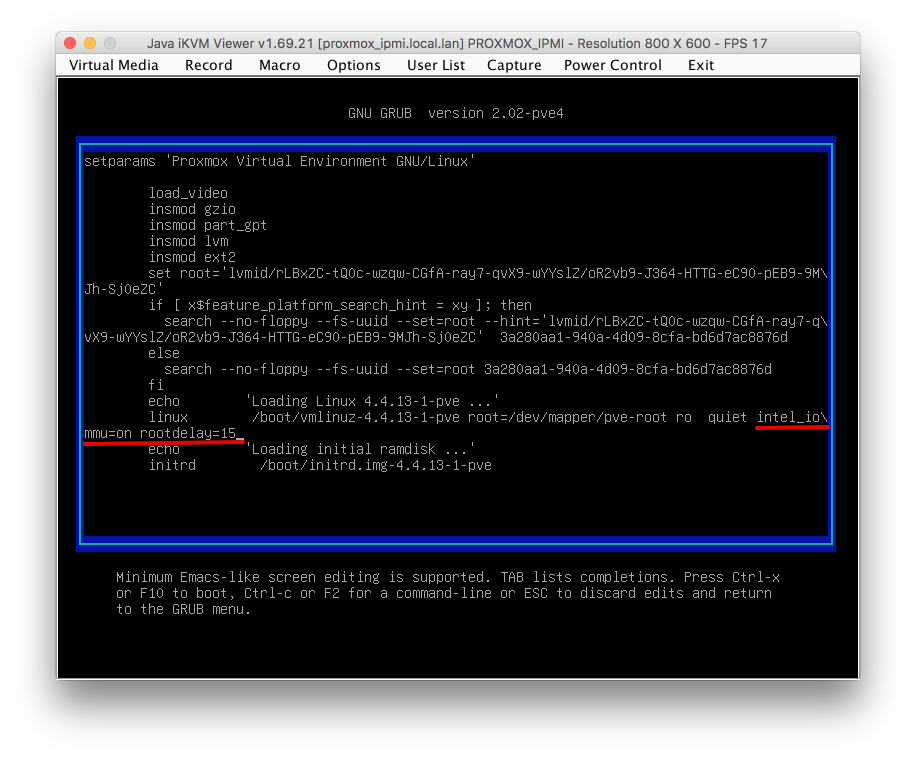
To resolve this, when presented with the Proxmox boot configuration page, press ‘e’ to edit the grub boot command sequence.
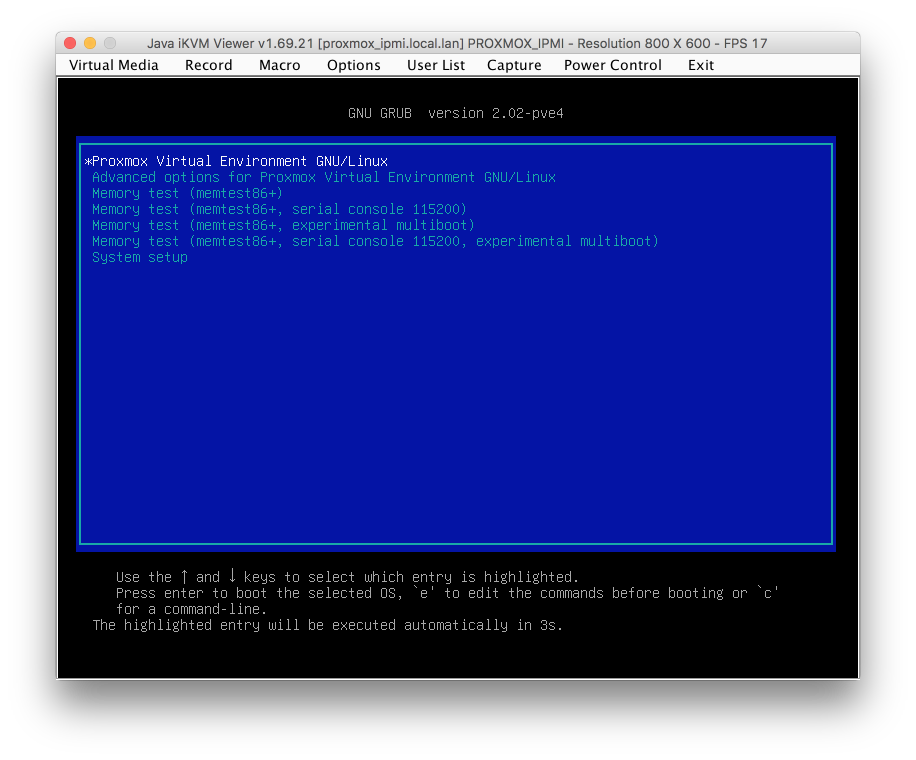
Append intel_iommu=on rootdelay=15 to the end of the ‘linux’ line so its as follows
linux /boot/vmlinuz-4.4.13-1-pve root=/dev/mapper/pve-root ro quiet intel_iommu=on rootdelay=15
Here’s my grub screen with amended text highlighted for clarity. Don’t worry if it spans onto a second line whilst you are typing.
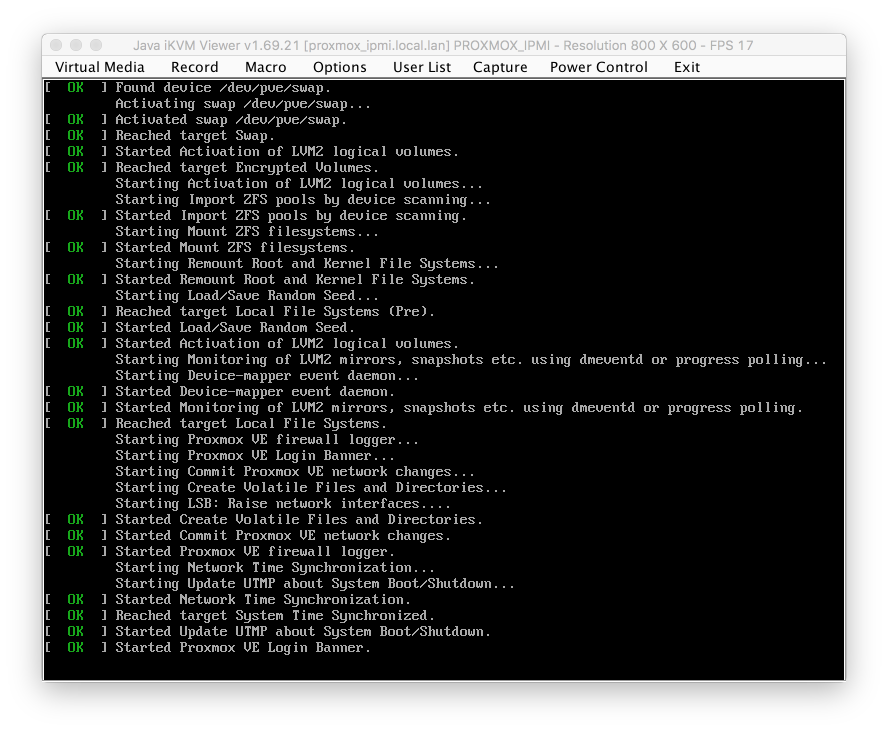
Press F10 to save and boot. This time allow Proxmox to boot through its boot menu. If everything has worked correctly you will see a screen that looks something like this with lines of text scolling up the screen.
Once the boot sequence has completed, you’ll be presented with a login screen. Proxmox has now completed booting and we can commence with our configuration.
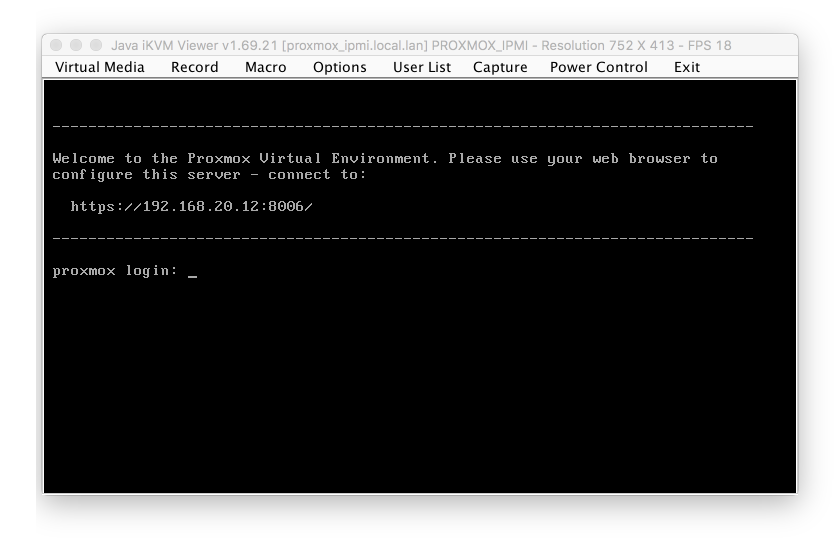
We aren’t going to jump into the web GUI immediately, first we will log into the command shell and setup the underlying Linux systems for a some key services we will need for reliable operation of Proxmox.
Proxmox configuration
Login to console with username root and the password you used during the initial install.
Make boot delay permanent
The change we made earlier to the grub loader allowed us to boot the system successfully, we need to make that change permanent to avoid having to go through those steps each time we want to boot the system. Enter
nano /etc/default/grub
Add intel_iommu=on rootdelay=15 to the line GRUB_CMDLINE_LINUX_DEFAULT="quiet" so it reads
GRUB_CMDLINE_LINUX_DEFAULT="quiet intel_iommu=on rootdelay=15"
CTRL-x to exit, Y and save.
Enter update-grub to commit the changes to grub loader.
Its worth verifying that you can shutdown and reboot the system without intervention at this stage and that the delay entered is adequate to give your drive time to initialise.
Entering shutdown -r now will initiate the shutdown and reboot.
Update Linux packages for non-licenced use.
The pve-no-subscription repo can be used for testing and non-production use. Its not recommended to run on production servers as these packages are not as comprehensively tested and validated prior to release. For my intended use, the free version will suffice.
Enter nano /etc/apt/sources.list to edit the repositories
deb http://ftp.debian.org/debian jessie main contrib

# PVE pve-no-subscription repository provided by proxmox.com, NOT recommended for production use
deb http://download.proxmox.com/debian jessie pve-no-subscription

# security updates
deb http://security.debian.org/ jessie/updates main contrib
CTRL-X, Y to Save and exit.
Enter nano /etc/apt/sources.list.d/pve-enterprise.list and comment the following line out by placing a hash (#) character at the beginning the line to disable and prevent errors in the logs the subscription only repo’s.
# deb https://enterprise.proxmox.com/debian jessie pve-enterprise
CTRL-X, Y to Save and exit.
It’s worth updating and upgrading your packages at this time with the following commands
apt-get update
apt-get upgrade
Set NTP time servers
Its important to have correctly syncronised clocks across your networks to prevent any issues. Lets ensure our Proxmox server is contacting the correct server for NTP info. My pfSense router provides internal NTP synchronisation.
Enter nano /etc/systemd/timesyncd.conf and add the following line but specify your own NTP server here.
Servers=192.168.20.1
you can verify NTP is working by entering the command
timedatectl status
and you should see the following lines in the response verifying NTP is enabled and syncronized.
root@proxmox:~# timedatectl status
      Local time: Sat 2016-07-01 22:42:02 EDT
  Universal time: Sun 2016-07-02 02:42:02 UTC
        RTC time: Sun 2016-07-02 02:42:02
       Time zone: America/New_York (EDT, -0400)
     NTP enabled: yes
NTP synchronized: yes
 RTC in local TZ: no
      DST active: yes
Mail reporting
Its critical for the safe long term running of a host that issues are addressed early before they have time to cause further problems. I configure mail on my servers to send updates via email so I am made aware of at the earliest opportunity.
I’ve built this guide around Gmail but this works with other providers too. One side effect of using Gmail I noticed is that the ‘from’ address on mail you receive will be changed to the Gmail accounts name overriding the Proxmox root user. I didn’t observe this behaviour with other SMTP providers I use but its not a huge inconvenience.
Install support packages
Install packages for generating hashes and security etc.
apt-get install libsasl2-modules
Specify SMTP account details
We’ll enter our mail account password into a file which we will generate our hash from.
Enter nano /etc/postfix/sasl_passwd
and enter your SMTP server, username and password as follows
[smtp.gmail.com]:587 username@gmail.com:<your_password>
Create the hash from the password file by you just created by entering
postmap hash:/etc/postfix/sasl_passwd
To ensure your unencrypted email details are left open for anyone to read, either delete the original password file, or change the access rights with the following command to be limited read only.
chmod 600 /etc/postfix/sasl_passwd
Setup postfix
We’ll now configure our postfix mail client to use the correct server settings. Enter
nano /etc/postfix/main.cf
and update the following line to reflect our SMTP server
relayhost = [smtp.gmail.com]:587
Append the following lines to the bottom of the file
#  use tls
smtp_use_tls=yes

# use sasl when authenticating to foreign SMTP servers
smtp_sasl_auth_enable = yes

# path to password map file
smtp_sasl_password_maps = hash:/etc/postfix/sasl_passwd

# eliminate default security options which are imcompatible with gmail
smtp_sasl_security_options =
Here’s what my complete file looks like.
myhostname=proxmox.local.lan

smtpd_banner = $myhostname ESMTP $mail_name (Debian/GNU)
biff = no

# appending .domain is the MUA's job.
append_dot_mydomain = no

# Uncomment the next line to generate "delayed mail" warnings
#delay_warning_time = 4h

alias_maps = hash:/etc/aliases
alias_database = hash:/etc/aliases
mydestination = $myhostname, localhost.$mydomain, localhost
relayhost = [smtp.gmail.com]:587
mynetworks = 127.0.0.0/8
inet_interfaces = loopback-only
recipient_delimiter = +

#  use tls
smtp_use_tls=yes

# use sasl when authenticating to foreign SMTP servers
smtp_sasl_auth_enable = yes

# path to password map file
smtp_sasl_password_maps = hash:/etc/postfix/sasl_passwd

# eliminate default security options which are incompatible with gmail
smtp_sasl_security_options =
Reload postfix
Reload and initialise postfix with new parameters with the command
postfix reload
Verify mail is sending
Send a test mail with the following command and verify it arrives at the address specified. Replace yourmail and yourhost in the command below with the account details you are sending the test mail to.
echo "test mail from proxmox" | mail -s test yourmail@yourhost.com
If you don’t receive the email shortly after entering the command, check the /var/log/syslog file for some details with the command tail -f /var/log/syslog
With Gmail specifically, you may need to log in to your Google account and “Allow less secure apps” under Sign in & Security to enable external access to your SMTP connection.

Configure Network UPS Tools (NUT) service
The NUT service is responsible for polling my UPS battery backup server which is hosted on my pfSense router. Proxmox runs a slave client which polls for power status updates, should my UPS battery level fall to a predetermined critical level the Proxmox server will commence a controlled shutdown initially shutting down all hosted virtual machines and then finally shuting itself down. Having power suddenly fail to a machine running multiple virtual machines is highly likely to result in some data loss which is undesirable in pretty much any environment.
Install the NUT package
apt-get install nut-client
Set the NUT client to slave mode by entering
nano /etc/nut/nut.conf
and setting
- MODE=netclient
Set up the notification command
We need a script which the NUT client can call to notify us via email of key events. Let’s create a script to enable this now. Enter
nano /etc/nut/notify
and paste the following into the file. Replace name@domain with the email address you want the alerts to go.
#! /bin/sh
echo "$*" | mailx -s "Proxmox: UPS notice" <name@domain>
CTRL-X, Y to Save and Exit.
Set the script ownership and executable status by entering the following commands
chown root:nut /etc/nut/notify
chmod 740 /etc/nut/notify
Your ownership and access rights on the files should look like this when done
# ls -l /etc/nut
total 28
-rw-r----- 1 root nut    73 Jul 17 00:04 notify
-rw-r----- 1 root nut  1544 Jul 16 23:35 nut.conf
-rw-r----- 1 root nut 15565 Jul 16 23:41 upsmon.conf
-rw-r----- 1 root nut  3887 Mar 20  2015 upssched.conf
Configure NUT client
To set up the NUT client, enter
nano /etc/nut/upsmon.conf
Append the text below to this file. You’ll need to update the monitor line with your UPS server details.
MONITOR UPS1@192.168.20.1:3493 1 apc apc slave
RUN_AS_USER nut
NOTIFYCMD /etc/nut/notify
NOTIFYFLAG ONBATT SYSLOG+WALL+EXEC
NOTIFYFLAG LOWBATT SYSLOG+WALL+EXEC
NOTIFYFLAG ONLINE SYSLOG+WALL+EXEC
NOTIFYFLAG COMMBAD SYSLOG+WALL+EXEC
NOTIFYFLAG COMMOK SYSLOG+WALL+EXEC
NOTIFYFLAG REPLBATT SYSLOG+WALL+EXEC
NOTIFYFLAG NOCOMM SYSLOG+EXEC
NOTIFYFLAG FSD SYSLOG+EXEC
NOTIFYFLAG SHUTDOWN SYSLOG+EXEC
The MONITOR line parameters are system powervalue username password type
- system = UPS identifier @ IP address : port
- powervalue = integer representing the number of power supplies that the UPS feeds on this system.
- username = username
- password = password
- type = slave
The NOTIFYFLAG specifies that the following events are reported
- ONLINE: UPS is back online
- ONBATT: UPS is on battery
- LOWBATT: UPS is on battery and has a low battery (is critical)
- FSD: UPS is being shutdown by the master (FSD = “Forced Shutdown”)
- COMMOK: Communications established with the UPS
- COMMBAD: Communications lost to the UPS
- SHUTDOWN: The system is being shutdown
- REPLBATT: The UPS battery is bad and needs to be replaced
- NOCOMM: A UPS is unavailable (can’t be contacted for monitoring)
Errors are reported to one or more of the following
- SYSLOG: Write the message to the syslog
- WALL: Write the message to all users with /bin/wall
- EXEC: Execute NOTIFYCMD with the message
Verify NUT server communications
Before we try and start our NUT service, lets ensure we can reach the server with the following command
# upsc ups1@192.168.20.1:3493 ups.status
ups.status: OL
which in my example reports the UPS is ONLINE and on mains power. You can enter uspc ups1@192.168.20.1:3493 to see a much more comprehensive status report.
Start the NUT service
Start the NUT client with the command service nut-client start
and verify it started correctly with service nut-client status. For example,
# service nut-client status

● nut-monitor.service - Network UPS Tools - power device monitor and shutdown controller
   Loaded: loaded (/lib/systemd/system/nut-monitor.service; enabled)
   Active: active (running) since Sun 2016-07-01 16:05:59 EDT; 4s ago
  Process: 4267 ExecStart=/sbin/upsmon (code=exited, status=0/SUCCESS)
 Main PID: 4270 (upsmon)
   CGroup: /system.slice/nut-monitor.service
           ├─4269 /lib/nut/upsmon
           └─4270 /lib/nut/upsmon
Verify the NUT client is working and reporting correctly
Its worth spending some time to verify this critical system is working correctly by testing thoroughly before relying on it. I trigger events via pfSense’s NUT server and verify messages and emails are received correctly. I can’t stress enough the value in testing the full UPS shut down chain to completion before relying on it in a production setting.
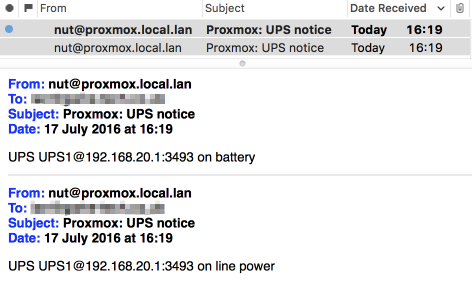
Here are the syslog entries associated with going on battery power. Line 1 is the upsmon notification, the following lines the mail being dispatched.
Jul 17 16:19:04 proxmox upsmon[1189]: UPS UPS1@192.168.20.1:3493 on battery
Jul 17 16:19:04 proxmox postfix/pickup[1348]: 9DB994207A7: uid=109 from=<nut>
Jul 17 16:19:04 proxmox postfix/cleanup[1532]: 9DB994207A7: message-id=<20160717201904.9DB994207A7@proxmox.local.lan>
Jul 17 16:19:04 proxmox postfix/qmgr[1349]: 9DB994207A7: from=<nut@proxmox.local.lan>, size=345, nrcpt=1 (queue active)
Jul 17 16:19:05 proxmox postfix/smtp[1534]: 9DB994207A7: to=<contact@nguvu.org>, relay=smtp.gmail.com[74.125.29.109]:587, delay=1.1, delays=0.01/0.01/0.95/0.17, dsn=2.0.0, status=sent (250 2.0.0 Ok: queued as A586CF29E1)
Jul 17 16:19:05 proxmox postfix/qmgr[1349]: 9DB994207A7: removed
and going back on main line power
Jul 17 16:19:34 proxmox upsmon[1189]: UPS UPS1@192.168.20.1:3493 on line power
Jul 17 16:19:34 proxmox postfix/pickup[1348]: 9C9C34207A7: uid=109 from=<nut>
Jul 17 16:19:34 proxmox postfix/cleanup[1532]: 9C9C34207A7: message-id=<20160717201934.9C9C34207A7@proxmox.local.lan>
Jul 17 16:19:34 proxmox postfix/qmgr[1349]: 9C9C34207A7: from=<nut@proxmox.local.lan>, size=348, nrcpt=1 (queue active)
Jul 17 16:19:35 proxmox postfix/smtp[1534]: 9C9C34207A7: to=<contact@nguvu.org>, relay=smtp.gmail.com[74.125.29.109]:587, delay=0.45, delays=0/0/0.34/0.1, dsn=2.0.0, status=sent (250 2.0.0 Ok: queued as 01913CCDC1)
Jul 17 16:19:35 proxmox postfix/qmgr[1349]: 9C9C34207A7: removed
Also verify emails came to your account to notify us of the events.
Here’s the two mails received into my email system.
Log in to the Proxmox GUI!
Finally… lets log into the web interface to complete our configuration.
Open a browser and head to the GUI address as entered during your install and also as displayed on the console page…
…and enter your username and admin password
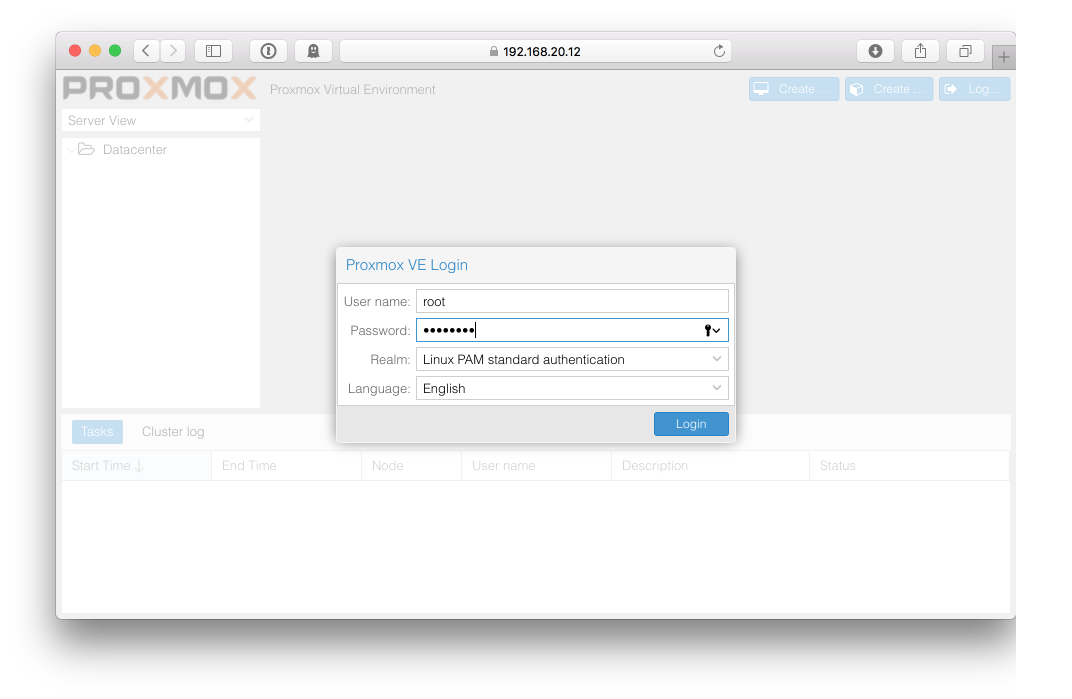
and assuming you don’t have a subscription, acknowledge the lack of subscription option.
Safari
I used Safari at first but had several issues including a opening consoles to VM’s. I found it was necessary to Always Allow the default Proxmox certificate to enable Safari to enable working with Proxmox viable.

Set access to Always Trust
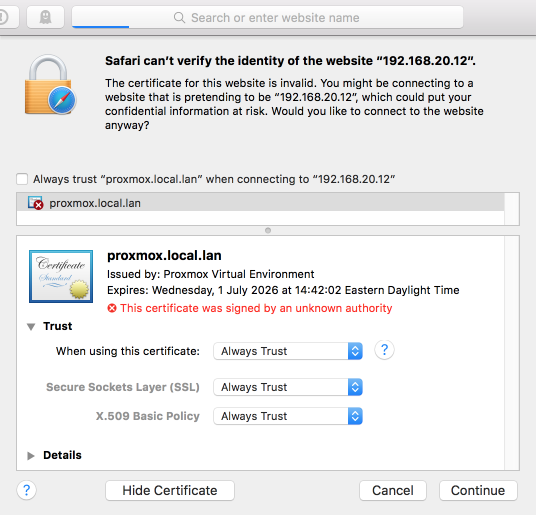
Firefox and Chrome seem to integrate with Proxmox much better so if you have either of them available on your system you might want to consider using them instead.
Configure additional network interface
I now recommend editing the network configuration via the Proxmox web interface rather than directly in the /etc/network/interfaces file.
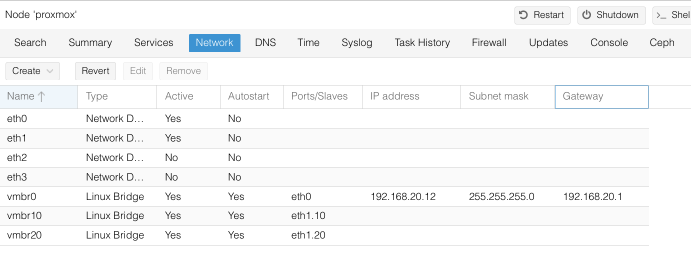
During installation, Proxmox configures the first interface found during install as its default interface, vmbr0. I use this interface for connecting to the Proxmox console, GUI and transferring backups of virtual machines to my NAS. I’ve added a second interface specifically for the virtual machines to use. This second interface is provided by a 10gig Intel x520 which is configured to supports two VLANs, VLAN 10 which is my management (MGMT) interface and VLAN 20 which is my general LAN. Depending on the intended use of the virtual machine I am creating, I’ll attach it to either my MGMT or LAN interface.
Navidate to ServerView > DataCenter > Proxmox and select Network.
Create vmbr10 / VLAN 10 - VL10_MGMT
Click Create and select Linux Bridge
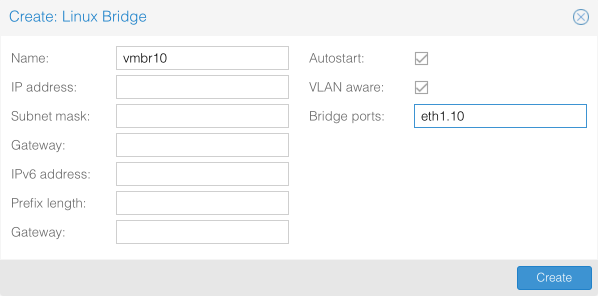
- Name = vmbr10
- IP address = empty
- Subnet mask = empty
- Gateway = empty
- IPv6 address = empty
- Prefix length = empty
- Gateway = empty
- Autostart = [x]
- Vlan aware = [x]
- Bridge ports = eth1.10
Create vmbr20 / VLAN 20 - VL20_VPN
Click Create and select Linux Bridge
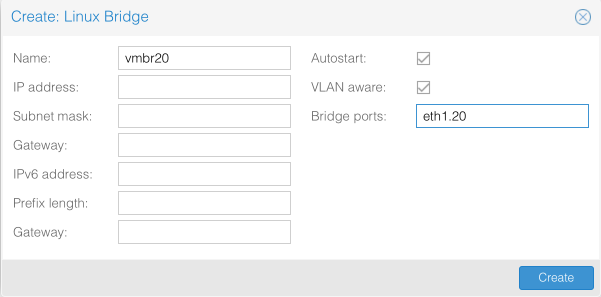
- Name = vmbr20
- IP address = empty
- Subnet mask = empty
- Gateway = empty
- IPv6 address = empty
- Prefix length = empty
- Gateway = empty
- Autostart = [x]
- Vlan aware = [x]
- Bridge ports = eth1.20
and here’s what the finished Network view should look like when you are finished.
And for completeness, here’s how this configuration translates into the /etc/network/interfaces configuration file.
$ cat /etc/network/interfaces
# network interface settings; autogenerated
# Please do NOT modify this file directly, unless you know what
# you're doing.
#
# If you want to manage part of the network configuration manually,
# please utilize the 'source' or 'source-directory' directives to do
# so.
# PVE will preserve these directives, but will NOT its network
# configuration from sourced files, so do not attempt to move any of
# the PVE managed interfaces into external files!

auto lo
iface lo inet loopback

iface eth0 inet manual

iface eth1 inet manual

iface eth2 inet manual

iface eth3 inet manual

auto vmbr0
iface vmbr0 inet static
  address  192.168.20.12
  netmask  255.255.255.0
  gateway  192.168.20.1
  bridge_ports eth0
  bridge_stp off
  bridge_fd 0

auto vmbr20
iface vmbr20 inet manual
  bridge_ports eth1.20
  bridge_stp off
  bridge_fd 0
  bridge_vlan_aware yes

auto vmbr10
iface vmbr10 inet manual
  bridge_ports eth1.10
  bridge_stp off
  bridge_fd 0
  bridge_vlan_aware yes
For a full description of this file and it contents, refer to the Debian network interface man pages
Save the file and reboot.
Configure SMART disk monitoring
For long term reliability its important we are notified of any potential disk failures by setting up frequent testing of the systems hard disks via the drives SMART reporting.
Install SMART tools
Install prerequisites
apt-get install smartmontools
Identify disks needing monitoring
You probably have a good idea of how many physical disks you installed in your system, you can identfy the device names by analysing the output of fdisk.
fdisk -l
We only care about the physical devices which will named something like /dev/sda, /dev/sdb etc.
Verify SMART data
Its worth checking that SMART data is available and sensible for each device. Replace device sde in the line below with your device names.
smartctl -A /dev/sde
This will display the output of the drives onboard telemetry.
smartctl -A /dev/sde

smartctl 6.6 2016-05-31 r4324 [x86_64-linux-4.4.21-1-pve] (local build)
Copyright (C) 2002-16, Bruce Allen, Christian Franke, www.smartmontools.org

=== START OF READ SMART DATA SECTION ===
SMART Attributes Data Structure revision number: 1
Vendor Specific SMART Attributes with Thresholds:
ID# ATTRIBUTE_NAME          FLAG     VALUE WORST THRESH TYPE      UPDATED  WHEN_FAILED RAW_VALUE
  5 Reallocated_Sector_Ct   0x0033   100   100   010    Pre-fail  Always       -       0
  9 Power_On_Hours          0x0032   098   098   000    Old_age   Always       -       5567
 12 Power_Cycle_Count       0x0032   099   099   000    Old_age   Always       -       41
177 Wear_Leveling_Count     0x0013   098   098   000    Pre-fail  Always       -       76
179 Used_Rsvd_Blk_Cnt_Tot   0x0013   100   100   010    Pre-fail  Always       -       0
181 Program_Fail_Cnt_Total  0x0032   100   100   010    Old_age   Always       -       0
182 Erase_Fail_Count_Total  0x0032   100   100   010    Old_age   Always       -       0
183 Runtime_Bad_Block       0x0013   100   100   010    Pre-fail  Always       -       0
187 Uncorrectable_Error_Cnt 0x0032   100   100   000    Old_age   Always       -       0
190 Airflow_Temperature_Cel 0x0032   073   047   000    Old_age   Always       -       27
195 ECC_Error_Rate          0x001a   200   200   000    Old_age   Always       -       0
199 CRC_Error_Count         0x003e   100   100   000    Old_age   Always       -       0
235 POR_Recovery_Count      0x0012   099   099   000    Old_age   Always       -       33
241 Total_LBAs_Written      0x0032   099   099   000    Old_age   Always       -       20463371908
Configure device monitoring
We’ll now configure smartmontools to perform regular updates. Edit the smartmontools config file by entering
nano /etc/default/smartmontools
Change the devices to monitor to your system devices. I commented out the default line and replaced it with my own which monitors a NVMe drive and four SSD’s (sde > sdh)
#enable_smart="/dev/hda /dev/hdb"
enable_smart="/dev/nvme0 /dev/sde /dev/sdf /dev/sdg /dev/sgh"
Set smart daemon to start on boot up by uncommenting the following line
start_smartd=yes
and set the monitoring frequency (set in seconds), I use hourly
smartd_opts="--interval=3600”
Save & Exit the editor.
Schedule device testing and notifications
Edit the smartd deamon configuration file by entering
nano /etc/smartd.conf
First lets disable automatic scanning for devices. We’ll setup our own specific devices later.
#DEVICESCAN -d removable -n standby -m root -M exec /usr/share/smartmontools/smartd-runner
Now we can schedule the short and long tests per device. You should consider customising the timing and frequency of these tests to suit your specific environment. See smartd.conf guide here for further details on how to schedule testing as per your requirements. I run short tests every week at 1am, and long testes every two weeks at 2am currently.
#Long tests every month on the 1st & 15th at 2am
/dev/sde   -a -d sat -s L/../01|15/./02 -m root
/dev/sdf   -a -d sat -s L/../01|15/./02 -m root
/dev/sdg   -a -d sat -s L/../01|15/./02 -m root
/dev/sdh   -a -d sat -s L/../01|15/./02 -m root
/dev/nvme0 -a -s L/../01|15/./02 -m root

#Short tests every month on the 1st 8th 15th 22nd at 1am
/dev/sde   -a -d sat -s S/../01|08|15|22/./01 -m root
/dev/sdf   -a -d sat -s S/../01|08|15|22/./01 -m root
/dev/sdg   -a -d sat -s S/../01|08|15|22/./01 -m root
/dev/sdh   -a -d sat -s S/../01|08|15|22/./01 -m root
/dev/nvme0 -a -s S/../01|08|15|22/./01 -m root

# send mail when starting tests
/dev/sde -m root -M test
Save & Exit the editor.
Start the smart tools daemon
Start the daemon by entering
/etc/init.d/smartmontools start
and verify your devices have been detected correctly by reviewing the syslog file, e.g
tail -n50 /var/log/syslog
Enable PCI passthrough
PCI passthrough allows you to use a physical PCI device such as a HBA or network card inside a VM (KVM virtualization only). Note that if you passthrough a device the device will not be available to the host anymore.
The following works on Intel CPU’s.
nano /etc/default/grub
change ‘GRUB_CMDLINE_LINUX_DEFAULT=”quiet”’ to
GRUB_CMDLINE_LINUX_DEFAULT="quiet intel_iommu=on"
exit and enter ‘update-grub’ to update the grub loader and reboot.
References
- Debian network interface reference
- Proxmox non-subscription repositories
- Network UPS Tools (NUT) manual
- Smartmontools
- S.M.A.R.T.
- smartd.conf - Linux man page
Changelog
1 December 2016
Added Intel PCI Passthrough section
16 November 2016
Added SMART disk monitoring section
Added changelog