Blue Iris based Video Security System
Last revised 13 September 2018.
Contents
Introduction
Requirements
Software, Hardware and Network design
Camera Configuration
Blue Iris Server Configuration
pfSense Configuration
External access
Introduction
I’ve been asked numerous times for details of my security camera system that I hinted at in my pfSense baseline configuration guide. It’s taken some time to create this guide primarily because I tried to create a detailed step-by-step guide but couldn’t find a way to cover all the potential systems and use cases. I decided to focus on producing an intermediate guide that will cover higher level design and configuration requirements to steer readers. Please share your feedback to help me iterate and make this guide more useful.
This guide will build upon my pfSense baseline configuration guide and cover configuration of infrastructure and performance related components that to a greater extent will influence the reliability and performance of your system. Configuration and optimisation of the video cameras themselves, including motion detection, is outside the scope of this guide.
Requirements
The requirements for the system I intended to create included
- Secure
- Reliable
- Have negligible impact on other network services
- Easy to use, including for non-technical users
- Ability to quickly view real-time perimeter of home regardless of location
- Cameras should be accessible everywhere, i.e internally and externally, including by 3G/4G cellular smartphones.
- High quality video during at day and night
- 4 week video retention
- Push notifications and alerts
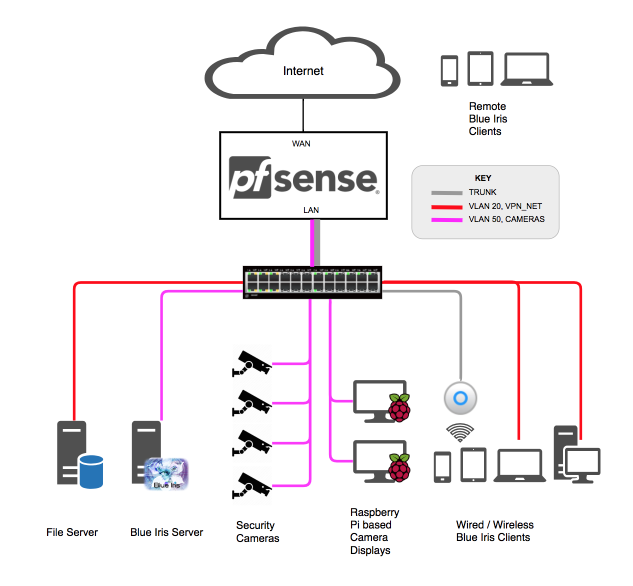
Software, Hardware and Network design
I selected Blue Iris security software for its combination of affordability, support and feature set. The primary downside was the need for a Windows licence but this in itself wasn’t prohibitive. There are also native mobile clients for Android and iOS as well as a great web based interface for remote viewing. I use a Windsows Server 2016 virtual machine under ESXi with 4 vCPU and 4GB RAM allocated on a Xeon-d 1541 processor based system.
Your own camera selection will be highly dependant on your physical needs, for example focal range and lighting will largely influence your decision. I deployed six Dahua IPC-HDW5231R-Z 2MP Starlight cameras around the perimeter of my home cabled with CAT-5 cable utilising power over ethernet (PoE) from my Juniper switch. These cameras have excellent night time performance thanks to the Sony ‘Starvis’ sensor as well as a motorized lens which simplified purchasing and fine tuning during installation. My cameras are configured to provide video on primary (1920x1080) and sub stream (640x480) broadcasts and update at 15fps which is sufficient to track movement whilst reducing network load and storage requirements. I use the camera’s image manipulation hardware to apply the timestamp to the video feed before it arrives at Blue Iris, this prevents Blue Iris having to do a lot of decoding, re-encoding just to add a timestamp to the video.
Remote access is supported from web browsers or mobile Blue Iris clients via a Traefik reverse proxy which enforces HTTPS access from clients preventing eavesdropping. This reverse proxy prevents the need to establish secure OpenVPN connections prior to connecting and reduces complexity for my less technical users to something manageable. Remote access is monitored by Fail2ban and other means to prevent unauthorized intrusion or brute-forcing of passwords.
I segmented the cameras and Blue Iris video system into its own VLAN to reduce the traffic pfSense needs to process as well as help prevent unauthorized access. Segmenting the network like this also allowed me to easily prevent the cameras from accessing the internet preventing any possibility of leaking information or providing access for a Command & Control Botnet. The only connectivity the cameras are permitted is to get their time from my pfSense based NTP server. Cameras are blocked from initiating any form of communication other than NTP requests from my pfSense NTP server.
To reduce persistent load on my spinning disk storage array, I added two HGST 8TB disks in a mirrored configuration providing some redundancy for when theres a hardware failure. These disks are hosted on an OmniOS system configured with Napp-it. This level of redundancy isn’t mandatory but if you have the means to implement it, it could be beneficial someday. The two disks record the cameras video streams 24x7 and provide around 4 weeks worth of recordings. The maximum duration you can retain will be dictated by available storage capacity and affected by image resolution, image quality, format and encoding. I found storage requirements can be tricky to predict accurately ahead of time and needed to upgrade my disks to achieve my desired duration.
To solve the need the for several permanent camera displays around the home, I use several Raspberry Pi’s attached to 20” monitors. As their native resolution is 1280x960 and the Raspberry Pi’s processor or network card isn’t exactly optimum for processing large pixel counts, I make use of a substream broadcast from each camera to provide several 640 x 480 streams @ 15fps. This reduced resolution provides enough detail to identify visitors to our property as well as enable six cameras to fit on screen at once. Initially I tried wireless connections to the Raspberry Pi’s but not surprisingly it wasn’t robust enough for reliable operation. Since moving to wired Cat5 connections I’ve experienced uptime in the region of 200 days + so far.
Camera Configuration
Log into each cameras web portal in turn and configure their settings as follows.
Video Settings
This enables a primary stream at 1920x1080 @ 15fps and a substream at 640x480 @ 15fps. I make use of the cameras ability to overlay time to prevent Blue Iris having to perform this duty later on in the video chain.
Main Stream
Encode Mode: H.264H
Smart codec: Off
Resolution: 1920 x 1080 (1080p)
Frame rate (FPS): 15
Bit Rate Type: CBR (Constant bit rate)
Bit Rate: 6144Kb/s
I Frame internal: 30fps
Sub Stream
Enable = [√]
Encode Mode: H.264H
Resolution: 640 x 480 (VGA)
Frame Rate (FPS): 15
Bit Rate Type: CBR (Constant bit rate)
Bit Rate: 1280Kb/s
I Frame Interval: 30fps
Overlay
Time Title: Enable
Channel Title: Enable if required.
Audio Settings
Audio enabled on primary stream but disabled on the substream.
Main Stream
Enable = [√]
Encode Mode = G.711A
Sampling Frequency: 16k
Sub Stream
Enable = [ ]
Network Settings
I disable everything except ONVIF support.
Mode: DHCP
IP Version: IPv4
PPPoE: Disable
DDNS: Disable
SMTP Server: None
UPnP: Disable
SNMP: Disable (enable if you use SNMP monitoring)
Bonjour: Disable
Multicast: Disable
802.1x: Disable
Access Platform, P2P : Disable
Access Platform, Onvif: Enable
Storage
I don’t currently make use of onboard SD card recording.
Local: None
FTP: Disable
NAS: Disable
System
Name: As appropriate
Date & Time
NTP: [√]
Server: 192.168.50.1
Port: 123
Interval: 5 minutes
Security
SSH: Disable
Multicast/Broadcast: Disable
Password Reset: Disable
CGI Service: Disable
Onvif Service: Enable
Genetec Service: Disable
Audio & Video Translation: Disable
Mobile Push: Disable
Auto Maintain
Auto Reboot: Disable
Auto delete old files: Disable
Blue Iris Server Configuration
Configure virtual machine
Physical hardware may be preferable but I’ve had good results with a adequately provisioned and well configured VM running under ESXi 6.7 with the following settings. This supports my six 1080p cameras with direct-to-disk recording running under Windows Server 2016 at 60% RAM use and 30% CPU when interacting with Blue Iris. When running as a background service utilisation is sub 10%. This graph illustrates memory consumption and processor load when Blue iris is active as well as running minimized.

My Blue Iris VM records to a CIFS file share mounted in Windows providing 8TB of storage on mirrored ZFS volume. I didn’t find any noticeable performance difference between Western Digital RED 5400rpm drives and HGST 7200rpm drives I upgraded to later to extend recording time.
Create and configure a new virtual machine as follows
- Cores: 4 vCPU
- RAM: 4GB (locked)
- Hard Disk: 32GB
- Network: VL50_CAMERAS
- Video Card: 4MB
- Latency Sensitivity: High
Install operating system
Feel free to use any recent version of Windows, my preference is for Server 2016 as it reduces bloat, run ‘leanly’ and doesn’t randomly upgrade/restart due to upgrades.
Configure Windows
I’m not going into a full on how-to guide as steps needed would depend on exactly which OS you used. These are the core settings I adjust on my new installs.
- Disable power saving features
- Enable remote desktop
- Enable RDP (3389) and 8181 (Blue Iris web server) access through firewall
- Disable automatic updates (I apply these manually)
- Disable Windows Defender (machine is dedicated Blue Iris server)
Configure Blue Iris
If you haven’t already, download Blue Iris from here. Be aware that direct-to-disk recording only works in the licenced version and this may affect performance if evaluating a trial.
Click on the cog icon in the top-left of the screen to enter settings, apply the following.
General
Support and Software Updates
- Prompt at startup = [√]
- Recheck every day at: 01:00 AM = [√]
- Automatic download and install = [ ]
Clips and archiving
Database Path: c:/BlueIris/db (Keep the database on the local disk to optimise performance)
Compact/repair DB each day at: 02:00 AM
Folders Set as per your local system
New = \fs01\NVRdata\BlueIris\New
Do not monitor free space = [ ]
Limit size = 6144GB set as per your storage availability
Limit Clip Age = [ ]
Previous data: Delete
Stored = \fs01\NVRdata\BlueIris\Stored
Do not monitor free space = [ ]
Limit size = 256GB
Limit Clip Age = [ ]
Previous data: Delete
Alerts = \fs01\NVRdata\BlueIris\Alerts
Do not monitor free space = [ ]
Limit size = 10GB
Limit Clip Age = [ ]
Previous data: Delete
Users
Create local users as per your needs
Web server
I have access to my Blue Iris camera system by two mechanisms, OpenVPN and a reverse proxy. Arguably OpenVPN is the more secure method, but I’m comfortable with the security I have around my reverse proxy setup to expose it. It certainly makes things easier for non-technical family members to check in on any alerts remotely.
Enable = [√]
Port: 8181
Virtual = /
Use new UI3 preview = [√]
Local/LAN access
LAN: 192.168.50.10:8181
Interfaces: 192.168.50.10
Remote/WAN access
Usually auto populated
Stunnel installed = [ ]
Advanced
All connections: Use secure session keys & login page = [√]
Autoban IP after unsuccessful attempts = [3]
Release banned IP after minutes = [10]
Use x-forwarded headers = [√]
Send Strict-Transport-Security header = [√]
Log ALL connections = [√]
Startup
Window: Quiet (minimized & no-splash)
Run as windows service = [√]
Require run as administrator = [ ]
Blue Iris window always om top = [ ]
Force display monitor to remain active at all times = [√]
Prevent power management putting PC to sleep = [√]
Add Cameras to Blue Iris
Configure Blue Iris for each physical camera you have installed.
Click on Add Camera icon
Type: Network
[√] Enable audio
[√] Enable motion detection
[√] Direct to disc recording (no re-encoding)
Video
Name: as appropriate
Short name: as appropriate
Address: http://192.168.50.x I use 200-205
username: as appropriate
password: as appropriate
Click Find/Inspect to pull configuration data from your camera, here’s my event log for reference.
Opening 192.168.50.200 port 80...
HTTP Get / request...
OK
ONVIF GetSystemDateAndTime
2018-09-13T16:18:56.000Z
Requesting device information...
Manufacturer: General
Model: IP Camera
FirmwareVersion: 2.640.0000002.0.R, Build Date 2018-05-23
GetCapabilities...
Querying services
Has Imaging services: /onvif/imaging_service
Has media services: /onvif/media_service
Has RTP_RTSP_TCP, requesting profiles
first profile is MediaProfile000
first source is 000
requesting URI for profile MediaProfile000
RTSP URI: /cam/realmonitor?channel=1&subtype=0&unicast=true&proto=Onvif
Has Event services: /onvif/event_service
Has WSPullPointSupport
RelayOutputs: 0
InputConnectors: 0
Has Device IO services: /onvif/deviceIO_service
AudioOutputs: 0
Has PTZ service: /onvif/ptz_service
Done
This populates the following fields, in my case
Make: Generic
Model: Main RTSP H.264/H.265/MJPG/MPEG4
Path: /cam/realmonitor?channel=1&subtype=0&unicast=true&proto=Onvif
Port: 554
Discovery/ONVIF: 80
Receive Buffer: 6MB
Use RTP/UDP ports: [ ]
Send RSTP keep alives = [√]
Use RTSP/tream timecode = [√]
Skip Initial HTTP DNS reachability tests = [ ]
Decoder compatibility mode = [ ]
Get events with PullPointSubscription = [ ]
Click OK and configure the rest of the tabs as follows
Hardware accelerated decode: Intel + VPP
Limit decoding unless required = [√]
Enable overlays = [ ] we use camera’s overlays instead to reduce Blue Iris’ processing load
Max rate: 15fps
Audio
Enable Audio
IP camera stream = [√]
Trigger
Advise to setup motion sensing but this is beyond the scope of this guide.
Record
Video: Continuous
Folder: New
[√] Create alert list image when triggered
Combine or cut video each 8 hrs / 4GB
Pre trigger video buffer = 5s
Video file format
Format: BVR, with FLAC audio compression
Video compression: Direct to disc H264
Webcast
[√] Enable: Adjust encoder settings
[ ] Add camera text/overlays
pfSense Configuration
Now we can move onto creating the VLAN and Interface on pfSense. Your new VLAN will need adding to your switches trunks and access ports depending on how and where you have your Blue Iris host.
The firewall configuration will enable
- Cameras can only access pfSense NTP server, everything else is blocked outbound
- All devices can access pfSense NTP server
- Non-camera devices (Blue Iris server, Raspberry Pi’s) can perform ICMP pings
- Non-camera devices (Blue Iris server, Raspberry Pi’s) can lookup DNS entries and access the internet
- Everything else is blocked
Create VLAN
Navigate to Interfaces > Assign > VLAN
Click ‘+’
Parent Interface: Your preferred parent interface, in my case, IX0
VLAN Tag: 50
VLAN Priority: 0
Description: VL50_CAMERAS
Save
Create VL50_CAMERAS Interface
Navigate to Interfaces > Assign
Select ‘VLAN50 on IX0’ from the available network ports
Click ‘Add’
Set IP address for VL50_CAMERAS interface
I like to match the third octet of my IP address to the VLAN ID as this makes remembering which is which easier, so VLAN id 50 = 192.168.50.0
VL50_CAMERAS Interface
Click on the label next to ‘VL50_CAMERAS’, its likely to be labeled ‘OPT’
Configure this interface as follows:-
General Configuration
- Enabled = [√]
- Description = VL50_CAMERAS
- IPv4 = Static IPv4
- IPv6 = None
- Mac address = None
- MTU = None
- MSS = None
- Speed & duplex = standard
Static IPv4 configuration
- IPv4 Address = 192.168.50.1/24
- IPv4 Upstream gateway = None
Private Networks
- Block private networks = [ ]
- Block bogon networks = [ ]
Click Save & Apply changes.
Setup DHCP per interface
To increase security we will only grant IP addresses to devices we explicitly configure in the reserved entries, although we’ll still need to define a range it won’t be used.
Navigate to Services > DHCP Server
Select VL50_CAMERAS tab and set the DHCP server as follows:-
- Enabled = [√]
- Deny unknown clients = [√]
- Range
- From : 192.168.50.100
- To : 192.168.50.199 - NTP Server 1 = 192.168.50.1
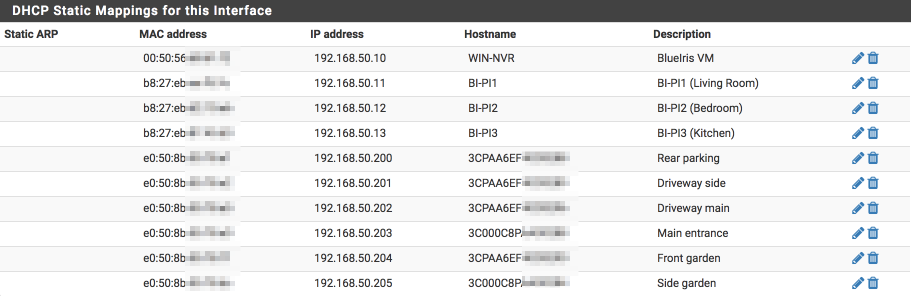
Add DHCP Static Mappings for this Interface
Add a reservation for each device that will be on this subnet, I’ve configured static address for my Blue Iris server, my Raspberry Pi display devices and my cameras.
Save & Apply
NTP Server
Ensure NTP is service all the devices on the VL50_CAMERAS subnet.
Navigate to Services > NTP
- Interface = add VL50_CAMERAS to your selection
Click Save
Set DNS Resolver
DNS will be served by our DNS Resolver
- Network Interface = add VL50_CAMERAS to your selection
Click Save
Set up outgoing NAT for VL50_CAMERAS
NAT is needed to convert your camera subnet’s private local IP addresses to the global registered address space.
Navigate to Firewall > NAT > Outbound
Click ‘↴+’
- Disabled = [ ]
- Do not NAT = [ ]
- Interface = WAN
- Address Family: IPv4
- Protocol = any
- Source
- Type = Network
- Source Network = 192.168.50.0 / 24
- Source port: Blank - Destination
- Type = Any
- Address = Blank
- Destination Port: Blank - Not : [ ]
- Translation
- Address = Interface Address
- Port = [ ] - Miscellaneous
- Description = VL50_CAMERAS to WAN - Click Save
Update Aliases for firewall rules
We are going to create a few aliases which we will use in the creation of the firewall rules later. These simplify the job of making changes in future especially as we add more interfaces and functionality to our network.
Update local subnets
Navigate to Firewall > Aliases > IP and edit LOCAL_SUBNETS
Add
- 192.168.50.0 / 24 “VL50_CAMERAS”
- Click Save
Update ports allowed to communicate between internal subnets
We will create a list of ports to define what traffic is permitted to traverse between our local subnets. You will need to amend this alias as per your own networks requirements but this should get you started. Reviewing the Firewall logs will illustrate which ports are being blocked.
Navigate to Firewall > Aliases > Ports and edit the Allowed_OUT_ports_LAN alias
Add the following ports
- 554 : Media / video / RTSP port
- 8181 : BlueIris web server
- 8999 : Discovery / OVFIF port
- 37777 : TCP Port
- 37778 : UDP Port
- Click Save
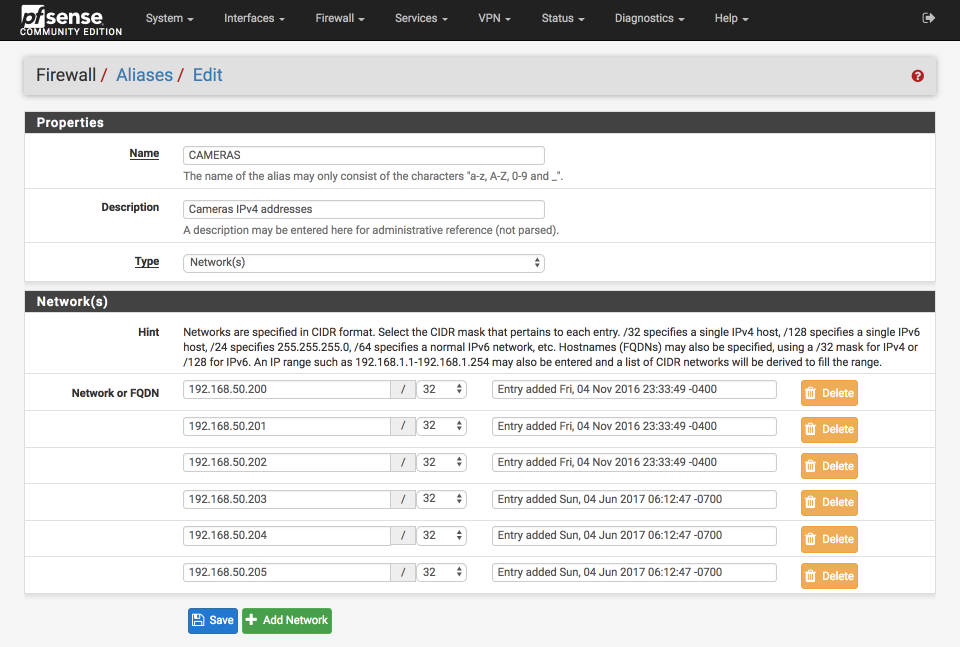
Create CAMERAS alias
Navigate to Firewall > Aliases
Click +Add
- Name = CAMERAS
- Description = Cameras IPv4 addresses
- Type = Network(s)
Add an entry for each of your cameras, for example. These addresses need to corrospond to the DHCP reservation you make for them also.
- Network or FQDN:
- 192.168.50.200 / 32
- 192.168.50.201 / 32
- 192.168.50.202 / 32
- 192.168.50.203 / 32
- 192.168.50.204 / 32
- 192.168.50.205 / 32
- Click Save
Your aliases should look like this when complete
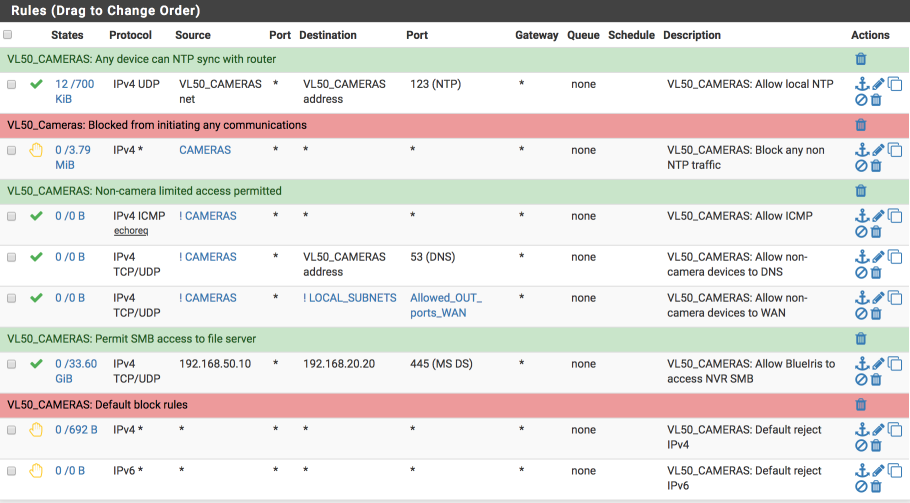
Configure Firewall rules
Firewall rules are applied in a top to bottom order and we make use of that aspect here so make sure your order matches mine when complete.
Navigate to Firewall > Rules > VL50_CAMERAS and create the following rules.
Permite all devices on VL50_CAMERAS to access pfSense NTP server
- Click ‘↴+’
- Action = Pass
- Disabled = [ ]
- Interface = VL50_CAMERAS
- Address Family = IPv4
- Protocol = UDP
- Source = VL50_CAMERAS net
- Destination = VL50_CAMERAS address
- Destination Port Range:
- From: 123 (NTP)
- To: 123 (NTP) - Log = [ ]
- Description = VL50_CAMERAS: Allow local NTP
- Click [Save]
Block CAMERAS accessing anything else
- Click ‘↴+’
- Action = Reject
- Disabled = [ ]
- Interface = VL50_CAMERAS
- Address Family = IPv4
- Protocol = Any
- Source = Single host or alias
- CAMERAS - Destination = any
- Log = [ ]
- Description = VL50_CAMERAS: Block any non NTP traffic
- Click [Save]
Allow non Camera devices to perform ICMP Pings for network diagnostics
- Click ‘↴+’ icon
- Action: Pass
- Disabled = [ ]
- Interface: VL50_CAMERAS
- Address Family: IPv4
- Protocol: ICMP
- ICMP type: echo request
- Source =
- [√] Invert
- Single host or alias
- CAMERAS - Destination: Any
- Log: [ ]
- Description: VL50_CAMERAS: Allow ICMP
Allow non camera devices to perform DNS lookups via pfSense DNS Resolver
- Click ‘↴+’
- Action = Pass
- Disabled = [ ]
- Interface = VL50_CAMERAS
- Address Family = IPv4
- Protocol = TCP/UDP
- Source =
- Invert Match: [√]
- Single host or alias
- CAMERAS - Destination = VL50_CAMERAS address
- Destination Port Range:
- From: DNS (53)
- To: DNS (53) - Log = [ ]
- Description = VL50_CAMERAS: Allow non-camera devices to DNS
- Click [Save]
Allow non-camera devices to access the Internet
This is used for Windows activation, updates, Raspberry Pi updates etc.
- Click ‘↴+’
- Action = Pass
- Disabled = [ ]
- Interface = VL50_CAMERAS
- Address Family = IPv4
- Protocol = TCP/UDP
- Source =
- Invert Match: [√]
- Single host or alias
- CAMERAS - Destination =
- Invert Match: [√]
- Single host or alias
- LOCAL_SUBNETS - Destination Port Range:
- From: Other
- Custom: Allowed_OUT_ports_WAN
- To: Other
- Custom: Allowed_OUT_ports_WAN - Log = [ ]
- Description = VL50_CAMERAS: Allow non-camera devices to WAN
- Click [Save]
Allow BlueIris server to access file server storage via CIFS only
- Click ‘↴+’
- Action = Pass
- Disabled = [ ]
- Interface = VL50_CAMERAS
- Address Family = IPv4
- Protocol = TCP/UDP
- Source =
- Invert Match: [ ]
- Single host or alias
- 192.168.50.10 (this is my Blue Iris server) - Destination = V
- Invert Match: [ ]
- Single host or alias
- 192.168.20.20 (this is my file server) - Destination Port Range:
- From: 445 (MS DS)
- To: 445 (MS DS) - Log = [ ]
- Description = VL50_CAMERAS: Allow Blue Iris server to NVR SMB
- Click [Save]
Add IPv4 default block
- Click ‘↴+’
- Action = Block
- Disabled = [ ]
- Interface = VL50_CAMERAS
- Address Family = IPv4
- Protocol = Any
- Source = Any
- Destination = Any
- Log = [ ]
- Description = VL50_CAMERAS: default block IPv4
- Click [Save]
Add IPv6 default block
- Click ‘↴+’
- Action = Block
- Disabled = [ ]
- Interface = VL50_CAMERAS
- Address Family = IPv6
- Protocol = Any
- Source = Any
- Destination = Any
- Log = [ ]
- Description = VL50_CAMERAS: default block IPv6
- Click [Save]
When you are done, your interface should look like this.
External access
In order to be able to access our Blue Iris server from outside our network you will need to register a domian name and point it at your WAN address. If you are on a residential connection its likely you will have a dynamic address from your ISP which you will need to sync with your domain name, you can do this with pfSense’s Dynamic DNS service. If you followed my remote access guide you may already have a DNS entry pointed at your WAN interface you could use.
Register domain name
If you don’t have a domain name registered, I recommend namecheap.com. Find a domain name you like and register it.
Dynamically update domain name
In pfSense, navigate to Services > Dynamic DNS and configure a dynamic update entry for the domain you just registered at namecheap. pfSense will keep this update as and when your WAN interface changes ensuring you can always access your Blue Iris install remotely via this domain name.
OpenVPN access
If you wish to access your network via OpenVPN, take a look at my inbound OpenVPN guide here.
Traefik reverse proxy access
I’ve previously used NGINX to handle my reverse proxy needs but recently I’ve been transitioning to Traefik which also handles Lets Encrypt SSL certificates automatically and is has tighter integration with docker that I’ve been experimenting with.
You’ll need to create a pfSense port forward to your reverse proxy to enable this method. I’ve included the pertinent sections from my traefik.toml file below which is used to generate and manage the HTTPS certificate and handle the redirect through my WAN interface.
defaultEntryPoints = ["https","http"]

[entryPoints]
  [entryPoints.http]
    address = ":80"
  [entryPoints.http.redirect]
    entryPoint = "https"
  [entryPoints.https]
    address = ":443"
    [entryPoints.https.tls]
      [entryPoints.https.proxyProtocol]
      trustedIPs = ["192.168.0.0/16", "127.0.0.1"]

[acme]
email = "letsencrypt@mydomainaddress.com"
storage = "acme.json"
entryPoint = "https"
OnHostRule = true
[acme.httpChallenge]
entryPoint = "http"

[file]

[backends]
  [backends.blueiris]
    [backends.blueiris.servers.server1]
      url = "http://192.168.50.10:8181"

[frontends]
  [frontends.blueiris]
     backend = "blueiris"
     entrypoints = ["https"]
     passHostHeader = true
     [frontends.blueiris.routes.blueiris_1]
       rule = "Host:blueiris.mydomainaddress.com"
Mobile application
Download Blue Iris from the Apple or Android stores, Configuration is straightforward. This will provide access to real time camera streams as well as previous clips & alerts.